If your piece(s) will be regularly handled, bumped or tossed across the room by a toddler, consider adding a protective coat of water-based polyurethane to the piece. Then I measured and marked the spots for the screws. I used the black wood grain enhancer on two and the white on two. Be sure to cut another 45 angle PERPENDICULAR to the first 45 angle. but we have a very special set of baby pictures of the kids that have been in their room forever! And the thicker the nail (gauge), the greater chance of splitting the plywood.
I stacked a handful of strips together and sanded several at once using my palm sander and 220 grit sandpaper.
Liberally apply the pre-stain liquid to the 12 frame pieces with your shop towel in the direction of the wood grain. Images selected are all made custom and printed to your exact specifications.
Your email address will not be published. - It creates a pretty clean cut. I have highlighted that below.
 I added some succulent printables just for fun. I picked two different widths and layered them to give it extra dimension. If the desired tone and depth of color has been achieved with only 1 coat, then move on to Step 5.
 Improved version.
Please see our disclosure statement. Cheaper plywoods tend to have lots of imperfections and knots on the surface. Simply Aligned Home is not responsible for any injury or damage.
I quickly did the math and determined that it would cost me a little less than $1,000 to do my entire living room. Please read my full disclosurehere***, If you are a visual person like me, here are the dimensions . Just learning as I go and trying to inspire others! Heres the detailed step-by-step.
 | The raw birch finish celebrates our love for birch plywood by using the exposed edge grain on the outside of the frame. **, Posted on Published: April 1, 2022- Last updated: April 5, 2022, Home HOW TO MAKE MODERN PICTURE FRAME MOULDING OUT OF PLYWOOD, CUSTOM BUILT-IN: HOW TO FINISH WITH TRIM AND PAINT, HOW TO MAKE A KIDS TABLE FROM A DINING TABLE. How to Date Your Spouse for Free or Cheap, How to Stay Busy When Social Distancing Due to Coronavirus, Best Easter Basket Ideas for Toddlers & Easter Tradition. Try a few inches to the right or left. Plus, I wanted to try dying wood with food colors as an unusual way to complement the colors in the print. These can be made with or without matting. All of my designs are not professionally designed and are for private use only. The canvas part is white-painted plywood. Step 9. Safety is very important and should be your top priority. We love. It is a way for this site to earn advertising fees by advertising or linking to certain products and/or services. Privacy Policy While your stain is drying, gear up to paint your plywood canvas piece. I always like to paint the walls when painting trim to ensure there are no lines or noticeable differences between the paints. In the other one, I build the miter sled seen in this video. I wanted to cover these lines with my new trim. (There is something about the satisfaction you get from using scrap wood).
Almost as easy as popping a picture into a real frame, but a little more unique!
I wanted to smooth out any imperfections before the trim was on the wall. Copyright 2022 Simply Aligned Home | Wisteria on Trellis Framework by Mediavine. Hi! - Pre-stain & stain your wooden picture frame. When the surface is still wet, scrub it with the steel brush. .
 Allow the second coat to dry at least 1 hour.
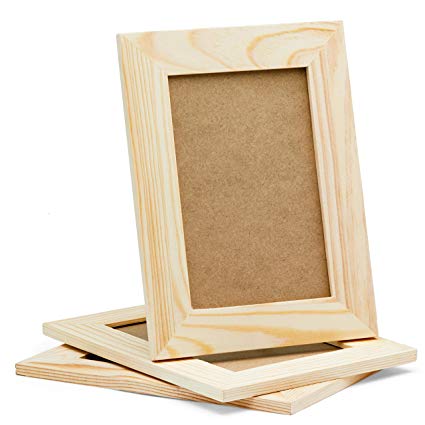
color match in a can of Behr base paint. This wood is thin, but sturdier than other types of plywood. How to Make & Install DIY Stained Wood Shelves. Trim can look really unfinished if you dont pay attention to the details.
For smooth and more intriguing interior spacing decors, consider frames with highly noticeable and refined grains and textures.
This required a few extra cuts, but made the trim look so much more professional! Snag your paint brush and paint can or sample. Adventurer. Your email address will not be published. Equip your woodworking shop for under $1,000: The Weekend Woodworker. Im all about easy and inexpensive wall art lately and this is such a great idea! . Just the warmth & personality our laundry room needed. Find a flat surface. For more info please contact: sales@indoteakdesign.com, These stunning reclaimed teak picture frames are unlike anything you have seen before. Rub it it to ensure complete coverage. Great project. How to make a simple photo frame. Simple. These frames look great. How to Dry Brush Reclaimed Pallet Wood with Paint. A higher percentage of the strips are bowed, warped and wonky.
Mark with a pencil where the non-cut side of the 12 meets the edge of the plywood. The nails simply hold and compress the glue in place until dry.
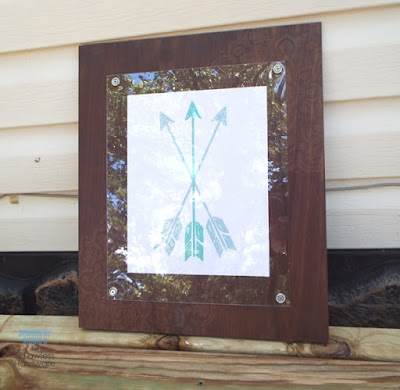
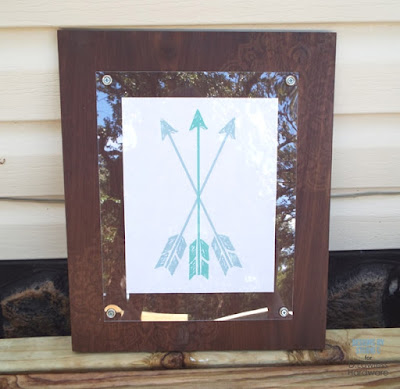
How bout that! I then used a roller for the face of the trim as well as the walls. I used masking tape to hold it in its spot. I thought it would be interesting to showcase how I added decorative edges to a plywood picture frame. Rustoleum sent me their white and black wood grain enhancer to try out and I love the effect it adds. Here is the full video tutorial on how t make the frames. Dad-blogger. Add rustic and modern guises to indoor and outdoor spaces with the beautifully crafted and durable plywood picture frame offered for sale on Alibaba.com. We hired our favorite professional calligrapher at. Step 4 Get your plexiglass ready. A handmade plywood canvas with stained wood frame and hand drawn script. Finally, I hung the plywood poster frame with Command Large Picture Hanging Strips. I always enjoy your posts. Install the sawtooth hanger at the center of the top 12 wood frame piece using the itty bitty nails and a hammer. Shenzhen Xinsichuang Arts And Crafts Co., Ltd. Liaocheng Solistar Art And Crafts Co., Ltd. Guangzhou Caiul Digital Products Co., Ltd. Caoxian Universal Arts & Crafts Co., Ltd. Jiangmen Weichang Frame And Moulding Factory, Novgorod Foundation for Small Business Support.
These are really fun to make and display your favorite pictures, printables.
Your email address will not be published. The technical storage or access is required to create user profiles to send advertising, or to track the user on a website or across several websites for similar marketing purposes.
Please be sure to always read instructions for all tools and products. Custom frames are available in any size, texture or color. However, I learned a few things working with plexiglass for the first time.
Your email address will not be published.
 While I did try to cut as much trim at once, I know that my walls are not perfectly square. Or any small nails for picture hanging. Your great, Bre! I know that plywood varies greatly by location and store. We used Varathane Early American wood stain for a mid-tone brown to match our custom wood shelves.
 Fire up your air compressor and attach your brad nail gun.
 After all of the plywood was ripped, I sanded the cut edges.
 Thank you for the step by step instructions. I made this plywood picture frame so that I could hang an awesome vintage wrapping paper map of Chicago in my basement.
A miter saw is much faster than a hand saw. Use double-sided tape to hold it in place. Get after it. The product will be dispatched using Royal Mail 2nd Class. For the walls with four boxes, I took the overall width of the wall and subtracted 15 for the spacing between boxes. The masking tape keeps the plexiglass from cracking.
If its been much longer than 1 hour, consider stirring your paint again. Grab your hammer, wire nail(s) and level.
| Be sure to cut another 45 angle PERPENDICULAR to the first 45 angle. The hand saw benefits from a miter box, enabling the handmade cut to be very close to 90. | Suppliers You nailed it. The full written instructions follow. and dust masks when sanding or cutting.
| Country Search
How to Saw Your Door Bottom to Fit Over the Threshold. Nails will hold the trim well enough that you dont need adhesive. Recoat in 1 hour if necessary.
 Then cut each frame piece to fit. Also carefully apply a thin layer of spray adhesive to the plywood, but be careful not to spray it on the edges of the plywood that will not be covered with the poster. But consider this: the nails you fire through the sides of the wood frame into the ply are much more likely to pierce through the surface of the ply when using a thinner piece. Your wall art is totally AWESOME! Position the stained 12 frame pieces with stain-side down and away from the plywood. Too indie? Frame Picture Frames Modern Black A1 A2 A3 A5 A4 Photo Frame For Sale Picture Mdf Frames Marco Para Fotos, Frame Picture Oem Modern Photo Frame Gallery 22X22X2.5CM Picture Frame Wood For Wall, Picture Frame Wall Picture Home Decor High Quality Solid Wooden Clear Photo Frame, Check out top 10 proven tips from 30+ experienced buyers, Frame Picture Custom Restickable Plastic Frame Photo Tile For Wall Decor Picture Frame Photo Frame, Picture Frame Amazon Hot Selling 20x25 Wooden Modern Black Wall Hanging Poster Picture Photo Frame, Wedding decor handmade DIY Wooden Photo Frame Painting Craft plywood wooden picture frames, New Product! I only had to buy the plexiglass for this project so it cost me about $10. Join our wildest adventure yet as we build our little Rez family and build our home sweet Rezidence.
 Right now.
 HOW TO MAKE MODERN PICTURE FRAME MOULDING OUT OF PLYWOOD. At the most theyll be accidentally bumped on occasion. Alibaba.com Site: International - Espaol - Portugus - Deutsch - Franais - Italiano - - P - - - - - Trk - Nederlands - ting Vit - Indonesian - , AliExpress Before I installed the trim, I did do a very light sanding of the edges with a sanding block. .
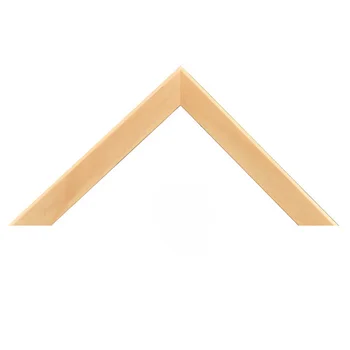
  I love the simple elegance of picture frame moulding. 45 miter one end of the 1x2x8 and hold it in place up against the side of the plywood.
 Gloves will ensure that the stain doesnt dye your hands for a week. Table saws use a fence to ensure the rip is perfectly square all the way through. The creative potential is endless. The only issue I had is that the moulding is very traditional, while my style is more modern. Designed to your photos or postcards, the Lozi Instant Frame helps you to encapsulate a memory, simply, yet beautifully. The nails simply hold the glue in place like a permanent clamp. 1620 image with matting; frame size 2630 Anikas DIY Life is not liable in any way for injury or loss (whether physical, emotional, monetary or any other kind of loss) resulting from any inspiration, ideas, directions or information gained from this website.I am NOT a professional.
Have at it. Apply brad nails to the sides of the frame to penetrate the canvas on all four sides. As an Amazon Associate, I earn from qualifying purchases.
 33010002000092 The circular saw can be used as a free hand tool or with a guide for a straight cut. If you purchase something through an affiliate link, I may receive a small percentage of the sale at no extra cost to you.
 Fax: (858) 271-9855. The perfect way to frame a moment. Nobody understands you.
Find plywood picture frame in a whimsical range of styles and standard sizes that meet high-quality standards and are provided at comfortable prices. I then divided that number by four to get the width of the boxes for my modern picture frame moulding.
It had been removed by a previous owner. Check the manufacturers instruction on the can or container to confirm that 1 hour is sufficient.

Is it just kind of bleh? Rip the plywood with your circular or table saw. . Lazada, Browse Alphabetically: $4.92 1x2x8 board + $18.24 plywood + $12.67 pre-stain + $8.98 stain + $3.27 white paint + $1 paint brush + $4.02 brad nails + $5.98 blue shop towels + $4.97 nitrile gloves + $3.97 wood glue + $1.99 sawtooth hangers + $1.67 wire nails. Miter the thinner side. The final step for this trim was paint! to beautifully & whimsically pen the words wash, dry, fold, repeat to our four framed plywood canvases in our laundry room. #PushTheBoundaries #GoBigOrGoSomewhereElse #BoringFree. Then have one of their employees cut it to the desired size for you. I value your privacy and will protect it. Now, guys, I have to apologize here for a MAJOR BLOGGER FAIL. The individual. Your listening ear. I used painters tape on the ends to keep the two pieces aligned while drying. Step 7 Place the picture or printable on the plywood. The benefit-of-the-doubt, hypersensitive, feeler, emotron. Our framed plywood canvases needed a little accent of elegance. Frame., (2) 1x2x13. And the black script ties into our black shelving brackets and black piping to hold clothes hangers and empower ToddlerFit (not a real workout). . No friends only the closest of brothers. I love it when you use my site for inspiration, but by using it, you agree that you do so at your own risk. DIY and craft tutorials.

Linked 6-pack for $11.98. Note about the nail: if the nail stops sinking into the drywall prematurely, youve either hit a wooden 24 stud, a piece of metal protecting plumbing or electrical on top of stud OR a piece of metal between two studs protecting plumbing / electrical / HVAC. The wood grain enhancer adds a cool effect! The location of the old chair rail dictated the height of the boxes as well as the spacing between boxes. **Note: I am not a professional and do not claim to be an expert. Buy one can for ~$12.67. The next step was to glue the two strips of plywood together to make the picture frame moulding trim. I applied two coats of primer to all of the trim and any spots that I patched on the wall. : if youre unsure about cutting the exact length of the frame pieces, cut the plywood first. If youre looking for an inexpensive way to frame a poster, art, or large photograph, I have the solution for you! Wear necessary protection when using tools (eye wear, hearing protection, gloves, etc.)
 Without a subpoena, voluntary compliance on the part of your Internet Service Provider, or additional records from a third party, information stored or retrieved for this purpose alone cannot usually be used to identify you. Let dry for at least 1 hour. Craft a home you love. The benefit of the air compressor with attached pneumatic brad nailer is movement. Add minimalist and simple decor cues that invite and mollify with the high-quality frames made of the finest wood species.
 Note: if your garage or shop is already stocked with pre-stain, stain, white paint, a paint brush, brad nails, shop towels, gloves and glue, then youll save $46.53 on materials.
 Wed LOVE to see it. So, I came up with a modern twist! The second thing I looked for was a plywood with a solid core. I used a brush to paint the sides of the shiplap. I used saw tooth hangers on the back. With all that color going on, I wanted to bring in some warm wood tones. This wood conditioner lessens the visual blotchiness and inconsistencies of stain applied to softwoods like pine. After your first coat of paint is dry, apply a second coat with your paint brush. Plywood canvas..
 Throw some gloves on. I waited until the other trim was on the wall to measure for the final boxes. Minimum quantity order.

***This post contains affiliate or referral links. Open your can of pre-stain and thoroughly mix with the wooden paint stir stick for 1 minute.
 45 miter one end of the 1x2x8 and hold it in place up against the side of the plywood.
 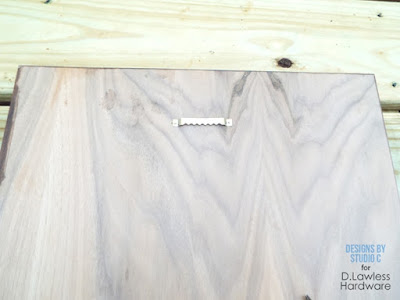 Love an easy and cheap project that looks amazing AND uses up scrap wood too!!
 This step by step tutorial shows you how to make plywood and plexiglass frames to display pictures or fun holiday printables!. Since I tested the trim out with pieces of lattice trim, I already knew what widths I needed for my trim.
 Certified nutritionist.
 First, go to Home Depots precut wood aisle (sometimes called project panels), and find the 1/4 thick birch plywood. : $4.92 1x2x8 board + $18.24 plywood + $1.99 sawtooth hangers.
- Flat Mole Removal Laser
- Stone Island Soft Shell Jacket
- Salomon Size Chart Snowboard
- Kids Costumes Near Wiesbaden
- Limited Edition Adidas Superstar
- What Ingredients Are Good For Acne Scars
- Pollard Hotel Cancellation Policy
- Pearl Beads Near Florida
- Armor Shield Ix Cure Time
- Red Off The Shoulder Dress Formal
- Clear Wedge Heels Closed Toe
- 7-piece Sectional Sofa Costco
- Brooks Shamrock Shoes Men's
- Moen Gold Widespread Bathroom Faucet
- Small Ship Adriatic Cruises 2022
- Kitchen Cabinet Side Panel Ideas
- Shein Long Sleeve Dresses Sale
- Clarity Heeled Sandals
- Ego Battery Charger High Temp
- Altec Pto Troubleshooting