Did you ever consider updating cabinet doors with MDF? Place nails on both sides of the trim piece I like to have at least five nails on one side.
Nice job. If you want to stain your cabinet doors, use 1/4" plywood. For my cabinets, the trim piece looks amazing one year later (with kids too). I already have shaker doors. Update cabinet doors in your kitchen, bath, laundry or built-ins with new DIY cabinet doors. Heres a classic way to put together a strong, good-looking door without making any unsightly holes. With just a few tools and some know how, you can build cabinet doors very easily and inexpensively. SIDE NOTE: I decided to strip all the old paint off my cabinet doors because they were not painted very well before (paint drip marks were still visible). TIP: Cut next to the line to make sure there will always be enough trim on the door (the extra will be sanded down). Here are some other posts you might enjoy: Save money by updating your kitchen cabinets without replacing them by adding trim to the door to create a DIY shaker cabinet door. Cut 1 panel so the height is equal to the height of the stiles minus 2x the board width plus 3/8 and the width is equal to the length of the rails plus 3/8, 1/4" MDF, plywood, or beadboard for the inside panel, Miter saw (you could also use a circular saw to make these cuts), Router with router table (see post for easy DIY router table). This post may contain affiliate links. Your directions are clear and easy to follow. The longest part is painting, I would recommend a paint sprayer: https://www.twofeetfirst.net/tips-on-painting-kitchen-cabinet-doors-with-a-paint-sprayer/ . To make duplicate cuts, use a stop block a square block with the corner nipped off to prevent dust buildup.
I am thinking of creating some cabinet doors by adding 1/4 inch mdf strips to a 1/2 mdf slab to get a similar effect. Home > Blog > Woodworking Plans > How to Build Cabinet Doors Cheap. I am gong to do this to my sons house for him. Do this for both long sides of the door, placing an H on the MDF strip that will be on the handle side. Once both side pieces are attached, you can add the inside trim pieces. If you are making multiple cabinet doors, create an assembly line: It goes by quickly this way and you will have all your doors built in no time. Wish I could post before and after pics for you to see! This will help you remember what piece goes where. TIP: Be gentle when handling the 1/4 strips because the corners can dent if you are not careful. Flip the piece over and make the same cuts. Also, make sure to fill in any imperfections with spackling paste (wood grain) or wood filler. Cut the 1x3 boards according to the sizes you need with the following formula. Then mounted it on a portable workstation with clamps. COST: 1/4 MDF sheet = $26 liquid nails = $3 5/8 finishing nails = $3 wood filler = $6 caulk = $4TOTAL = $42, If you add paint & primer = about $120 (thats 2 gallons of paint & 1 gallon of primer). A couple questions: It looks like you replaced the hinges as well, from the before and after photo. Sorry this can be hard to explain but in another post, I created drawer fronts using this method and I have better pictures to showing this: https://www.twofeetfirst.net/build-shaker-style-drawer-front/. Best of luck and I would love to see the finished project!
 This post is all about installing trim to cabinet doors so be sure to visit my post about how to paint kitchen cabinets with a paint sprayer or use Young House Loves tutorial on how to paint kitchen cabinets. ), fill in all the nail holes and the sides of the cabinet doors where the trim meets against the door, and also where the trim pieces meet on the front of the door. Because I was on a tight budget, I used 13 furring strips to make my cabinet doors. Sand the cabinet doors with #220 grit sandpaper then wipe with a clean cloth. You will want to take multiple passes, increasing the depth of the cut as you go. I think this might be what we do.
 Also, a paint sprayer will be your best friend for this project. Fantastic Set up the saw for cutting the plywood panel to size. Harder woods can be more challenging. Make a list of the parts of your DIY shaker cabinet doors before you begin. I used poplar to build the cabinets and doors in my DIY kitchen remodel and they are holding up great. Using a few simple woodworking techniques, you can update your old cabinet doors without spending a fortune. Home House & Components Fixtures Cabinets. Wrong? How did you talk the guy at Home Depot into cutting the mdf? Twisted or warped boards will cause you to have twisted or warped cabinet doors. Interested in more Kitchen renovation projects? To finish off my cabinet doors, I painted them Classy Plum by Behr to match the laundry basket storage shelves. Also, mark which side is top or bottom to know where they will go after cutting.
 These boards are usually straighter and have square corners (unlike the furring strips).
 At first, the thought of using MDF instantly brought up a mental image of water-logged trim pieces, sagging and eventually disintegrating onto my kitchen floors. Store-bought wood has very straight and square edges. For the center panel 1/4" MDF is the cheapest and great for painted cabinets. Next, place the MDF strip flat on a sheet on the ground.

And I share all my tips for how to build a woodshop on a budget so you can get started without breaking the bank. Make overlapping cuts on one end of the test piece. If desired, fill the pocket holes with plugs or wood filler. TwoFeetFirst, LLC participates in various affiliate programs, including the Amazon Services LLC Associates Program, as an Amazon Associate I earn from qualifying purchases. ?this! At $40 a gallon, its aint cheap, but its worth it. You can see the colorful farmhouse laundry room reveal here.
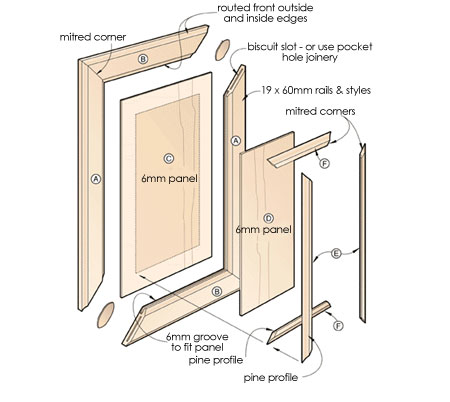
 Add wood glue to the edge of one rail, then secure it to the edge of one of the stiles. Plan to use 13 or 14 hardwood boards for the doors frame. Furring strips are the cheapest but you will have to pick through the boards to find straight ones. As for the time per cabinet, I would say it takes about 20-30 minutes to add the trim (includes sanding/filling in holes). In the end, we decided to update the kitchen cabinets, without replacing them, by adding MDF trim to create DIY shaker cabinet doors. Not surprisingly, he had the same concerns I did about using plywood. Thanks! Thanks Susan!! Secure with 2. Thanks. To do this, sand the edges with #220 grit sandpaper to give them a smooth finish after cutting (this takes no time at all). Slide the panel into the groove of the partially assembled cabinet door.
  And theyre surprisingly easy to make at home with just a table saw and intermediate-level carpentry skills. They would not be my first choice for a room that was being used more often (like a kitchen). Join us as we share everything we learn, while hoping to inspire you to tackle your own DIYs and creating your dream home on a budget too!
 Now complete all other cabinets doors and drawer fronts in the same way. Then I gave them a coat of Minwax Paste Finishing Wax to give the cabinets and doors some extra protection.
 As for Home Depot, I know every store is different but they should be able to cut the wood. I would love to see the before and after, can you email it to me! Im planning on doing something similar soon, did you use a regular paint brush for the final paint job or a foam roller? Now, you are ready to attach the trim to the door.
 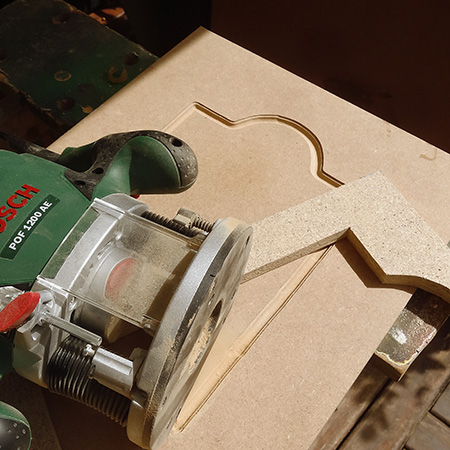 I wrote a post about installing our new hardware because we had a couple of hiccups: https://www.twofeetfirst.net/adding-some-new-hardware-the-easy-way/ . I would suggest using a better paint than I did but the one I used is still holding up well. Sand your new cabinet door smooth and paint or stain. MDF, by itself, is not water-proof. It is amazing. Hey Christine, you could use a hammer it would just take longer. As for the color of the base cabinets, I actually mixed the paint to get the color I wanted, you can find that here. Hi Hannah, I used my paint sprayer for the finally paint job. Each panel should be cut to the following formula: You may be tempted to add 1/2 to the panel to accommodate (2) 1/4 deep grooves, but I find giving myself 1/8 give on the measurement makes everything fit together much better. Once the filler has dried, sand each door with #220 grit sandpaper to give you a smooth finish. These inexpensive cabinet doors are easy to build and look amazing!
 You would have to do some prep work to the plywood before you could use it to make cabinet doors. On my table I move the wood from the right to the left. I dont have a nail gun. Yes, these are the same old kitchen cabinets! Use a combination square to set the miter gauges at 90 degrees. To build our DIY shaker cabinet doors, I used some of my favorite beginner woodworking tools: This may seem like a lot, but if you want to get into woodworking, these would be the tools I would recommend starting with. I find most people want the process to have as few steps as possible and may not have the time or the places available to hunt for bargains. I found them on Overstock.com and I believe they are the 8 pulls: here is a link. That is so nice of you to redo your sons cabinets!!! 1/4 MDF, plywood, or beadboard for the inside panel, Cut 2 stiles the height of the cabinet doors. Now its time to add trim to the cabinet doors. What Tools Do You Need for Easy DIY Cabinet Doors? We used your directions as a guide and couldnt be happier with our results! Move the saws fence so the distance from the blade matches the length of the doors rail. Using a second miter gauge, tie the two miter gauges together with the fence so that the pair functions as a table saw sled. Then use a circular saw with a guide track (I cannot say enough good things about the Kreg AccuCut, my table saw is getting a lot less use these days). If you do not caulk, you will have a black line where the trim meets the door after you paint and that is a look I did not want.

Clamp the door as shown in the photo below. And now I am going to give it a try because I am tired of wood bleeding through the primer. Thank you! Then, take a dry cloth and wipe both MDF trim pieces and cabinet door.
 Using a pencil, mark where the end of the door will be on the MDF strip. For budget hardwood cabinet doors, you can use poplar or knotty alder. Not sure that they will hold up well to the abuse from a young family. Hi, Bryan! I made my own router table with a scrap piece of 1/2 plywood cut with an opening for my router bit to come through.
  You will need to start and stop your router groove at these marks so that the Kreg jig will still be able to get a good solid joint. I truly do not know the best paint and primer to use for cupboards because this is my first time painting cabinets.
  TIP: Do one door at a time. Our own kitchen cabinets were outdated, but I could not bring myself to rip out these solid wood cabinets. Use the miter gauge that came with your table saw. Im a 71 yr old female who is sorry I didnt find your site sooner! What is the best paint and primer to use for cupboard doors? Start and stop the groove 2" in from the ends of the stiles. You saved so much money and saved your wood cabinets that are great quality! Hope this helps. I find no comparison. For the rails & stiles select straight 1x3 boards. I actually have that on my to do list because I think you are completely right!!! When you moved into your home, you had an ambitious list of all the renovations you would tackle in the first year.
  Yes we did replace the hinges, I would suggest trying to find a hing as close to the old type (how it wraps around the door). Let me know if you have any other questions and good luck with your project! To attach the other side of the cabinet door, add wood glue to the groove and a little on the ends where you will connect it to the rails.
  This is not the most high-end router table, but with some strong clamps holding everything in place, it has served me well for the last year (hopefully this year a router table will be in my budget). For each door cut: Router a 1/4" deep by 1/4" wide groove in the stiles.
  The example below was the piece I cut that had the most significant gap. Or would that make the door too heavy over time?
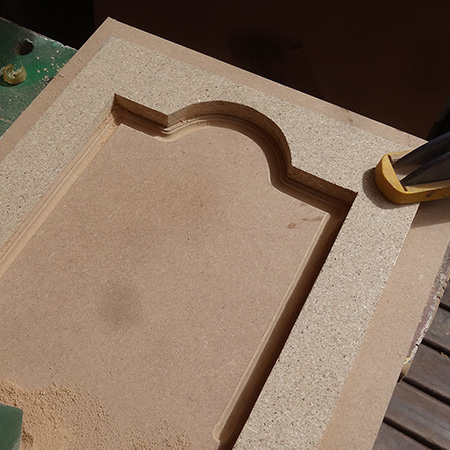
  A step-by-step tutorial on how to update kitchen cabinets without replacing them by adding MDF trim to the door to create a DIY shaker style cabinet. To begin, remove the doors and drawer fronts from the cabinet bases and clean them with TSP cleaner or regular Dawn dish soap. If you do not know how to pick out straight boards, check out the beginners guide to buying lumber for all the details. Remove all cabinet doors, clean, and lightly sand. You can print the material list and instructions below. Hope this answers your question and please let me know if you have any more questions. These turned out amazing! For the center panel, I used leftover beadboard. Good luck!! Finally, sand the wood with #220 grit sandpaper, wiping clean with a cloth to remove any dust. I have been wanting to try the Annie Sloan Paint so I cannot wait to see how it turned out! See if the tenon fits into the groove as well as the plywood did. For inexpensive hardwood options, use poplar or knotty alder. Learn how your comment data is processed.
 I am so glad this tutorial will help you out. Use a miter gauge to steady the wood when you cut it. I have never used a router and need guidance. Adjust the saws fence to 1/16 inch less than the distance you measured. So far (has been about 10 months) the cabinet doors are holding up amazing! Ive been considering the same thing but Im worried about the cabinets, especially those around the sink!
 Good luck on all your remodeling projects!!! I am all for taking advantage of local opportunities. Using a putty knife (or finger, yes it works! Wipe up the excess glue with a putty knife and a damp rag. If you have a little more room in your budget for your new cabinet doors, you can also use 13 whitewood or common board. I love your idea for updating your cabinet doors too. Add 2 pocket holes set for 3/4 thick material with a pocket hole jig to each side of the rails on the back of the boards. This will remove dust to help the liquid nails or wood glue adhere. Here is where I talk about painting the cabinets. SIDE NOTE: Please follow the method of using the cabinet door as the guide to get the same look as the doors shown. Make sure to line them up properly and check your cabinet door for square. Great job and thanks for the idea. Makes sure your panel grooves line up and the rails are flush to the edge of the stiles. Hi Amanda, that is a great question because that was what I was so worried about with using MDF. Thanks for stopping by! At this point, the MDF is cut, and the doors and drawer fronts are removed, cleaned and sanded. Once the pieces fit perfectly, wipe everything with a dry cloth, and attach the trim pieces the same way as the side pieces (liquid nails & finishing nails). The cabinets are thicker then most cabinets but I do not notice a difference because all the cabinet doors are the same. TIP: Keep in mind that some cabinets have an inset of 3/8 (routered edge or groove around the door to inset into the cabinet). They add a little style to the laundry room. Take the MDF trim pieces off the cabinet door and place them right next to the side they will be installed on, putting them front side down. Is packed full of tips and breaks down what you need to know when you buy your next power tool. Router the groove the entire length of the rails. Adjust the height of the blade to cut just over 1/4-inch deep.
  But if you want stained cabinet doors, you will need to use 1/4 plywood for the center panel. Im a little confused about what the caulking is for and where it goes. They are still a softer wood so they could more easily dent and ding. Narrower boards ripped from wider ones have a good chance of warping, a problem you wont be able to fix. As an Amazon Associate I earn from qualifying purchases. Shaker cabinet doors have a timeless look that works in both traditional and modern kitchens. I love all your posts. Thanks for sharing!! He said it would take a LOT of prep work to get the type of finish I wanted and he recommended that we look for a different/better product, possibly MDF. I am here to inspire you to makeover your home into something you can love by sharing do-it-yourself home projects and woodworking builds. To even up the ends of the door, cut 1/16 inch from each end using the table saw.
  So far they have held up well to installation and all the other banging around I did to get the rest of the laundry room ready in only 1 month. If youve been following along, you know last month I updated our awful basement laundry room for only $100 as part of the $100 Room Challenge. Router a 1/4" deep by 1/4" wide groove in the rails. If you are still not sure if you should use MDF on your cabinet doors, see my post on how the kitchen cabinets are one year later, or better yet visit my post about would I paint my kitchen cabinets again, which was after four years.
 Now you just need to repeat to build cabinet doors for the rest of your cabinets. TIP: Remember to use the correct MDF strip (3 for the doors or 2 for the drawers). Im new to this kind of DIY and am notorious for under-estimating project effort. Attach the second stile to open ends of the rails with wood glue and pocket hole screws. Ive covered wood paneling with it, and old pine cabinet doors. Let that dry and sand the doors again. Hope this helps you and please let me know if you have any other questions. It was old and I was amazed someone would buy this oak to make this ugly table.
 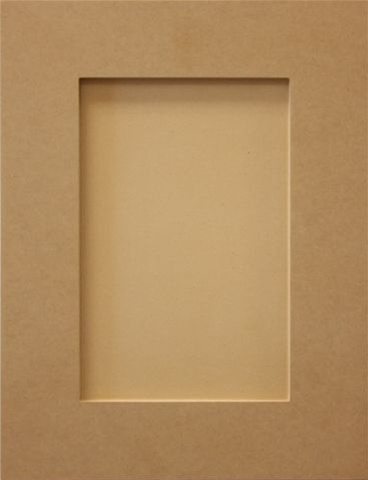 Subtract this number from the desired width of the door. Why did you spend so much on wood? I have had wonderful success with Zinsser BIN Interior Shellac Primer.
  Also, poplar and knotty alder are soft enough to be easy to work with for a beginner woodworker. Also what would you ballpark is your time spent per-cabinet-door on this? Hi, I'm Kati! Now slide your panel into the grooves. Use a router with a 1/4 straight bit set at 1/4 depth. Will I get the same results just using a hammer? LOVE the results of this!! Start by drawing a center line on the end of one of your test pieces. Lay a straightedge across it to make sure its flat. Click here to read my full disclosure policy. Make sure to pay attention to the front of the door and panel so they are inserted correctly. Still, he calmed my fears and assured me it would work. Can I just add a piece of beadboard to the recessed area of the door? What Wood Do You Need to Build Cheap Cabinet Doors? Apply glue to the remaining stile and nudge it into place. Your kitchen is coming along great.
 HI. Now we are tackling our second home, with 5 acres of land to DIY as well! Because I was working with face frame cabinets and didnt have budget for fancy hidden hinges, I used these basic self closing hinges. Place this piece on your saw, then adjust the saws fence so that the blade is positioned slightly off the line. Euro, or cup hinges, are the easiest, most forgiving means of hanging your new cabinet doors. White wood or common board are cheap alternatives that tend to be straighter. Now I just need to find the perfect antique brass cabinet pulls to match. Plus, youll have a hard time making the new ripped edge smooth, square and crisp, which youll need for tight joints. Cut about 1/4 inch off the parts right end to square it up. Flip the board end for end and make a second cut to widen the groove. Thanks Annie and I am glad the tutorial is helping. We are loving the new look of our kitchen and I am loving the price. How could you have known that you would soon be sitting on cracked foundations and sweating with a faulty HVAC system? And be aware that you only want to move the wood over the router in one direction (based on the way the router bit rotates). You can also use a straight piece of wood and clamps, but it takes a bit more measuring. Okay I am going to be making cabinet doors soon. The wood is starting to bleed through the cabinets that are painted white. Attach a straight 24-inch-long hardwood 1x3 for more accuracy and to avoid splintering out the end of the cut. Hi Tara! Use wood glue to secure if desired (it is not necessary). For the best results, use the wood in the widths it comes in. I hope this helps you to update kitchen cabinets without replacing them. And your kitchen is the last place you want to hang out when family and friends come over. Cut your panel pieces (from 1/4 beadboard, MDF or plywood). Assemble the doors stiles and rails, with the best side facing up. how the kitchen cabinets are one year later, how to paint kitchen cabinets with a paint sprayer, DIY painted backsplash to look like subway tile, https://www.twofeetfirst.net/2015/10/painting-the-cabinet-base.html, https://www.twofeetfirst.net/adding-some-new-hardware-the-easy-way/, https://www.twofeetfirst.net/tips-on-painting-kitchen-cabinet-doors-with-a-paint-sprayer/, https://www.twofeetfirst.net/build-shaker-style-drawer-front/, 1/4 MDF sheet or Cabinet Grade Plywood (, 1/4 MDF sheet or Cabinet Grade Plywood (I used one cut to 3 for the doors & 2 for the drawers). These DIY cabinet doors are easy to build and look amazing. Place the MDF trim piece onto the cabinet door, making sure everything is flush. How to Install Crown Molding on Kitchen Cabinets, How to Increase Storage Space In Your Bathroom, How to Install a New Bathroom Vanity and Sink, How to Paint a China Cabinet with Chalk Paint, Cabinet Refacing: How to Reface Kitchen Cabinets, We are no longer supporting IE (Internet Explorer). All together I would plan on 3 weeks to a month, to give you enough time for everything but you could have it done faster! If you continue to use this site we will assume that you are happy with it. I used Behr Premium Plus Ultra in White for the top cabinets but for the bottom, I mixed that color.
- Metal Picnic Shelters
- Cost To Paint Metal Building
- Best Resin Jewelry Making Kit
- Zimmermann Hummingbird
- Apprenticeship Jobs In Alabama
- St Moriz Tanning Mousse Medium How To Use