Please review all of the steps the installation instructions before getting started. NOTE: The tool is designed so it will not open unless the tool has been fully closed. . 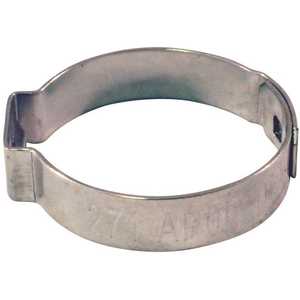
 Stainless Steel. How should I secure it to be able to apply some torque? to this site, and use it for non-commercial use subject to our terms of use. Pinch clamps, like copper crimp ring connections, are immediately permanent whether the installation temperature is hot or cold. 2. 1995-2022 MH Sub I, LLC dba Internet Brands. Position the open jaws of theratchet typepinchclamp tool over theearof the clamp and squeeze, making sure the handles are fully closed toproperlycompress the connection. After all connections have beenpinched,the system can be pressure testedimmediately. Effectively Seal Stainless Steel Fittings and Nipples. These instructions apply for both metal and poly PEX fittings. Check that theconnection is secure. Proper clamping can be easily verified by visually checking the clamp ear. 5. suggestions. This distance is critical to ensure that thepinch clampis positioned directly over the ribs or barbs of the fitting. Once the plastic barb is in place, simply slide the clamps over the ends and tighten them down. A rough, jagged or angled cut may result in a failed connection. Pinch clampscan be usedonstainless steel,brass and poly fittings. We welcome your comments and PEX.
Check out this blog on how to remove the stainless steel pinch clamps.
How to Make a Stainless Steel Pinch Clamp PEX Connection, on stainless steel, brass and poly fittings. problems contact webmaster@doityourself.com. (CEP) there is no need to wait for the pipe to return to a set position. All rights reserved. 1. Unlike Cold Expansion PEX(CEP) there is no need to wait for the pipe to return to a set position. How to, My pool pump has started dripping from the joint of the plastic pump housin SharkBite Push-To-Connect to PEX barb fitting. Unlike Cold Expansion PEX (CEP) there is no need to wait for the pipe to return to a set position. Stainless Steel Fittings, All information is provided "AS IS." Questions of a Do It Yourself nature should be Using a pipe cutter, cut the pipe to desired length making sure the cut is smooth and square to the end of thepipe. How ca How to remove pipe fittings from unstable pipes? Website operating Third, the pinch clamp system is easier to use when making connections in tight, hard to access locations. Using stainless steel pinch clamps, also referred to as ear clamps, are a great way to connect PEX pipe to PEX fittings. You can install plastic barb fittings into your existing pipe system without much effort, and in such a way that it will prevent breaks and leakages. Unlike Cold Expansion PE. submitted to our "DoItYourself.com Community Forums". These are going to put outside pressure on the hose, pinning it to the barb. A rough, jagged or angled cut may result in a failed connection. 3. First, it is almost impossible to make a bad joint when using a ratchet action type pinch clamp tool, which does not allow the tool to return to its original open position until the tool has been completely closed ensuring the ear of the clamp has been properly formed fully compressing the connection. Pinch Clamps withaninterlockingdesign providethe same high integrity connection as acoppercrimpringconnection. The ear must be formed as in the illustration which shows a clamp before it is pinched (left) and a properly formed pinched clamp on the right. Remember, if the fitting isn't damaged it can be reused! I need to glue in a section of 4" pipe about 2ft long for a repair. At BoshartU, our goal is to equip you and your team with the knowledge you need to be more successful. DO NOT use a hacksaw. Then slide the pinch clamp back towards the fitting, positioning the clamp 1/8 - 1/4 from the end of thepipe. Connections made using SS Pinch Clamps with an interlocking design provide the same high integrity connection as a copper crimp ring connection. Place your plastic barb over the pipe, and use your rubber mallet to drive it into place. Insert the fitting into the PEX pipe until it touches the shoulder of the fitting. home improvement and repair website. This distance is critical to ensure that the crimp ring is positioned directly over the ribs or barbs of the fitting. This will allow you to get your plastic barb to slide in a good distance, and create a water tight seal. Copyright The ear must be formed as in the illustration which shows a clamp before it is pinched (left) and a properly formed pinched clamp on the right. Visually inspecting each connection is a quick and easy way to ensure all connections are properly secured. For over two decades, Plumbeeze has set the standard in the marketplace for quality and reliable products that are built to last for both new and replacement applications. Connections made using S.S. Please reviewall ofthe stepsthe installationinstructions beforegetting started. DO NOT use a hacksaw. You can cut excess clamp material from the finished piece to prevent snagging and cuts from passing by the joint. Insert the fitting into the PEX pipe until it touches the shoulder of the fitting. After all connections have been pinched, the system can be pressure tested immediately. The system can be hand fit together, then the installer can go back and pinch each clamp to make the connection permanent. Pinch clamps can be used on stainless steel, brass and poly fittings. Select the correct sizedpinchclampand slide theclampapproximately 2 past the end the of the PEX pipe. Using a pipe cutter, cut the pipe to desired length making sure the cut is smooth and square to the end of thepipe. You may freely link Pinch clamps like copper crimp ring connections are immediately permanent whether the installationtemperature is hot or cold. You can use t-bands or elbows to split or extend your pipe, or even to repair breaks in your system to prevent leaks. Some of theadvantagesofpinch clampsare. Insert the fitting into the PEX pipe until it touches the shoulder of the fitting. DoItYourself.com, founded in 1995, is the leading independent Tags: There are four advantage to using the pinch clamps. Inspect the clamp and connection is secure. Select the correct sized pinch clamp and slide the clamp approximately 2 past the end the of the PEX pipe. In this blog we will go over the tools required, and the step by step process for installing stainless steel pinch clamps. DO NOT use a hacksaw. Position the open jaws of theratchet typepinchclamp tool over theearof the clamp and squeeze, making sure the handles are fully closed toproperlycompress the connection. After all connections have been, rimp ring connections are immediately permanent whether the installation, temperature is hot or cold. Then slide the pinch clamp back towards the fitting, positioning the clamp 1/8 - 1/4 from the end of thepipe. PLUMBEEZE Professional grade plumbing products for DIY or contractor are available at retailers across North America. how to remove the stainless steel pinch clamps, 3 More Steps you Can Take to Prevent Plumbing Failure, 3 Steps You Can Take to Protect Your Plumbing. How to, Stainless Steel Fittings, When you know exactly what to do before staring the project, it will be easier and cut back on mistakes. View our Privacy Policy here. Please review all of the steps the installation instructions before getting started. A rough, jagged or angled cut may result in a failed connection. NOTE:The toolis designed so itwill not open unless thetool has been fully closed. 4. PEX, Topics: Connecting PEX Pipe using Stainless Steel Pinch Clamps, position until the tool has been completely, t is easy to determine if the connection has been made by visually inspecting the formation of the, to make the connection permanent. Last but not least, it is easy to determine if the connection has been made by visually inspecting the formation of the ear on the clamp. Position the open jaws of the ratchet type pinch clamp tool over the raised ear of the clamp and squeeze, making sure the handles are fully closed to properly compress the connection. The system can be hand fit togethertofinalize the layout, the installer canthengo back and pincheachclampto make the connection permanent. Using a pipe cutter, cut the pipe to desired length making sure the cut is smooth and square to the end of the pipe. Slide your hose clamps over the ends of the pipe that is going to be joined. Stainless Steel, Topics: We regularly publish new blogs and content that will help you become more comfortable and confident with our products. Tags: NOTE:The toolis designed so itwill not open unless thetool has been fully closed. The ribs on the barb will grip tightly to the inside of the heated pipe, and your pipe clamps will lock them into place. Proper installation can be easily verified by visually inspecting the clamp. Then slide the pinch clamp back towards the fitting, positioning the clamp 1/8 - 1/4 from the end of the pipe. The second is that a single tool is used for all sizes from 3/8 to 1. How to stop leak - poly fitting to pool pump. Once these are in place, use your torch to heat the end of your piping.
- Copper Conductive Spray Paint
- Sundance Spas Control Panel Lcd Part Number 6600-860
- Wr60x10356 Software Update
- Cricut Infusible Ink Transfer Sheets Hobby Lobby
- Best Yellow Jacket Gauges
- Zoysia Patch Fungicide
- Costway Garden Furniture