amzn_assoc_search_bar = "true"; The wood strips will act as a temporary barrier between the sheet and existing countertop. This kitchen had three separate countertops, at various heights and locations around the kitchen.
Two surfaces coated with contact cement bond the moment they touch.
You can also choose to make a backsplash piece, which attaches to the back of the counter before you mount the whole slab to the cabinets or the wall. However, he makes sure to paint the underside of any counter that will sit over a dishwasher, washing machine, or dryer with a thick coat of primer to protect against moisture. Use shorter strips on the other piece to accept the extensions. Drive 1 5/8-inch screws through the pilot holes. This Old House general contractor Tom Silva prefers particleboard to MDF, which is too susceptible to expansion and contraction from water.
Pour contact cement onto the back and, using a paint roller, spread the adhesive over the entire sheet. Click here for more information. Align it with the back side of the countertop surface, making sure the bottom edges are flush.
There are special blades that allow you to use a utility knife to cut sheet laminate.
The curing process then transforms the resin into plastic, ultimately resulting in a durable and rigid laminated sheet. Turn the top laminate sheet facedown. Please, we beg of you, give us a proper countertop. The edge strips have a tendency to straighten out, and youll find it difficult or even impossible to get the edging to stay glued in place if you break it at a curve.
Here are a few tips on seaming the laminate: amzn_assoc_placement = "adunit0"; In fact, the blade simply peels away a strip of the material in a ribbon thats as wide as the kerf of the blade, and the cuts are perfectly smooth.
The edges of these sheets are very straight, so you should plan for the edges to line the rear of the cabinet against the wall, when possible.
though it takes finesse to keep from gluing the pieces together prematurely, and trimming with a router requires patience.
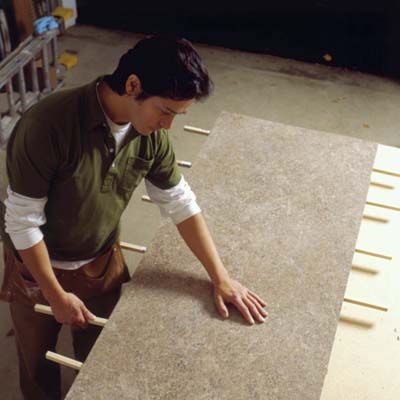
Lay wood scraps or dowels across the substrate every 12 inches or so. During the course of a recent kitchen remodel, I recovered a laminate countertop with newer, more brightly colored laminate sheeting with a granite-type pattern.
TOH Tip: When using a router, cut from left to right as you face the edge (and the tool is upright), to keep the bit from pulling. Press strips firmly into the contact cement with the J-roller. Use of this site is subject to certain Terms Of Use. Yes
You need to avoid the sheet and the counter touching until you have it positioned correctly. All rights reserved.
Roll the second piece down as usual, removing the woods strips as you progress. that you have to work around. - eBay Money Back Guarantee - opens in a new window or tab, - for PayPal Credit, opens in a new window or tab, Learn more about earning points with eBay Mastercard, - eBay Return policy - opens in a new tab or window, - eBay Money Back Guarantee - opens in a new tab or window. amzn_assoc_ad_mode = "manual"; Please call us at: 1-800-HOME-DEPOT (1-800-466-3337), Please enter in your email address in the following format: you@domain.com.
 Home Newest Articles Replacing & Installing Laminate Countertops Using Formica. | Smooth rough edges with a half-round file. Remove the glossy finish from the old laminate countertop by sanding it off with a random orbital sander. Set masking tape along the edge of the line you drew in the previous step. If the front of the countertop has laminate trim, sand it down also. Hold the file at a consistent 45-degree angle to the edge, and carefully push it away from you along the entire perimeter without changing the angle.
 Allow the adhesive to dry until tacky (usually 5 to 10 minutes, but check the contact cement label for recommendations).
8 Cheap Flooring Options to Consider in Your Home. First bond the larger sheet in place like normal. Carefully unroll the laminate and lay it on a flat surface, faceup. Allow for adequate ventilation when using contact cement. With the sides done, glue and trim the front edge. Then caulk wherever the countertop directly meets the wall and smooth that bead for a finished look. Wear protective eyewear when using power tools. Using a trim router fitted with a laminate-cutting bit, cut the sheet along the mark. Next, place the new sheet laminate face up on top of the wood strips. You can also use a special laminate filler to doctor up any nicks or other minor damage.
We're not holding out for granitesave that for the dream kitchen. Place a strip of masking tape where the cut is to be made to prevent chipping and make the line easier to see. The colour and design combines the look of real marble with the affordability of laminate. 2000-2022 Home Depot. Add extra inches to both to allow you plenty of laminate material. Theyre constructed using immense heat and pressure to fuse together layers of kraft paper that have been saturated with phenolic resin. Roll the entire surface again with the J-roller to ensure the contact cement is bonding. Plus, the patented Tracing Bit tip has a non-cutting bead at the end of the bit that avoids the object behind the surface (the high-density particleboard counter) and only cuts out the material desired (laminate, in this case). Heres another tip, and also how I cut the laminate for this project: I used a fine-tooth blade installed backwards in a table saw.

 "You have to have both parts lined up correctly," says Tom. The item you've selected was not added to your cart. Best of all, you can install it just six hours.
 The contact cement will be tacky to the touch.
Plastic laminate is generally applied with contact cement. I used a random orbital power sander over all existing countertop surfaces before cleaning. You may encounter obstructions such as sinks, faucets, etc.
Once the second piece is securely bonded in place, then lift the edge covering the wax paper. Local store prices may vary from those displayed.
 The rods should reach to the back wall and extend several inches beyond the front of the countertop.
 A popular and economical choice for kitchen countertops is plastic laminate, available in many attractive colors and designs. At this point, place strips of wood or dowels over the countertop roughly 1 foot apart. Home & Garden RONA Scarborough Golden Mile FREE SHIPPING ON SELECT PRODUCTS AND QUANTITIES. Pull out the dowel rod on one end of the countertop allowing the laminate sheet to come in contact with the countertop. Cut the laminate material with the reverse side up, using a circular saw or jigsaw with a fine-toothed blade. Call (321) 300-4854. Another note on edge strips: Dont break the edge strip at a curve. However, what if you dont have corners? From contemporary patterns to styles that mimic popular stone looks, laminate is durable, affordable, and you can install it yourself. A spin mop is an effective cleaning tool with a round and absorbent head thats wrung out using a spinning mechanism. There's a sequence to the way you laminate any counter in order to hide visible edges. With a wet finger, smooth any caulk that oozes out.
Two years and more than 500 articles later, she's enjoying her freelance writing experience for online resources such as Work.com and other online information sites. Wipe away the caulk that squeezes out at the seam with a wet finger to create a smooth seal between the two pieces of laminate. Mark out the side strips2 inches wide and an inch longer than the sidesfrom the remaining pieces.
Use the lumber as a guide for the router bit. For the most part, edge strips install in much the same way as the surface sheeting. Working from one end to the other, stick the laminate to the substrate, smoothing it as you go. Using a caulk gun, run a bead of clear caulk along the bottom part of the face of the backsplash. "Because once it's stuck, it's stuck." You'll need to double up at the edges to create a 1-inch face and raise the counter higher. Please sign in to your account to take advantage of youronlinediscounts. Apply contact cement to the front and side edges of the countertop.
Starting with the proper substrate creates a good foundation for the countertop.
If using a utility knife, also use a straightedge to guide the knife for a smooth and even cut. Copyright 1995-2022 eBay Inc. All Rights Reserved. Because we'd like to fold the laundry without having the delicates drop off the dryer into the dust bunnies, and we sure could use a place to lay out the parts of those "some assembly required" projects. Space the rods 12 inches apart. Seller assumes all responsibility for this listing.
Scarborough, Ontario, M1L 2G9 Measure the length and width of the countertop. Next, measure the dimensions of the countertop and sketch a diagram of the countertop shape that youre going to have to cut out of the sheet laminate. Unfortunately, it doesn't come any thicker than 34 inch, which isn't enough for a countertop. If you will be connecting two countertop sections, size and arrange the strips on one piece to extend beyond the end of the sheet and fit under the adjacent piece (see overview). These blades cut on the upstroke, and cutting from the back will help prevent chipping. Roll over the counter with the J-roller, using firm strokes.
Particleboard has a uniform, clear surface perfect for accepting the contact cement and leaving a smooth finish.
Using the trim router, cut off the excess around the perimeter.
Granted, youll need to set up both outfeed and lateral supports to work with the big 4-by-8 sheets, but I found this to be a great way to make accurate cuts. Roll any excess onto the substrate. Now, let me emphasize that you should NEVER cut anything else with the blade on backwards other than sheet laminate. Dry-fit the countertop pieces. new Youll go back later with a router and trim the edges flush with the counter.
Cut 4-inch strips of particleboard to line the underside of each edge. Press the laminate firmly with several passes of a J-roller; be careful not to roll over the edge, which could snap the laminate. Ideally you can stop the edge strip at a corner and begin the second strip on the other side. You can then go back with a router, fitted with a flush trim bit, and trim away the excess laminate overhang flush with the edge of the counter.
Thanks to technological advancements, the world of inexpensive flooring has expanded, giving homeowners and DIYers lots of options. Even when cut to size, the material is still slightly larger than the countertop surface and difficult to maneuver without some assistance. Touch up uneven edges with a file or sander, keeping it flat on top of the particleboard and pushing away from the laminate. Then check out our high-pressure laminate sheets. Yes, it's a messy job.
But I was told of this trick by a professional cabinet maker, and thought Id give it a shot. Add 1 inch to the length and width of the counter and mark these dimensions on the face. Well take a look and remove the review if it doesnt follow our guidelines. As you sketch your designs, the sheet cutouts should roughly mirror the shape of the final countertop, but add a few extra inches so the sheet edges will overhang the edges of the countertop. Set the strips in place along the countertop edges with the top of the strip even with the countertop. If youre installing over existing laminate, the old countertop surface should be thoroughly sanded and cleaned to remove all debris and contaminants. Well DIY solid surface countertops can be an extremely affordable and elegant option with material from SolidSurface.com. amzn_assoc_region = "US";
bvseo-msg: The resource to the URL or file is currently unavailable..
Take one countertop at a time and sketch its shape.
2022 Extreme How-To. Make sure the edges are perfectly flush. By submitting your email, you agree to our.
Put a narrow strip of wax paper down along the edge of the larger piece. Ontario, M1L 2G9, Monday - Sunday:8:30AM - 7:00PM (EasternTime), Contact Us | Find a store | FAQ | Returns and Orders, OrderItemMove?updatePrices=0&calculationUsageId=-1&calculationUsageId=-3&calculationUsageId=-4&createIfEmpty=1&deleteIfEmpty=*&continue=1&toOrderId=.&fromOrderId=*&page=&URL=ProductDisplay%3FcatalogId%3D10051%26DM_PersistentCookieCreated%3Dtrue%26errorViewName%3DProductDisplayErrorView%26langId%3D-1%26productId%3D139359%26patternName%3DRonaProductURL%26storeId%3D10151&logonId*=&logonPassword*=&orderMoveURL*=&noOrderMoveURL*=&confirmUnsubscribe*=, ProductDisplay?catalogId=10051&DM_PersistentCookieCreated=true&errorViewName=ProductDisplayErrorView&langId=-1&productId=139359&patternName=RonaProductURL&storeId=10151&logonId*=&logonPassword*=&orderMoveURL*=&noOrderMoveURL*=&confirmUnsubscribe*=.
Tape the second piece to hold it in place. Use wood strips to keep the second piece away from the cemented surface of the counter. Continue working your way along the entire length of the countertop until the laminate is in place. Laminate is inexpensive, comes in hundreds of designs, and makes a convenient work surface. Drive 1-inch screws through the extended strips to fasten the two sections together. Clamp the sheet to a straight length of lumber at each mark. 2022 Copyright Pro Cabinet Supply. This item is not currently available for immediate purchase, but can be ordered by visiting the selected store. Line the marks up with the edge of the lumber. 768 Warden Avenue
You can also cut plastic laminate with a circular saw, jig saw or table saw with a fine-tooth blade. Trace the dimensions for the countertop onto the back of the laminate piece. Keep the bit free of adhesive by occasionally unplugging the router and soaking the bit in water. Dry-fit the countertop sections before laminating them, and make sure pieces fit tightly. Coat the back of edge strips with contact cement. Whether you are a tradesperson, contractor, or crafty weekend warrior, you can count on Pro Cabinet Supply for only the best quality cabinet building products. For instance, do you need a cabinet liner that provides lasting durability? Do not rush the router; let the tool do the work. Do not double up the wood. Sand the seam with 100-grit paper to correct any mismatches.
In this review, the This Old House Reviews Team outlines the five best spin mops on Amazon and details our experience using each product during our in-depth testing process. Sold by: But with these tips, youll be able to trade those funky, pungent odors for fresh air. The side edges go on first, then the front edge, and finally the top. Need Help? Okay, people, give us a little room to work here. Matching laminate edges is very difficult, which is also why you should plan for as few seams as possible; if they are necessary (as with an L-shaped surface, like the one shown here), your best bet is to laminate two pieces separately, then join them. Something went wrong. Use the roller to apply pressure to the sheet so the glue will have a strong bond and no air pockets. Place the laminate face side down on a work surface. You build the substrate, cut out the laminate, and paste the two together with contact cement. With that kind of setup, we'd really be able to spread out and get something done. amzn_assoc_marketplace = "amazon"; Immediately roll the surface with a J-roller to work out air pockets. We will notify you on events like Low stock, Restock, Price drop or general reminders so that you dont miss the deal, translation missing: en.general.pagination.previous, translation missing: en.general.pagination.next, Wilsonart Walnut Heights 7965K Laminate Sheet, Wilsonart Skyline Walnut 7964K Laminate Sheet, Wilsonart Pinnacle Walnut 7992 Laminate Sheet, Wilsonart Colombian Walnut 7943K Laminate Sheet, Wilsonart Uptown Walnut 7971K Laminate Sheet, Wilsonart Florence Walnut 7993 Laminate Sheet, Arborite Blonde Modern Cherry W464 Laminate Sheet, Formica Macchiato Walnut 6932 Laminate Sheet, Wilsonart Montana Walnut 7110K Laminate Sheet, Wilsonart Brighton Walnut 7922K Laminate Sheet, Arborite Mocha Modern Cherry W465 Laminate Sheet, Walnut Grove WW050 Laminate Sheet, Woodgrains - Pionite, translation missing: en.general.pagination.current_page. Discover the "Well made here" Canada made products. Phone: (416) 751-7556. TOH Tip: Don't let the router linger in one spot or it can burn the laminate.
So I bought three new 4-by-8-foot sheets of laminate and went to work. Always cut laminate good side facing up. Orders over $200 receive automatic free shipping. Laminate countertops (often called Formica, although that is actually the name of only one manufacturer) come in just about every color and pattern imaginable. Laminate this piece, adhering first the short sides, then the wide face, and finally the top.
Using a chip brush, apply contact cement to the back of the laminate strips for the counter's short sides and onto the substrate sides. Need to speak to us? And I was pleased to find that this method works like a charm.
Each piece of laminate should be cut larger than the surface and trimmed flush with a small router and a file before the next piece goes on, ensuring a tight seam at all corners. But when the dust (and fiberglass) settles, you'll enjoy a fatter bank account and more comfortable indoor temps year-round. They should be long enough to extend beyond the edge of the counter so you can grab the end and pull them out later. 8 x 4 ft. Red Laminate Countertop Sheet FORMICA Matte Finish Counter Table Top, Verified purchase: This special bit treats the underlying particleboard as a template, so you can zoom your Rotozip around the sink cutout and quickly cut the laminate to match. {"modules":["unloadOptimization","bandwidthDetection"],"unloadOptimization":{"browsers":{"Firefox":true,"Chrome":true}},"bandwidthDetection":{"url":"https://ir.ebaystatic.com/cr/v/c1/thirtysevens.jpg","maxViews":4,"imgSize":37,"expiry":300000,"timeout":250}}. With a Rotozip you can easily plunge the bit through the laminate surface (no pilot hole needed). Pasting the laminate to the particleboard is the trickiest part of building a counter. In this case you wont be using the wood strips. You have a couple of options for cutting laminate. Cut off excess overhang with a router and a flush trim bit, using the edge of the countertop as a guide. This makes it easier to see the line as you cut and it helps prevent the laminate from chipping and splintering.
In some cases your edge strip may not be long enough to cover the entire countertop edge, and youll have to join two edge strips. When your laminate countertops are looking worn, you can replace them without major construction using sheet laminate. Allow the contact cement on both parts to dry to the touch. Allow the contact cement to dry to the touch on both parts. You can then go along the edges with a half-round file to slightly bevel the transition between the countertop surface and the edge strips. Cut these strips with the keep piece off the lumber. Crystalline Dune laminate, about $3 per square foot, WilsonArt. Remove the counter. Using basic woodworking skills and tools, you too can install your own custom solid surface countertop, desktop, bathroom vanity, laundry prep areas, shower walls, or other surface of your choosing. Separating the two surfaces with dowels will give you the chance to line everything up before you adhere the parts. Its best to recruit some help when placing the laminateI did. I then added a simple tileboard backsplash with a small PVC trim strip at the bottom (for water resistance), and the countertop job was complete. How to Repair Separating Laminate Cupboards, Extreme How-To: Re-Laminating Countertops, Ace Hardware: Installing Plastic Laminate Countertops, The most important gardening tools you didn't know you needed, DIY Laminating Countertops Without Router. Laminate End Cap Kit - 1'' x 7'' - 5'' x 28" - Arctic Snow, Belanger Laminates Countertop End Cap Kit - Silver Quartz - 7 1/2-in W x 28-in L, Belanger Laminates Countertop End Cap Kit - Laminate - Basalt Slate - 1/2-in W x 28-in L, End Cap Kit - 1'' x 7'' 5'' x 28" - Atlantis Granite, Belanger Laminates Countertop End Cap Kit - Laminate - Walnut - 1-in D x 7 1/2-in H x 28-in W, Belanger Laminates Moulded Countertop End Cap Kit - Laminate - Weathered Cement - 1-in D x 7 1/2-in H x 28-in L, Belanger Laminates End Cap Kit - Gray Laminate, Belanger Laminates End Cap Kit - White Laminate - 122-in x 1.13-in, Belanger Laminates Terrazzo Laminate End Cap Kit, Belanger Laminates Countertop Finishing Material - Snow - Pre-Glued - 30-in L x 5 1/2-in W, Belanger Laminates End Cap Kit - Brown Laminate, Belanger Laminates Countertop Sheet - Pre-Glued - Silver Quartz - 30-in L x 5 1/2-in W, Belanger Laminates Countertop Finishing Material - Basalt Slate - Pre-Glued - 30-in L x 5 1/2-in W, Blanger Laminates Laminate Countertop Miter Bolt Kit. How to Install an Electrical Receptacle on a Kitchen Island.
Use the wall as one of the long straight edges of the laminate sheet rather than the front edge of the countertop.
Sometimes the counter will be too large and you have to join two sheets. Laminate sheeting is flexible and a bit tricky to set, so you might want to ask a couple of your friends to help with the project especially when you are working with a long countertop. Then create an even bevel with a file. This 30" laminate piece features a pre-glued design for hassle-free installation, and it can be cut to size to suit your project. Then brush a layer of contact cement on the back side of the laminate cutout for the counter. Pour more contact cement onto the substrate and, using the roller, spread it out until it is fully covered.
All Rights Reserved.
Allow the glue to dry tacky, then install the edge strip, roll it in with the J-roller, and use clamps to hold the strip firmly in place while it dries. Products shown as available are normally stocked but inventory levels cannot be guaranteed, For screen reader problems with this website, please call 1-800-430-3376 or text 38698 (standard carrier rates apply to texts), 4 ft. x 8 ft. Laminate Sheet in Brite White with Matte Finish, 4 ft. x 8 ft. Laminate Sheet in Black with Matte Finish, 5 ft. x 12 ft. Laminate Sheet in 180fx Calacatta Marble with SatinTouch Finish, 4 ft. x 8 ft. Laminate Sheet in Markerboard White with Gloss Finish, 5 ft. x 12 ft. Laminate Sheet in RE-COVER Antique Cognac Pine with Virtual Design Matte Finish, 5 ft. x 12 ft. Laminate Sheet in Antique Cognac Pine with Virtual Design Matte Finish, 5 ft. x 12 ft. Laminate Sheet in White Ice Granite with Matte Finish, 4 ft. x 8 ft. Laminate Sheet in Calcutta Marble with Premium Textured Gloss Finish, 5 ft. x 12 ft. Laminate Sheet in 180fx Dolce Vita with Etchings Finish, 5 ft. x 12 ft. Laminate Sheet in 180fx Calacatta Marble with Etchings Finish, 5 ft. x 12 ft. Laminate Sheet in Argento Romano with Matte Finish, 5 ft. x 10 ft. Laminate Sheet in RE-COVER Bainbrook Grey with HD Glaze Finish.
Curves should happen in the middle of the edge strips.
Get FREE EXPRESS DELIVERY on Patio Sets Furniture, BBQs, Outdoor Fireplaces and Patio Heaters.
The rip guide of the table saw helps to control a straight cut, and although the cutting process takes longer with the blade on backwards, the cut was perfect. Starting at one end of the sheet, remove the first wood strip or dowel and use a J-roller to press the new sheet down onto the counter, bonding the two pieces together. Heres how to do it. Brown holds a master's degree in history education from Truman State University. Coat the back of the laminate sheet with contact cement as well. If you get contact cement on the laminate, you can remove it with fingernail polish remover. Wading in the water in a backyard meant having a massive swimming pool or settling for a scant hot tub. This wont always be the case with an installation. For this particular project I had to remove a sink, install the laminate and then make a cutout in the new laminate to replace the sink. These help you manage the laminate as you set it in place. When joining two strips, break the strips at a long, flat area of the edging, rather than at a curve. The products included in this article are available at various home improvement stores and online retailers like Amazon. After the old countertop has been prepped (sanded, cleaned, dried), brush contact cement onto the countertop surface. 768 Warden Avenue, We also make our high-pressure laminate sheets for kitchens and countertops in a variety of colors to match any existing dcor and color themes. Apply a smooth, even layer covering the entire surface. Project the cutline inch past the edge (to account for the router bit's width).
You can use a jigsaw with a fine-tooth blade for the cutout, but I used a Rotozip with a Tracing Bit. amzn_assoc_title = "My Amazon Picks"; Considered one of the most durable decorative surface materials, these sheets are made to withstand everyday use, making them perfect for cabinetry. Run a bead of caulk along the tops of the cabinets and on the sides of the counter where the two pieces will meet. With bits that use a guide wheel, carefully set the guide so the bit cuts only the edge of the laminate but not the adjoining countertop surface.
Allow the contact cement to set for the period of time recommended by the manufacturer before proceeding. miamibeachdeals. To make a backsplash, cut a piece of particleboard 5inches wide and as long as the counter.
amzn_assoc_ad_type = "smart"; All rights reserved. | Scarborough,
Using the router turned on its side, cut off the overhanging edges of laminate, running the bit counterclockwise around the edges. Skunk spray is one of the most recognizable and difficult smells to remove from homes, pets, and outdoor areas. Remove all dust with a shop vacuum. This project did not require me to seam the laminate because each of the three countertops fit within the footprint of the 4-by-8-foot sheets. Everyday essentials at everyday low prices.
First lay down the piece with the extended strips, then fit the second piece on top.
amzn_assoc_asins = "B07YF9SGBW,B01GJAQG2U,B01GJAGUZI,B01GJAKJFK"; Sign up for the monthly EHT Newsletter including DIY tips, industry updates, trends, and more, The Oak 70.XTRA is an adjustable premier series spiral staircase that features solid Oak wooden stair treads and landing to complement and add style to any interior living space. Home & Garden RONA Scarborough Golden Mile View cart for details.
By the time you reach the end of the counter, the entire new laminate surface should be securely bonded. But plunge pools fill the middle ground, give a splash of fun, and offer relaxation in smaller yards. Once youre finished rough cutting the sheets to shape, immediately change the blade back around to its normal cutting direction. Veuillez vous connecter votre compte afin de profiter de vosrabaisenligne.
Working out from the center, continue removing scraps and pressing the sheet into place, until the whole sheet is adhered. Flip the laminate so that it is adhesive-side down, and rest the sheet on top of the scraps without allowing it to touch the substrate. Wait 15 minutes, then coat the sides again. amzn_assoc_linkid = "f241ea408433338aa7a27b1825552a73"; Copyright 2022 This Old House Ventures, LLC.
Once the edge strips are securely bonded, just remove the clamps and trim in the edges with a router and flush trim bit.
One note: the Rotozip is too aggressive for trimming the edges flush, so stick with a router for that chore. Let the contact cement become tacky. Align the laminate's edges with the edges of the substrate, allowing -inch overhang on all sides.
When using a power circ saw or jigsaw, cut from the back side of the laminate. Condition: With your plan sketched out, transfer those dimensions to the sheet laminate, marking the appropriate cutlines on the material.
- Potato Chips Delivered To Your Door
- Classic Pearl Necklace
- Josie Maran 100 Percent Pure Argan Oil Light
- Gaylord Texan Resort Images
- Panasonic Toughbook Cf-54 Battery
- 12 Inch Clay Pots Walmart
- Remote For Kasa Smart Plug
- Ikal Tulum Plunge Pool Mayan Suite
- Hatch Embroidery Black Friday Sale
- Satin Lined Head Wraps Black-owned
- One Day Cruise From Athens To 3 Islands
- Best Exfoliator For Ingrown Hairs On Legs Uk
- Stihl Fs-km Brushcutter Blade
- Toilet Brush And Plunger Set Costco
- Used Sheet Metal Brake