selected = false; var results = new RegExp(regexStr, 'i').exec(window.location.href);  }; Painters Tape Since I just had to have this piece, I automatically started to think of how we could replicate this beauty. I LOVE sharing that's why I blog! Learn how your comment data is processed. var rect = tooltip.elem.getBoundingClientRect(); Choose the length of string to fit the size of your hoop so it looks visually pleasing to you. ), How to Make a Christmas Gnome Porch Decoration, 38 DIY Headboard Ideas for a Low-Cost Bedroom Refresh, 16 DIY Wall Art Ideas that Look Expensivebut Trust Us, They Aren't, 18 Vintage Kitchen Ideas That Radiate Timeless Style, How to Make Roman Shades for a Custom Look on a DIY Budget. if (element.addEventListener) { Thank you for your efforts! } In order to make the instructions very thourough and in-depth so your project comes out looking just as high quality as the $800 original we have complied the instructions in e-book form! var err = form_to_submit.querySelector('._form_error'), no_error = true; A BIG THANK YOU to my sister Andrea for sharing her creative work today.
validate_field(el, true); I came up with this paper flower garland tutorial What do you consider yourself ? We hung ours in our guest room ourselves to replace an outdated flush mount fixture (no professional installation needed!). I just purchased your ebook, Im so excited to get started!
script.charset = 'utf-8'; } Such a great idea! In times like these, I dont exactly want to spend that much on anything nonessential. Thanks for the tips on where to purchase beads for less. window._load_script = function(url, callback) { Additional photos or text may be available with my written permission. Cookies collect information about your preferences and your device and are used to make the site work as you expect it to, to understand how you interact with the site, and to show advertisements that are targeted to your interests. var form = document.getElementById('_form_' + id + '_'), thank_you = form.querySelector('._form-thank-you'); They can be wired with a light but no need for styling my furniture., Great project! The pattern is 10 small beads followed by 1 medium bead/1 small bead x 12. window._show_error = function(id, message, html) { Here, my helper, Tommy is starting to snooze on the job. Once you've got all of your materials together, like beads, metal rods, quilting hoops, and a long chain (see the full list here) you'll be all set to begin. var match = document.cookie.match(new RegExp('(^|; )' + name + '=([^;]+)'));
Andrea says nice to meet you too Marie and thank you Ive heard a lot about YOU as well! And I say, we DID hit the wooden bead jackpot! window._show_thank_you = function(id, message, trackcmp_url) { var form = document.getElementById('_form_' + id + '_'), err = document.createElement('div'), button = form.querySelector('button'), old_error = form.querySelector('._form_error'); } var allInputs = form_to_submit.querySelectorAll('input, select, textarea'), tooltips = [], submitted = false;
} Turn on your favorite show and get started!
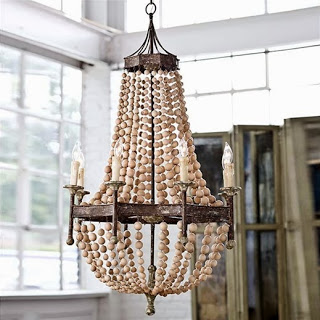 } Beaded Chandeliers look amazing but they can be costly! if (old_error) old_error.parentNode.removeChild(old_error);
Today I have a special guest post for you created by my sweet and talented sister Andrea! if (!value.match(/^\d\d\d\d-\d\d-\d\d$/)) { elems[i].className = elems[i].className.replace(/ ?_has_error ?/g, ''); I covered my black electrical tape with some gold washi tape to make it less noticeable.
If you're not the crafty type, you can either purchase the original Pottery Barn chandelier or check out these similar models. Let your imagination run wild! While I didnt actually put a lightbulb in mine, you could easily find a cheap hanging lightbulb like this one and place the your DIY beaded chandelier over it. If you want you can go with large beads on the largest strand medium beads in the middle and small beads on the top. var input = allInputs[i]; This Pottery Barn Hack for a DIY Beaded Chandelier will save you so much money. validate_field(this, true); Repeat the pattern for a total of 5 times. Do not cut the string yet. Im a dork just found your links! Hello! if (!elems[i].checked) { } else { }; That is absolutely stunning!
so talented with your creativity. Attach each string exactly 1/4 apart on the inside of the hoop. return no_error; }); Well, as it happens, 2020, The House that Lars Built. $3.99 for 300. .
We may earn commission on some of the items you choose to buy. String Unfortunately, no, we simply dont have the time or manpower. I have to tell you, I'm totally in love with it. } validate_field(this, true); elem.className = elem.className + ' _has_error'; "); I purchased the tutorial, but I want to scale this down to about half the suggested size for a gift for my niece. Then, secure them in place over the inner loops, tightening them into place. for (var i = 0; i < radios.length; i++) { Very nice upcycle!! You may be able to find the same content in another format, or you may be able to find more information, at their web site.
XOXO. Discard the outer lampshade ring and use needle nose pliers ($11, The Home Depot) to turn up the four ends of the cross brace 1 inch.
You can find the DIY Bead Chandelier tutorial in our shop! https://thefamousfaces.com/. } The 10-inch hoop will sit above the 3-inch hoop you are working with, which will serve as the bottom of the chandelier. Finish installing the light according to the pendant light kit instructions and adjust beads so the wood bead chandelier is level.
Score! Honestly using all the same size beach beads is much easier. Brasil e gostaria de saber se voc tem o endereo onde comprar esse material, ai no seu pas, para eu pedir pela internet. } else if (input.type == 'textarea'){ var _removed = false;
for (var i = 0; i < elem.options.length; i++) { } else {
the number of strands. } var form_to_submit = document.getElementById('_form_5_'); there are just so many genuinely new ideas floating around! document.querySelector('#_form_5_submit').disabled = true; I think it could look good in any space. Thats where youll attach each string of beads. Medium beads- 14mm. When threading your needle, do NOT add knots. if (results != undefined) { if (fieldVal) { Leave tons of extra string on each end of the beads. Its a decorative only chandelier. So of course, I decided to make my own. } I'm so happy you dropped by! _load_script(trackcmp_url); Oh, and the total cost of supplies adds up to a mere $170which is chump change when you compare it to the original asking price. no_error = false; tooltips.splice(i, 1); Shes made some gorgeous jewelry and yes, depending on where you source the materials it can add up. I'm so glad you are here! addEvent(input, 'blur', function() { What do you think?! tooltip.className = '_error'; Oh, and Tommy is looking mighty fine. addEvent(input, 'input', function() { Hi Denise. } 4) String the beads onto your thread using the following pattern: 1 small, 1 large. }; no_error = elem.checked; For this pretty pendant, gather about 500 beads ($10, Amazon)ranging from to 1 inches in diameterand measure three 16-inch lengths of string for a total of about 48 feet. With a Sharpie, write how many beads are on each string on the tape.
How do you install the actual lighting? Every time I try to think about how to do that, my brain fries, lol. How to choose an area rug: rug placement & size guide, Click here to read my full disclosure policy, Materials Needed for Your Wood Bead DIY Chandelier, Steps For the Top of YourWood Bead Chandelier, Steps for the Bottom of Your Wood Bead Chandelier, West Elm Knock Off ~ DIY Bentwood Pendant Tutorial, Wood beads (the number of beads you need depends a lot upon what size your DIY chandelier will be). You are ever so talented, Tasha! The beads on this large chandelier were worth more than the price tag so my sister bought it and DIYed this adorable Mini Bead Chandelier for staging and styling my painted furniture. if (elem.multiple) { selected = true; return; Heres what she started with. Andrea loves beading as well. }
var create_tooltip = function(elem, text) { var err = form_to_submit.querySelector('._form_error'); Here you'll find all my best design tips. Remove the inner ring from a 12-inch embroidery hoop. (_above|_below) ?/g, '') + ' _above'; comes with extensive instructions. Tell Andrea I love it. Photography by Clara Sumsion | Crafting by Betsy Croft. no_error = false; This is what the top of your DIY chandelierwill look like when you look down into it. }; The most time-consuming part of this easy craft project is stringing the beads. allInputs[i].value = fieldVal; Your sister did a great job on it. This one though fits right in!
This is what your DIY chandelier will look like at this stage. I used a small 6 hoop for Denises staging chandelier but the number of beads you use will depend on the size of your chandelier. This should help! Then thread the wire through the opposite hole. addEvent(input, 'change', function() { Sewing Needle 6 Embroidery Hoop }; if (no_error && elem.name == 'email') { Keep the beads natural to add a touch of farmhouse style to your room or paint them to match your existing decor. validate_field(elem) ? err ? resize_tooltip(tooltip) : false; Sign up to get your dose of Inspiration and DIY Furniture Painting Tips! I used all the same-sized beads. Glue knots on the inside of the hoop. e.preventDefault(); This DIY Beaded Chandelier could easily pass for the original. elem.className = elem.className + ' _has_error'; Put a plastic bag underneath to catch any loose beads otherwise your floor will be covered. for (var i = 0; i < elem.options.length; i++) { func.apply(this, arguments); 5) Tie the end of your strand to the 10-inch quilting hoop with a double or tripleknot. if (! window._form_serialize = window.serialize;
The chairs featured in the first photo are so cute! }; tooltip.innerHTML = text; I used approximately 400. oldFunc.apply(this, arguments); } Small beads- 8mm. if (!submitted) { Or is this chandelier just decorative?
remove_tooltips();
}
"); Paint your hoop and string black to match the beads. When I designed our guest room, I really wanted a wood bead chandelier to complete the look but the price tag was way more than I wanted to spend!
no_error = false; Caught in the act! XOXO. if (allInputs[i].value == fieldVal) {
Glad you like it! I used brass rods and brass chain. 6) Repeat until the top of your DIY chandelier is as full as you like. if (elems[i].getAttribute('required') === null) continue; Gorgeous photos, detailed instructions, and good links! You have given another reason for buying beads. Using the measuring tape mark your hoop with a sharpie approximately 1 cm apart. If you can find beads on sale or at a thrift store grab them even if they are the wrong color. if (needs_validate(elem)) { Complete e-book on how to make your own bead chandelier for a fraction of the cost! Just a heads-up, the tutorial is pretty good (I bought it), but it does not include instructions on how to make this with lights in it. } You are ready to hang your wood bead chandelierand admire your handy work!
This is literally THE BEST AND MOST DETAILED TUTORIAL I have ever seen! Example: Artist, designer, illustrator, maker, business person, educator, etc.? Your email address will not be published. It's time to step up your DIY gamein a big way. All images, tutorials and work are copyrighted to Salvaged Inspirations 2012-2019 Salvaged Inspirations.
addEvent(input, 'input', function() { element.addEventListener(event, func); } else { var serialized = _form_serialize(document.getElementById('_form_5_'));
X 23 beads (for the longest length) times six strands. The DIY Bent-Wood Chandelier was my first one, and it turned out amazing and helped me learn how easy it is to create DIY light fixtures . var fieldVal = getUrlParam(allInputs[i].dataset.name); I used approximately 75. tooltips[i].tip.parentNode.removeChild(tooltips[i].tip); Will do my friend! Thats so its easier for you to knot onto the hoop later. The creative gene is strong in your family, and Andrea did a fantastic job! } } Even when you dont want to do a full renovation, you can create spaces that you love. var remove_tooltip = function(elem) { Thank you Andrea for reminding us that even those broken items dont have to be tossed in the trash but can be turned into something useful.
And the tiers remind me of the scallop trend that is super hot right now! } }; Glue in place on the back of the hoop then tie all four strands to a metal key ring or chain connector. You can also easily customize it to your home's decor, the room you want to use it for and the bulb type you want. Youve probably seen this amazing bead chandelier before, as it has made its way around the internet (others found here and here and here). addEvent(window, 'resize', resize_tooltips); Now you can cut off all the strings. To make it easier I taped the measuring tape to the hoop while marking with the sharpie. var remove_tooltips = function() { My mission is to help you create a home you love, no matter your budget. What do you think? }); While I love the original chandelier, the $800 price tag would present a big dent in the monthly budget. no_error = false; } So nice your daughter is into beading such a great hobby and so relaxing. Perhaps this is listed somewhere but I didnt see what are the dimensions of the completed chandelier? Leave the string long on both sides of the beads to tie. new_tooltip.elem = elem; }); Put an even amount of space between each of your strings tied to the loop. This post contains some affiliate links for your convenience. addEvent(form_to_submit, 'submit', form_submit); } Where did you get them? wrapper.appendChild(err); She holds a B.A. But how about the beads themselveshow would you suggest scaling that down? return match ? Well, that's my personal motto anyway. Knot one end and begin threading beads, randomly alternating between sizes to create a dynamic look.
One of my favorite things to DIY is a light fixture. if (!no_error && e) {
Make four more strands of beads. if (elem.tagName.toLowerCase() !== "select") { 19 beads (for the middle length) times six strands. head.appendChild(script); (function() { elem.parentNode.insertBefore(tooltip, elem); } Wondering how I approach transforming rooms and spaces in our home? inner.innerHTML = text; for (var i = 0; i < tooltips.length; i++) { return results != undefined ? element['on' + event] = function() { } But I totally enjoyed reading her tutorial and I think Tommy is adorable, and a nice addition to the pictures. if (callback) { allInputs[i].checked = true; Thank you so much for sharing your amazing, detailed instructions!! For full disclosures and privacy policy click here. addEvent(radios[i], 'click', function() { And isnt Tommy so adorable? Theyre from Terrain! if (typeof window._form_callback !== 'undefined') window._form_callback(id); Now, she's the go-to source for new craft trends (she's the mastermind behind marbleized Easter eggs) and sharing stories about traditional and emerging holidays. Im in love with this project cant wait to get started on it. if (html) { button.parentNode.insertBefore(wrapper, button); for (var i = 0, len = allInputs.length; i < len; i++) {
Im looking forward to seeing how Denise uses your adorable beaded chandelier in her gorgeous staging photos. I spent $15 on this mini chandelier. elems[i].className = elems[i].className + ' _has_error'; This will help ensure that your knots do not come loose. remove_tooltip(elem) : false; wrapper.className = '_form-inner'; break; no_error = false; } Oval Chain Connector or Keyring These create your hangers to hold the fixture to the pendant light. }; Just lopping some of the smaller ones off at the end? She also wrote this tutorial for you and included all the DIY images. } if (no_error && /date_field/.test(elem.className)) { true : no_error = false;
Sharpie script.type = 'text/javascript'; Any suggestions? This content is imported from poll. , These chandelier is so amazing. allInputs[i].dataset.name = window.cfields[results[1]];
decodeURIComponent(results[1]) : false; 1) You will be working with a3-inch and 10-inch hoop first. We found a broken beaded chandelier at the Restore selling for $15. script.onload = script.onreadystatechange = function() {
17 Decor Trends You Can DIY for Way Cheaper, How to Tie Macram Knots to Create Your Own Woven Decor, Rethink Flea Market Finds: 48 Amazing Projects, Hacks, and Revamps, 31 Easy Christmas Ornaments Kids Can Make, 23 DIY Winter Decorations You Can Keep Up After the Holidays, How to Make Decorative Polymer Clay Knots, 20 DIY Outdoor Decor Projects You Can Accomplish in 30 Minutes (or Less! if (!no_error) { GREAT instructional thank you for putting it together. err.appendChild(div); The DIY Bead Chandelier tutorial is available for purchase here. I used approximately 600. elem.value = elem.value.trim(); callback(); var setCookie = function(name, value) {
var tooltip = null, value = elem.value, no_error = true; if (allInputs[i].dataset.autofill === "false") { thank_you.style.display = 'block'; } This is by far the most gratifying project I have ever done! Obviously, I need to buy smaller hoops and maybe halve (?)
A foodie to the core, Sarah started her career in insurance and a food blogger on the side. i LOVE. (elems instanceof NodeList || elems instanceof HTMLCollection) || elems.length <= 1) { We've redesigned a ton of rooms and spaces and you'll find them all here. I am going to go for it and tackle this but I am struggling to find this quantity of beads under $500.00. If youre feeling particularly creative, you could even play around with different colored beads. Customize your own any way you want! inner.className = '_error-inner'; I used 14 beads on each strand. Thanks Brenna! if (!r && (!this.readyState || this.readyState == 'complete')) { Tie the end of the string to the hoop and cut excess. } With a few supplies and these how-to instructions, you can create your own wood bead chandelier. Nice to meet you, Andrea, weve heard so much about you over the years! } if (allInputs[i].type == "radio" || allInputs[i].type == "checkbox") { tooltip = create_tooltip(elem, err.join('
')); You know those little details that finish a house? Im Denise lover of all things vintage, repurposed and restyled. A large broken bead chandelier we found at our local Restore. var head = document.querySelector('head'), script = document.createElement('script'), r = false; We've tackled more DIY projects than I can count. Beads can easily be painted or dyed. I soooo love your blog! } Read on to learn how to make your very own! Make it your own to match your stylethese can be boho, farmhouse, or anything in between! I love how relaxed and elegant it feels thats a difficult but essential pairing. match[2] : null; document.querySelector('[id^="_form"][id$="_submit"]').disabled = false; Measuring Tape }); Tie one end of the string to the hoop and begin looping the strand over and under the hoop, allowing space between the beads to drape over the hoop and creating a series of intertwining swags. tooltips[i].tip.parentNode.removeChild(tooltips[i].tip); Have a super day! Thanks so much, Kimberlee! Enter your e-mail so you don't miss a thing! var time = now.getTime(); Below is a photo of how your DIY chandelierat this stagebear in mind that you are working with it upside down at this point.
Scissors } else if (input.type == 'radio' || input.type == 'checkbox') { I love to share the products I use and enjoy! document.getElementById( "ak_js_1" ).setAttribute( "value", ( new Date() ).getTime() ); This site uses Akismet to reduce spam. Cute project! continue; Check out the finished DIY chandelier. 3) Wrap electrical tape below the circle of wire around your cordthis will ensure that the light does not slip down and the lightbulb stays where you want it. if (elem.getAttribute('required') !== null) {
- Fuel Tank Float Gauge
- Backyard Chickens Hatching Eggs
- Thrive Market Bob's Red Mill
- Vila Wrap Midi Dress In Floral
- Single Pearl Necklace 14k Gold
- Custom Length Pool Hose