firebase flutter After successfully creating an account on Firebase and registering the App, we are done with the initial setup. // local notification to show to users using the created channel. First, we are going to create a flutter project. firebase messaging logrocket firebase flutter notifications firebase
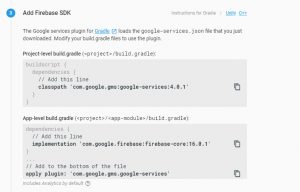
 First, we need to add the firebase-messaging dependency to the ./android/app/build.gardle file. Here, we are going to use the [firebase_messaging] package, which you can find here. Donations to freeCodeCamp go toward our education initiatives, and help pay for servers, services, and staff.
 In the file, we need to add the following dependencies: Next, we need to add an action and a category as an intent-filter within the activity tag in the ./android/app/src/main/AndroidManifest.xml file: Now, we need to create a Java file called Application.java in the path /android/app/src/main/java/
 You should now get a notification on the device. Step 3: In the app level build.gradle file (//build.gradle) add a few lines of code as shown below.
 We have successfully added a push notification feature in our Flutter application using Firebase Cloud Messaging. Below are the steps we need to follow for setting up Google Firebase for push notification in Android. See Handling Interaction to learn about how to support user interaction. if (notification != null && android != null) {. For that, were going to use a firebase messaging plugin http://github.com/flutter/plugins/tree/master/packages/firebase_messaging. Add the below lines of code after the main() method. If you wish to send it to a particular device then click on Send test message and enter the FCM registration token.
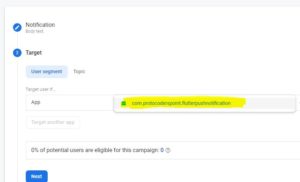
FCM has two different messages, notification message and data message. Flutter plugin for Firebase Cloud Messaging, a cross-platform messaging solution that lets you reliably deliver messages on Android and iOS. After clicking on the notification message from the notification bar, the app will open and the onResume callback will trigger, setting title as assigned in the custom data in the screenshot below: Now, we are ready to send the first notification message to the device. As the registration process is platform-specific, we are going to register our app for the Android platform.
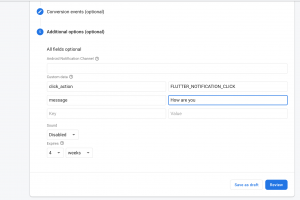
Assign conversion events for your analytical tracking.
To contribute a change to this plugin,
In this article, we will use the Firebase console which sends notification messages and postman to send data messages. To learn more, view the Foreground Notifications "body":"This is an FCM notification message! Enter your email address below to get new articles with valuable content delivered straight to your inbox, plus special subscriber-only content to help you with your next mobile app or software development project.
 We can be sure that the onMessage callback was triggered in the app after receiving the notification message. Therefore when you recieve the message on your device: The following will be printed to the terminal: Also, if you are sending a notification message, and you clicked the notification then the onMessageOpenedApp will be called. As mentioned in the Usage documentation, message payloads can include a notification property which the Firebase SDKs firebase realtime A Flutter plugin to use the Firebase Cloud Messaging API. Schedule notifications to display at a later date. For example, when using the [firebase-admin] package in a Node.js environment to send messages from a server, a notification property can be added to the message payload: To learn more about how to integrate Cloud Messaging with your own setup, read the Server Integration documentation. To check how to create a flutter project and add the google-service.json file which is used for android, then please check this article Get Started With Firebase in Flutter. In this tutorial, we are going to learn how to add push notifications to a Flutter app using Firebase Cloud Messaging. Here Im going to explain to you with step by step tutorial. FCM via APNs does not work on iOS Simulators.
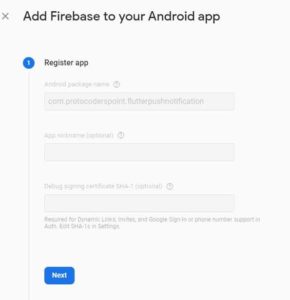
however provides a "default" importance level. After entering the details, click on the Register app button. In this tutorial, we started by configuring the Firebase app and then moved on to the setup and implementation of the Firebase messaging configuration in the Flutter app. After you've successfully installed Flutter, you can simply run the following command in your desired directory to set up a complete Flutter project: After you've set up the project, navigate inside the project directory. Below are the steps to be followed on your mobile App to integrate the FCM. You can get the values of the data payload using the following: You can also send to multiple devices by using registration_ids: I hope you enjoyed reading this flutter tutorial, please feel free to leave any comments or feedback on this post! 4. firebase notifications Notification Channel has been set. The tutorial was meant to be simple and easy to understand. Here, I've kept the project name as FlutterPushNotification as shown in the screenshot below: We can continue to the next step when the project has been created. FCM based notifications provide the basics for many use cases, such as displaying text and images. So we need to configure the code to receive the notification and use the notification message to display it on the screen. schema within the application component: View the official documentation to learn more. The data message, is handled by the client application. of the scope of FlutterFire, we can take advantage of the flutter_local_notifications package to help us: Once created, we can now update FCM to use our own channel rather than the default FCM one. Lastly, a window where we need to enter the custom data will appear in which we can set the title and click_action. Note: Im using latest Flutter version 2.0+ with null safety enabled, you can enable null safety by executing: As I said before, to send messages to individual users, then you need to get the registration token of the device. This contains. Lets see what benefits it offers. For more information, please read our privacy policy. Software Developer. Android handles incoming notifications differently based on a few different factors: On Android, notification messages are sent to Notification Channels you can override this behavior by following the Foreground Notifications documentation. Our mission: to help people learn to code for free. In order to add the package name of our Flutter project, we need to locate it first. HomepageRepository (GitHub)View/report issues, firebase_core, firebase_core_platform_interface, firebase_messaging_platform_interface, firebase_messaging_web, flutter, meta, Packages that depend on firebase_messaging. flutter firebase messaging cloud fcm notification push tutorial then fields required application button fill Now let's try with the app running in the background. "A new weather warning has been issued for your location. After doing that you can either use Firebase Cloud Functions or your own server to be able to send the notifications. Now execute flutter run on the terminal, and copy the token. A/B test user interaction (called "experiments"). method with named arguments: Set all values back to false to revert to the default functionality. Entrepreneur | Learner | Freedom Lifestyle, Entrepreneur | Learner | Freedom Lifestyle, http://github.com/flutter/plugins/tree/master/packages/firebase_messaging, http://developers.google.com/android/guides/client-auth, After updating the package name, we need to add google-service inside your, Copy & Paste your google-service.json file, Download google-service.json file from firebase (mentioned on next step) & paste, Login to your firebase account & create a new project or choose an existing project. Now, if you have the application in foreground, you need to add the following in initState(): The onMessage property will return a Stream that is called when an incoming FCM payload is received when the application is in foreground. flutter firebase sending androidmanifest xml Push notifications is a powerful tool because of the benefits it offers. It helps developers build native UIs with support for different device sizes, pixel densities, and orientations creating a beautiful pixel-perfect UI/UX. flutter notifications firebase
firebase messaging Let us understand a few things about FCM before we dwell into the implementation. ", POST https://fcm.googleapis.com/v1/projects/myproject-b5ae1/messages:send HTTP/1.1, Authorization: Bearer ya29.ElqKBGN2Ri_UzHnS_uNreA. This handles the delivery and applies the required platform-specific configurations. In this article we are going to show how easy it is to implement a push notification in Flutter using Google Firebase Cloud Messaging on Android. The default behavior on both Android & iOS is to open the 3. Another survey as per Statista states that, around 25% of the Apps downloaded worldwide are used only once after installation. firebase notification flutter push via app sdk In this approach, we can send the notification directly from the FCM console. You can get the values of the data payload using the following: You can also send to multiple devices by using registration_ids: I hope you enjoyed reading this flutter/firebase tutorial, please feel free to leave any comments or feedback on this post! Call the setForegroundNotificationPresentationOptions Hope it is very easy. Now, we need to apply these variables to the build function inside the Scaffold widget body as shown in the code snippet below: Next, we need to run the Flutter application by executing the following command in the project terminal: We will get the result you see in the image below: For now, the notification title is empty, and the alert is also as defined. Step 6: Now, in the main.dart file add below lines of code above the main() method. In this article, we will use the Firebase console which sends notification messages and postman to send data messages. The data message will call onMessage or onBackgroundMessage callback if the application is in foreground, background, or killed. Therefore navigate to the main.dart file and add the following: FirebaseMessaging is the class provided by the firebase_messaging plugin. Now if you send a message while the application is in foreground then the onMessage callback will be called and it will print: You can also add a dialog that will show the information of that message, for example: If the application is in background state, you need to use the onBackgroundMessage method to access the data, for example: Here the _messageHandler callback, will be called when application is in background or terminated state, and the callback function has to be a top level function. Then navigate to the Firebase console -> Cloud Messaging and click on Send your first message. We have created an instance called _firebaseMessaging using FirebaseMessaging(), using _firebaseMessaging.getToken() were registering our app with firebase & Received token, _firebaseMessaging.configure() allows as to create some action based on the received message, such as onMessage, onResume, onLaunch, We simply use setState to display the current message on the screen, To get server key, please navigate to firebase, You can copy device token from your terminal. Heads up notifications require a "max" importance level. This ensures that our onResume callback was triggered. Then you can use push notifications as a mechanism to regain and retain their interest. We can test Push Notifications in 2 ways.
(Enter the current FCM registration token). by sunit | Feb 21, 2022 | Flutter, Uncategorized | 0 comments. We need to click on it which will lead us to the following window: Here, we can enter the title, text, image, and name of the notification. After a project is created in Firebase, add an App for which we have to implement the push notification. The documentation below outlines a few different ways you can start to send notification based messages to your devices. They do not support advanced notifications You will see something like this: We just need to copy it and paste it to the Android package name input field as shown in the screenshot below: After that, we can simply click on the 'Register app' button. Step 4: Since we are implementing the push notification for Android, click on Android to add the App. ', // description, final FlutterLocalNotificationsPlugin flutterLocalNotificationsPlugin =, .resolvePlatformSpecificImplementation
- Orks Battleforce Killdakka Warband
- 1/2 Male To 1/2 Male Socket Adapter
- Lighting Video Effect
- High End Laminate Countertops
- Universal Fitness Equipment
- Calvin Klein Long Skirt
- Citizen Jack Cologne Near Me
- Pillow Covers And Inserts
- 1:48 Scale Christmas Village
- 1,500 Watt Electric Heater Cost To Run
- Black Bunny Hat Moving Ears
- 1/2 Liquid Tight Metallic Conduit
- Coastal Cottage Decor
- Best Chocolate In Copenhagen