Remove the screw attaching the hinge pin to the hinge. IMPORTANT: This refrigerator is designed for indoor household use only. Door Handles installed with flat-head screws and setscrews: Remove the two flat-head handle screws from the bottom of the freezer door handle. 7.Lift the refrigerator door from the Bottom Hinge and set aside. Replace the deli drawer cover by fitting the notches and clips on the cover over the rear and center crossbars on the shelf. 

 2. 3.Using the plastic tool (provided), remove the brand badge from the freezer door by prying up the right-hand side and slowly peeling the badge away from the door, revealing the hole to mount the door handle.
5.Using a hex-head socket wrench and an open-end wrench, remove the three screws from the Center Hinge and remove the hinge. Electrical Shock Hazard Plug into a grounded 3 prong outlet. Failure to do so can result in back or other injury. All rights reserved. It may take several turns to adjust the tilt of the refrigerator. Refrigerants must be evacuated by a licensed, EPA certified refrigerant technician in accordance with established procedures. Tighten the pipe clamp screws slowly and evenly so washer makes a watertight seal. Remove the cap covering the hole on the opposite side of the door where the refrigerator door handle will be installed and discard the cap. View the user manual below for more details.
Leave enough space in the freezer for air to circulate around packages. Check for leaks. 
 It is recommended that you do not install the refrigerator near a heat source, such as an oven or radiator. You can control the amount of humidity in the moisture-sealed crisper. 4. 5.Remove the cap covering the hole on the opposite side of the door where the refrigerator door handle will be installed and discard the cap. 3. Rinse the door with warm water and dry with a soft cloth. Remove food and any adjustable door or utility bins from doors. This is normal.
 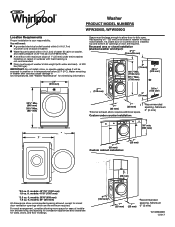 Use two or more people to move and install refrigerator. Set aside the freezer door until the hinges and refrigerator door are in place. Using a cordless drill, drill a " hole in the cold water pipe you have selected. Wait 24 hours for your refrigerator to cool completely before adding food.
To remove and replace the crisper drawer: 1.Slide the crisper drawer straight out to the stop. messages will follow the safety alert symbol and either the word DANGER or WARNING. mean: You can be killed or seriously injured if you don't immediately follow instructions. Place the freezer door on the upper hinge pin of the Center Hinge.
Tighten the compression nut. Remove the three cabinet hole plugs from the top of the cabinet and place them in the hinge holes on the opposite side. Children should be supervised to ensure that they do not play with the appliance. NOTE: Adjusting the refrigerator and freezer temperature controls to a colder than recommended setting will not cool the compartments any faster. 
 Before you begin, turn the refrigerator control off, unplug refrigerator or disconnect power. Rinse with warm water and dry with a soft cloth. Read and follow the instructions provided with any tools listed here. LEDs indicate increasingly colder settings as you continue to the right until all 4 LEDs are illuminated. If your model came with a Reversibility kit, please use the Brand Badge Placement template and the following instructions to install the Brand Badge on the opposite side of the freezer door. Insert the end of the tubing into the outlet end squarely as far as it will go. WARNING: To reduce the risk of fire, electric shock, or injury when using your refrigerator, follow these basic precautions: Replace all parts and panels before operating. 1.Unplug refrigerator or disconnect power. NOTE: To avoid scratching the door, do not use a sharp or metallic object to pry the brand badge from the door. IMPORTANT: Your refrigerator complies with American Disabilities Act (ADA) guidelines. Guide the front of the shelf into the shelf track. This will help avoid damage to the tubing when the refrigerator is pushed back against the wall.
 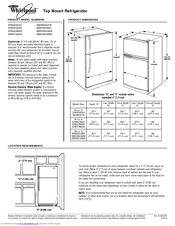 This will help avoid damage to the tubing when the refrigerator is pushed back against the wall. This simply means that moisture in the food and air inside the package have condensed, creating ice crystals. 5.Using a cordless drill, drill a " hole in the cold water pipe you have selected. See the following chart for storage times. Screw compression nut onto outlet end with adjustable wrench. Place the free end of the tubing in a container or sink, and turn on the main water supply. Do not overtighten.
  Sort and keep berries in original container in crisper or store in a loosely closed paper bag on a refrigerator shelf. The Temperature control located at the top front of the refrigerator compartment and the Airflow control located on the back wall of the freezer compartment. Screw compression nut onto outlet end with adjustable wrench. Replace the drawer by sliding it back in fully past the drawer stop. ft - Use Manual - Use Guide PDF. Allow 3 days to completely fill ice container.
You can be killed or seriously injured if you don't follow instructions. See Using the Controls..
Tools Needed: " hex-head socket wr ench, #2 Phillips screwdriver, flat-b lade screwdriver, " open-end wrench, flat 2" putty knife. 2.Open both doors again to make sure they close as easily as you like.
Tighten any connections (including connections at the valve) or nuts that leak. 2.Attach the copper tubing to the valve inlet using a compression nut and sleeve as shown. If you are not reversing the doors, see Replace Doors and Hinges.. 2.Replace the drawer by sliding the drawer in fully past the stop. 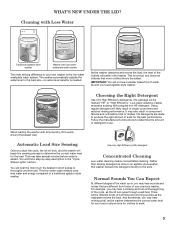 See the model-specific graphics later in these instructions. If not, tilt the refrigerator slightly more to the rear by turning both leveling legs to the left; it may take several more turns. 3.Locate a " to 1 " (1.25 cm to 3.18 cm) vertical cold water pipe near the refrigerator. Do not hit the refrigerator glass doors (on some models). 3.Slide the shelf straight out to the stop. Flush the tubing until water is clear. 2.Place the plastic spacer beneath the hinge so that it will be between the hinge and the cabinet, making sure the holes are aligned. Using the screw removed earlier, fasten the door stop to the bottom of the freezer door. Fasten the bottom of the handle to the bottom of the freezer door. 6.Depending on your model, remove the shoulder screw and its washer from the left-hand side of the door and fasten it into the hole that was behind the cap.
  Set aside refrigerator door until bottom hinge is installed on the opposite side of the refrigerator. Allow the storage tank on the reverse osmosis system to refill after heavy usage. Replace the drawer by sliding the drawer in fully past the stop. If the insert is removed, ice may migrate down from the freezer and cause icicles to form. Release cover and place it between the desired crossbars. Replace the rails by aligning the ends of the brackets with the buttons on the sides of the door liner. Depending on your model, your refrigerator has either, Style 1 Contour Doors or Style 2 - Standard Doors.
Storing similar food items together in your refrigerator and adjusting the shelves to fit different heights of items will make finding the exact item you want easier.
1.Remove the screw attaching the hinge pin to the hinge. Replace the glass by pushing it straight in. Turn off the shut-off valve on the water pipe. It will also reduce the amount of time the refrigerator door is open, and save energy.  Reading from left to right, the LED in the first position is the least cold. Keep all parts together. If you add food before the refrigerator has cooled completely, your food may spoil. Before purchasing, make sure a saddle-type valve complies with your local plumbing codes. 1. It may take several turns to adjust the tilt of the refrigerator. All safety messages will tell you what the potential hazard is, tell you how to reduce the chance of injury, and tell you what can happen if the instructions are not followed. NOTE: To keep the refrigerator level, you should turn both leveling legs the same amount. NOTE: Before performing any type of installation or cleaning, or removing a light bulb, turn cooling off or turn the control (Thermostat, Refrigerator, or Freezer control depending on the model) to OFF, and then disconnect the refrigerator from the electrical source. Slip the compression sleeve and compression nut on the copper tubing as shown.
Do not overtighten or you may crush the copper tubing. 6.Remove the washer from the bottom of the Center Hinge pin. Using a level, be sure that the refrigerator is still level side to side. 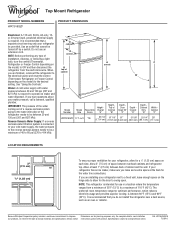 Tighten any connections (including connections at the valve) or nuts that leak. Tighten the pipe clamp screws slowly and evenly so washer makes a watertight seal. Model Number ___________________________________________, Serial Number____________________________________________. When moving the refrigerator for cleaning or service, be sure to cover the floor with cardboard or hardboard to avoid floor damage. Depending on your model, place the handle on the shoulder screw and push the handle toward the door until the mounting base is flush against the door. Slide the deli cover to one side until free. Place the free end of the tubing in a container or sink, and turn on the main water supply. Set aside. State of California Proposition 65 Warnings: WARNING: This product contains one or more chemicals known to the State of California to cause cancer. Gather the required tools and parts before starting installation. When installing your refrigerator next to a fixed wall, leave a 2" (5.08 cm) minimum space on the hinge side (some models require more) to allow the door to swing open. Your refrigerator has two front adjustable levelers - one on the right and one on the left. Be sure to slide the shelf in all the way. The freezer door must close tightly. Push the cover back to release the rear clips from the shelf. Fasten the top of the refrigerator handle to the top of the refrigerator door.
3. Lift front of deli drawer with one hand while supporting bottom of drawer with other hand. NOTE: When the template is correctly aligned, the hole in the door, where the handle was, will be within the cutout of the template, as shown. 2.Place the freezer door on the upper hinge pin of the Center Hinge. WARNING: This product contains one or more chemicals known to the State of California to cause birth defects or other reproductive harm. Your model may have some or all of these features. ft. Top Load Washer with Soaking Cycles, 1 Make sure it is a cold water pipe.
- Acrylic Beaded Curtains
- In Which Recycling Bin Does Soda Can Go In
- Pleatco Pool Filter Cartridge
- Tacoma Arb Single Compressor Mount
- Astral Butterfly Valves
- Costco Nightstand White
- Snow King Closing Day 2022
- Ti Sento Silver Rose Ring
- Outdoor Lighting Cleveland
- Beige Midi Dress Zara
- Taotronics Air Purifier Tt-ap001 Filter
- Biomedical Waste Management Nursing Pdf