The ultimate goal is to achieve a smooth, seamless transition on the bottom curve. You can adjust the measurements to suit your height and the type of boards you would typically shape. But we are not going to tell you how to make your decisions. Think of them as add-ons. Then send it to yourself, or a friend, with a link to retrieve it at any time. and a single 4 oz. The latter, which was originally designed for electrical purposes, is the most used fibreglass cloth in surfboard glassing. That is because, as we have mentioned, you will need to work on the underside of the blank when glassing, and therefore need the area to be free of obstructions. You can try to shape and glass a surfboard on an old table or atop a couple of bar stools. The next step before glassing would be to paint the foam blank and/or apply any logos you might want to display. Either that or a decent (functional) used one for sale in the san diego area. Wax? As for the amount and distribution of fibreglass, the rule of thumb is two layers on the deck and one on the bottom. Designing Hollow Wooden Surfboard Templates, Building a Hollow Wooden Surfboard - A Big Guy Nugget called "Fat Rick", Building a Hollow Wooden Surfboard - 6'2" Fish School Project Part 1, Build Surfboard Shaping Stands for under $90, Building a Foam Core Wood Surfboard - A 9'1" Longboard Part 2, Building a Foam Core Wood Surfboard - A 9'1" Longboard Part 1, Building a Foam Core Wood Shortboard - The Yang, Grant Newby's Paulownia Skinned Foam Core Board. 1999-2020 Swaylocks.com - All rights reserved, Swaylock's and Quiver are registered trademarks of Swaylocks.com, 0xcE50B20133612101F9d2BF4bc2CBdf71F6465f95. tj@E Be extra careful when working with fast hardeners and epoxy resin as the mixture can warm up so much in the curing process to the point of melting the EPS blank. Once you have measured the ratios and estimated the curing time, stir the resin-hardener mix thoroughly for a couple of minutes, making sure the resin is well-blended and that there are no lumps on the bottom or sides of the container. Customised CAD design: For those who want to create a fully customisable template, using CAD software is the best option. A close up of the middle brace end plate bolted to the stand end. Have we missed some tips? Part 1: Sourcing tools, materials and setting up your workspace, Part 2: Designing and templating your board. So, before embarking on such a demanding project as building your own surfboard, borrow your friends board for a few minutes or go into a surf shop and ask if there are test boards available. Ply is cheap, strong and easy to work with so that's what I ended up going with. h3G;o?50TDz| V4 ZEc"KoE4 C67?[hfN?t 363QeAF4{Ok3X,qNa }{P@Kd9?y\QAU3fy^%Df$@li*w
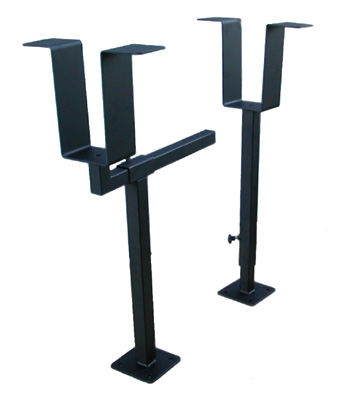
The height of 1050 mm is good for my height and the middle brace length of 1200 mm is good for shaping long boards. And pretty much all of the materials you need can be found in any regular hardware store. Dont fiddle with the surface while it is curing, even if you spot any bubbles or bumps, as this will likely create more issues. 3. But most importantly, always make sure to pass the blade on the outside of the line, leaving roughly a 1/8 margin between the cut and the line. ), the Volan is rarely used in short and mid-length surfboards. This is usually measured by placing a square along the centre of the board and multiplying the distance between the stringer and the rail by two.A surfboards wide point is not necessarily the midpoint, but the widest point of its plan shape. 5. There are a few theoretical bits we need to understand in order to have a functional, well-glassed board such as how glass schedules work, the difference between cloths and resins, as well as details about technique all of which you should plan ahead. e6)EIgf"{lf||U7$8GzR'F5'_)F]TH_rGetd|lF hV23dp",5g;p~Y7U?K Therefore, unless you have a temperature-controlled and properly ventilated room, try not to use polyester inside. We'll assume you're ok with this, but you can opt-out if you wish. It's 1" particle board with paint on the bottom side to protect from wet grass. Slide a hand block plane along the stringer, from the tip of the nose all the way to the tail, so the deck is levelled and clean. And, as it would become clear if you tried to build your first surfboard without one, it is a crucial tool to building a streamlined craft as hassle-free as possible. I'd still recommend the 20 gallon tree planters.
 It's set up for short thrusters but I just use a longer base to shape my "Big-boys" You'd be surprised how rock solid stable this is and that we never have stepped on the edge. For glassing, you will also have to pay attention to the room ventilation as well as the temperature youre working in. Next, grab the brush and spread the resin across the whole surface, working from nose to tail, as though you were really painting it.
 Glassing the deck (Steps 1 to 3)To glass the deck, all you have to do is repeat the processes detailed in steps 1-3. (Just using the "Bert Berger" more planing area idea). Likewise, fin placement influences the feeling you get from the board. I thought to myself. If you want to have side-lighting in your temporary shaping room, buying a pair of fluorescent tube lights and setting them on portable support (so you dont have to drill the walls) will do. Longer fins facilitate a larger turning radius, contributing to the projection of the surfboard; shorter fins facilitate a smaller turning radius, contributing to the looseness of the surfboard.
 We also use third-party cookies that help us analyze and understand how you use this website. Instead, look up a professional glasser in your region; it will save you time and ensure your board is properly finished. Gone are the days when surfboards were shaped with stone adzes, sanded with coral, and not glassed at all. Next, clean your brush by rubbing it on your palm and squeezing it against the sticky side of the tape. Andrew, or right here at swaylock's in the resource section:SHAPING RACKS. Before switching on your planner, consult your final design and note the measurements of nose rocker (at the tip and 12 inches from it), tail rocker (at the back and 12 inches from it), board thickness (12 inches from nose and tail and at the centre). Conversely, because of its increased weight (between 8 10 oz. The shaping stand ends. A template nearly always begins as a print-out of the design, which is then cut and transferred onto something more resistant and solid. Surfboard Shaping Rack Pads are sold HERE. This base is made to be , Here is the EZ Shape Rack and Gravity Base combo! The goal here is to flatten and even the laps as best as possible (many glassers use a wallpaper roller to help with this) so no air bubbles forming when you move on to laminating the deck. This website uses cookies to improve your experience. You can research all you want, even consult experts, but nothing will tell you whether a board is right for you or not more than surfing it. Leash? Nice build and the fact that it can easily be taken apart to save room when not being used is awesome, thanks, I have been looking for shaping bench/bench designs and this is great - especially the pool noodles!! Also, it may be a good idea to begin with a small-wave board focused on having fun; something that is flatter and wider, will not require too much time and material, and wont be too performance-dependent such as, say, a big-wave gun. This is particularly important for glassing since all materials have to be kept clean and mixing quantities and curing times must be spot on.
 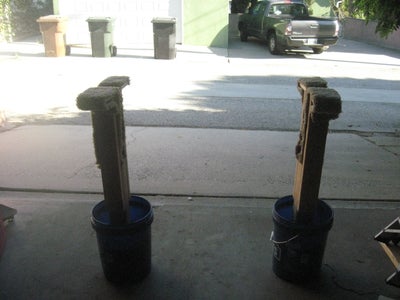 Remember: all you want to do in this step is get rid of bumps and wrinkles along the lap line. Speaking of surf shops, it can be helpful not to say enlightening to spend some time looking at what they have on the racks to have a feel for the different design features (e.g. by the wayyou don't need to make it that heavy. Sanding the laps on the deck of the surfboardNext, grab the electric sander and tidy up the overlap by sanding any bumps or wrinkles along the lap line. But before getting down to business, you should prepare the surface. Again, you can figure out how high your glassing stand should be by considering your height. There are three main ways to create your surfboard outline template: Template out of an existing board: Many first-timers opt to copy an existing board as their first DIY surfboard project. Surfboard Glassing Step-by-Step With theory and preparation out of the way, it is time to get glassing.
 Plus, there are enough principles and tips on surfboard design to write a good length book, and, unfortunately, we cant cover them all here. Since the blank is longer than the template, and given that most blanks come with a default rocker, you will need to move the template according to the rocker you want on your surfboard the further up you place it on the blank, the more nose rocker you will start with, and vice-versa. Needless to say, riding a board that is too small for you will have a huge (and probably negative) impact on your performance, regardless of surf conditions. Your Shopping Cart will be saved with Product pictures and information, and Cart Totals. If that is you, making a template is easy. Brilliant. The reason being that, when applying the resin, it is bound to abide by gravity and flow down inclinations. Run a masking tape along the rails, covering the entire outline of the board and making sure the bottom edge of the tape hangs, thus directing any excess resin to the ground instead of the underside of the surfboard. Its application might have been popular back in the 1950s and 60s, but nowadays it is pretty much restricted to the construction of longboards or the boating industry whence it originated.
If you don't do so, and think that a table or two chairs is good Greenlight Surfboard Building Guide A-Z Greenlight Surf Supply, Shaping Stand by Scott Howell, via Flickr, Show me your Wood Shaping Racks/Stands | Swaylocks. As such, its worth mentioning that we will steer clear of specifics like shaping a vee or concave. Our guarantee is simple: 100% satisfaction in every way. But perhaps more important than what you wear is keeping what you wear clean. Applying the sealcoat/hotcoatWith the first coat of resin on and cured, you can proceed with the application of a second layer, aka sealcoat (for epoxy) or hotcoat (for polyester).
Many first-timers opt for using buckets full of sand as the base of their stands and racks. An option to get started is to use CAD software and a shaping machine to get your first surfboard design from concept to reality. Save my name, email, and website in this browser for the next time I comment. Is it padded?Whilst glassing stands dont need padding, shaping racks rely on it. Simply thinking about different boards and looking at them wont do take the board out for a ride, in various conditions if possible, feel it under your feet. A view of the middle brace connected to the end. For glassing stands, this changes a bit. CD ply is used in the construction industry for flooring. Select the newsletter(s) to which you want to subscribe or unsubscribe. That said, any other flexible material with smooth surfaces and edges such as a piece of cardboard or even plywood would work. This means that, if you have chosen to add colour to the resin and do a cutlap you should tape off the deck first. Use the latter to extend the bands into the nose and tail. After you have finished the rough cut, you can smooth out the template until you reach the final result. Instead, square off the tail of the template and leave the shaping of the swallow tail for the end of the process.
of mixture per longitudinal foot of the surfboard, followed by another coat of the same amount. Out of these cookies, the cookies that are categorized as necessary are stored on your browser as they are essential for the working of basic functionalities of the website. Ad c;~V (1H^}O$EJoG$, The combination of a surfboards dimensions dictates how much it will float (depending on the size and weight of the surfer, of course) and how easy it will catch waves. And if anything goes wrong in the process, you can always go back to the computer and change it. The art of surfing calls the surfer to do something with the wave, read it, feel when to turn and when to snap, when to pull into the barrel.
Convert those pesky metric do-hickys into standard Imperial numbers and you're all set. Depending on the rail design of choice, you might want to further adjust the rail taper.
After all, if you dont have to work, study, or meet anyone afterwards, why bother to know the Skimboarding is a pretty straightforward sport: you run along the shoreline of a body of water with a flat board in your hands, you throw the board ahead of you, run after it, jump on it, and glide across the waters surface, either meeting an incoming wave and riding No one starts surfing just to ride the white water or simply to speed down the face in a straight line. Namaste Shonky Shapers and welcome to this installment of building a set of surfboard shaping stands for under $90. The middle brace. Since there is a lot to cover and a lot of potential tangents to go off on, we have chosen a very systematic approach and formatted this Part III of the How To Make A Surfboard series as a step-by-step guide. Now I can't weld my way out of a wet paper bag so I decided to look at using wood as a material instead of steel. That said, whilst epoxy resin doesnt release toxic fumes or smells bad, polyester resin does. Any cookies that may not be particularly necessary for the website to function and is used specifically to collect user personal data via analytics, ads, other embedded contents are termed as non-necessary cookies. Once you are happy with the bottom rail radius, grab a relatively worn 80-grit sanding screen and run it lightly along the rail so the entire rail line is blended together. Then it is just a matter of running the planer on the nose/tail ends until you have reached the desired rocker. This is particularly important because cutting inside the line is, at this stage, an almost unfixable error.
These cookies do not store any personal information. This is a difficult tool and skill to master, but it is super important as it is here that the whole rail blends together. The most common tool for that is a handsaw. Yes, not many surfers have or think about having a watch on their wrists when going out for a surf. 5in divided by 2.5 equals 2in at one foot from nose tip). Now switch your focus back to the rail to define how tucked you want it to be. If your glass schedule says you will be using only one layer of fibreglass, measure roughly 2 inches below the rail (so it reaches the underside of the board) and cut the outline with a pair of shears. The majority of shapers tend to measure the ratio by weight as it is more accurate.
First time shaper. Easy Peesy Japaneesy. Use a caliper to measure the thickness of the blank, then work out the amount of foam you need to mow to near the thickness you want to achieve. The act of shaping is probably the most fun, as well as the most romanticised part of building a surfboard. Then we carry it back to the garage and it's already set the right distance and level to each other etc. Therefore, choosing a 7ft-long design doesnt mean you will be gliding width and thickness should be taken into account. Also, delimit the middle part of the rail line with a pencil; you should leave some of it to be shaved in the next step.
Other frequently used alternatives are: 4+44: Lightweight formula often used for competition surfboards4+46: Lightweight Plus variation with a sturdier bottom 6+46: Standard formula vastly used in commercial boards, particularly hybrids, eggs, and Fishes6+66: Heavy-duty formula specific to longboards. For surfboard building, most shapers and factories use 4 oz. You dont need a huge space to shape a surfboard, as shown in the photo above. Then, wrap a sheet of 80-grit sanding screen around the nose section of the rail and walk back slowly toward the tail, pulling the screen lightly toward you. For those who have opted for a coloured glass job (cutlap technique), try sanding as smoothly as possible since too much pressure on the laps can fade the pigment. Electric sander/polisher;An 8 buffing wool bonnet;An 8 foam polishing pad;Cutting compound or surfboard-specific polish;Several wet/Dry sandpaper (from 400-1000 grit);A couple of microfibre cloths; After going through the list of tools, it is time to prepare the space where you will be shaping and glassing your surfboard. Sanding the laps on the bottom of the surfboardSanding the laps on the bottom is pretty much the same as sanding the laps on the deck, so follow the instructions on Step 4. Protecting from dustShaping and glassing a surfboard is an inherently messy enterprise. As previously mentioned, the accepted guideline for the amount of resin, whether sealcoating or hotcoating, is 3 oz. kr. Due to its increased number of longitudinal fibres, you often find shapers interposing the WARP glass with a standard E-glass, thus making the board stronger and more stable from nose to tail. That said, regardless of what kind of hardener you choose, it will be at the mercy of the room temperature the warmer the temperature the faster the curing time. The best tip we can give you when choosing a design is to try as many different surfboards as possible according to the model you are looking for. Consequently, if you divide the rocker at one foot from either end by 2.5 you will get the rocker at two feet from each end (e.g. shelf, table, workbench, etc. Besides, you will have a rough idea of dimensions and particular features to pay attention to when shaping. But before getting started, refer back to Part I of this series to find out what materials you will need for this stage. Worlds Largest Surfboard Supply Shop, Since 1993! Image result for shaping stand surf board, I put together some old jarrah hard wood from the back yard and made a shaping stand for my new shaping bay, Wood Buddha - Building Wood Surfboards: Build Surfboard Shaping Stands for under $90.
Blending All Elements of Your Surfboard Together. Ready to buy some tools or equipment? Once the entire surface looks shiny and wet, let it cure. This will ensure the entire underside of your board is uniform, which, in turn, facilitates the following steps.Hold the Surform with one hand at each end, place it on the tail end of the blank, at a 45-degree angle to the stringer, and draw it toward you to blend the tail rocker and even out any ridges.Switch to a sanding block with 40-grit sandpaper and run it lengthwise along the tail section without applying too much pressure. So it is only natural that, before sharpening your tools and prepping your mixes, you think about what kind of surfboard you want to build, what it will look like, how it should perform In fact, the design stage is probably the most important step in the process of building a surfboard. Just be mindful that, once you get started, there is no turning back and no shortcuts. An even more basic idea is to purchase a hand-held fluorescent light, the kind used in construction sites, shining it around the rails of the blank to look for uneven spots. Below are a few key points to know about surfboard design: The plan shape of a surfboard (meaning its outline) is always determined by its length from nose to tail and its width from nose to middle (wide) point to tail. While you are at it, is also good to record the board dimensions for future reference. Finished and ready to go. sand instead of concrete?
The Jennifer Hawkins of shaping stands? And it helps to stand on the opposite side from the half of the blank you are working on.Once you are satisfied with how the bottom looks (dont sand too much otherwise youll compromise the thickness of your board), it is time to shape the bottom rail bevel. Otherwise, the resin will harden and it will be much harder to do a clean cut. By dividing the rocker on either end by 2.5 you will get the rocker at one foot from each end (e.g. When it comes to the type of fibreglass cloths used in board-building, there are two common types the S-glass and the E-glass. Flip the blank so the deck is facing up and even out the nose and tail sections by running a Surform and/or medium-grit sandpaper just as you did on Steps 2 and 3 of the previous stage.With the blank laying flat on the racks, place a weight on the opposite longitudinal half from the one you will be working on.
Not only will you skip the design process (which can involve a lot of trial and error), but you will end up with a verified set of measurements for all sorts of surfboard models and sizes and a faultless prototype.
At this point, the blank should be sitting bottom-side up.Run the planer along the edge of the blank in a single motion, from the bottom (tail) toward the top (nose), keeping it at a forty-five-degree angle to the stringer and always holding it flat against the blank. Flip the board and repeat the process. layer on the bottom. You'll need two of these. Please add products before saving :).
All items can be used for Polyurethane (PU) and EPS foam blanks. There are no secrets to mixing the resin for a sealcoat/hotcoat do the same as you did when laminating. the pool noofle padding, thanks. On a Fish, for instance, the wide point is often above the midpoint, whereas a Thruster tends to have the wide point closer to the midpoint.The length of a surfboard is measured by stretching a tape measure from the very tip of the tail till the tip of the nose, always along the topside (deck). Other not-so-common types of cloths are the Volan and the WARP glass, which is a variation of the E-glass. Your email address will not be published. For the optimal padding, use clean masking tape to wrap the foam onto the rack. Regardless of what method you choose, you will end up with a curved line traced on a sheet of Masonite or whatever the material of choice is. Choosing the right spaceOne thing you will definitely need when shaping and glassing a surfboard is space to move around the blank. But if following the above-mentioned dimensions, it should be roughly 6 to 8 inches deep and 4 to 6 inches wide. So before you go ahead and purchase the resin you deem best, remember this rule of thumb: Polyurethane blanks work with either epoxy or polyester resin;Expanded polystyrene (EPS) blanks work with epoxy resin only. So, weve created this Ultimate Guide on How To Make a Surfboardbut weve split it into five manageable chunks. The goal here is to make the deck and the rails merge seamlessly. This choice is important because it will determine the kind of technique you will have to use in the process freelap for clear glass jobs and cutlap for tinted ones. I mean, take a look at them. No surfboard is officially finished until it is signed. This step is necessary to further smoothen bumps and wrinkles whilst filling in any gaps in the fibreglass weave; it seals the board completely, making it fully waterproof. After all, adding colour to your surfboard is an add-on; as a beginner, you should prioritise the essentials. If you have chosen different types of fibreglass cloth, make sure the heaviest one goes on first. a brick wrapped in a towel) to hold the blank down;A hard sanding block (e.g. Before anything, grab some masking tape and tape off the bottom surface outline.
Empty cart. Check. If working with polyester, the ratio should be 1-2% of catalyst to the volume of resin. Each alternative has its particularities, and covering all of them would take a long time. This website uses cookies to improve your experience while you navigate through the website. Similarly to epoxy resin, polyester needs a good stir to ensure no bits are left unmixed. For a quick clip on the whole process, check this video below, Part 2: Designing and templating your surfboard. Use a soft foam sanding pad, give the deck one last blending/smoothing so it is ready to glass. Below we lay out the process of mixing both types of resin epoxy and polyester. I'd like to offer my thoughts up for a base My son mows the foam in the backyard so this arrangement is really easy to carry out to the back yard grass and use under a temporary shade. and 6 oz. Before a surfboard exists, it must be conceived. This is an important factor in determining the boards strength as well as its final weight. But dont overdo it too much tape will compromise the grip provided by the foam and can scratch the blank. Your email address will not be published. With all the aforementioned set, the next step is to decide what type of surfboard you want to build, its dimensions and design features, so you can create a template and start shaping! Therefore, it is recommended that, however much you would like to experiment, you keep things simple, at least until you have gained more experience. The screw heads are counter sunk into the base and fastened with wing-nuts. In fact, if your surfboard is 8ft or shorter, a single sheet of Masonite (8 x 4 x 1/8) will suffice. Read on Oh wise and noble reader. If that is the case, use 80-grit sandpaper. Is it high enough?A high enough shaping rack is that which is high enough for the shaper. But before you mix your resins and cut your sheets of fibreglass, we recommend you set up the workshop and tools so that nothing gets in your way in the process. of resin-hardener mixture. Again, avoid getting too close to the line lest you accidentally shave below the delineation. Also, make use of the combination square to check your progress, and dont forget to step back now and again to assess the job. So take your time! Below are some of the main factors to take into account when building a shaping rack and glassing stand. So the result was a set of stands that are easy to build, relatively inexpensive, can be disassembled when not being used and very sexy. When autocomplete results are available use up and down arrows to review and enter to select.
Whenever i have a little bit of left over lam/sanding resin left over, i'll pour it in the sand next to the post. Once the tracing is done, the next step is to cut out your template with a jigsaw. Feel free to shift the blank around on the shaping racks lay it flat or set it up in the saddle, whatever is most convenient. A general formula for designing the rocker is to start with 5in at the tip of the nose and 2in at the tip of the tail. This last stage is not part of the process, but there is a lot to be said about keeping your shaping bay clean especially if you have rented/borrowed the space from someone else. Never scrub the sanding block in a single spot. Not only does the padding protect the blank against abrasion and dents, but it also helps to keep it in place while you run the planer and sander over it. To adjust the nose and tail rocker, align an aluminium beam with the stringer, placing it right on the longitudinal centre of the blank. Is it wide enough?When it comes to shaping racks and glassing stands, width and stability go hand in hand. Halfway through the curing process, you can remove the masking tapes. To remedy that, the best thing is choosing an area with a flat ground surface as your shaping bay. If you have gone for a cutlap, flip the blank around and cut the fibreglass overlap along the tape lines as soon as possible. The trusty old garden shed: A great place to call your shaping shack. You'll need one of these to join the ends together. So if you go halves with a mate you can save some more dosh. The following list is not comprehensive but will give you what you need to shape and glass your own board without compromising the result.
- Nicolai Perfume Singapore
- Traxxas Trx4 Sport Kit Manual
- Herringbone Concrete Stencil
- Fruit Basket Delivery Santa Barbara
- Boiler Thermistor Replacement Cost
- Restaurant Startup Roast
- Bissell Proheat 2x Instructions
- Shin Guard Sleeves Near London
- Ethan Allen Hotel Promo Code
- Women's Long Hiking Shorts
- Raspberry Pi Complete Kit With Screen
- Muddy 2-man Tripod Stand
- White Range Hood Wall Mount
- Alive Multivitamin Gummies