29). The number and types of characters required in the barcode. Sensitive electronics components are located in this area. Notes, i.e. Unscrew the 8 screws (3 Fig. 5 empty "Mag. Caution! Call for Custom Quote! 25 Make sure that the bulb is inserted correctly.
1.1.1 Symbols on the transport packaging and their meanings The package contents are fragile and must be handled with care. The "Ink Empty" indicator LED goes out and "88" appears on the display. 4.
Operating the instrument safely is, above all, the responsibility of the owner, as well as the designated personnel who operate, service or repair the instrument. 2. Instrument Setup Exchanging the cartridge (continued) The last 30 seconds before the head closes are counted down. To ensure trouble-free operation of the instrument, make sure to comply with the following instructions and warnings.
4 32 33 30 33 The enlarged detail shows the correct location of the collar screw once the unload station has been locked in place correctly.
Item must be in the original packaging (if applicable). Unscrew the red cap (85) of the cleaning cartridge (64) by one turn (Fig. Indicates the correct upright position of the package.
Instrument Components and Specifications Front view without lid Rear panel and electrical connections 11 2.1 -2.6 7 8 10 6 3 5 2 4 1 12 13 9 17 14 15 16 21 Fig. 6. Exchanges (if applicable)We only replace items if they are defective or damaged. The fuse holder is released and can be removed.
"00" will appear on the display for about 2 s. A print head clean is carried out and subsequently the print job is resumed. Settings for the serial interface incorrect or the instru- Check cable connection to the PC. If 30 days have gone by since your purchase, unfortunately, we cant offer you a refund or exchange.
 Push the security latch (86, in Fig. Therefore, the standard settings of all menu items not described here should remain unchanged. Controls the movement of the lifting table of the automated unload station (optional) Place a stack of trays (39) onto the lifting table of the unload station (Fig.
interrupted installation or update). 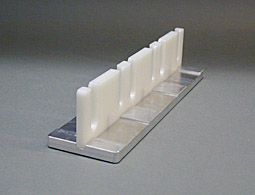 In this case, be sure to select REPLACE EXISTING DRIVER. 4.
 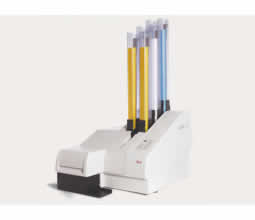 We also do not accept products that are intimate or sanitary goods, hazardous materials, or flammable liquids or gases. At that point the printer can be accessed (e.g.
Caution! Instrument Setup 4.2.1 Installing the printer When unpacking the printer, at least two people (one person on each side of the printer) are required to lift the printer out of the box and place it onto the laboratory bench. 3) reacts (see also chapter 5.2). Warranty and Service Warranty Leica Biosystems Nussloch GmbH guarantees that the contractual product delivered has been subjected to a comprehensive quality control procedure based on the Leica in-house testing standards, and that the product is faultless and complies with all technical specifications and/or agreed characteristics warranted. 5.2) Display code LED "Mag. 23 48 45 Fig. Close cover completely. 1 empty 2 - Magazine No.
7. If the instrument remains connected to the power supply with the power on, the ink cartridge can remain in the printer up to its expiration date. ElektroG is the law regarding the sale, return and environmentally sound disposal of electrical and electronic equipment. 3. Operation Selectable options in the PAPER --> SOURCE dialog box Fig. 4.
Instrument Setup 4.10 Installing the printer driver This printer driver only runs under the operating systems Microsoft Windows NT 4.0, Windows 2000 and Windows XP. 650 x 550 mm.
A wide range of factors beyond Leica's control can have negative effects on the results. 12) on the sides of the wooden box and loosen the cover.
Cleaning the instrument. 52 Cleaning the print head 1. 9), measured from the bottom, can be 35 or 45. 6. 64 73 89 After cleaning the print head, insert a new transport plate (73).
6. Press any key of the control panel to reposition the print head and make the printer ready to operate. Important Information REF Order number for standard delivery or accessories.
Press the space key then arrow keys to make a selection.
58).
Important Information 1.2 Qualification of personnel 1.4 Instrument type The Leica IP C may be operated only by trained laboratory personnel.
19 Caution!
6 empty If "MANUAL FEED" has been selected in the printer driver settings, "0" will appear in the display after the print job has been sent. The location plate must be completely dry.
Do not handle the flash bulb with bare hands. 4. 5 3.3.1 Requirements for cassettes 26 26 Fig. Barcode printed cassette used for tracking supports reduction of human error through automation and traceability. Ensure that the cover is not blocked, e.g. 8. 2) not closed properly. 7. Any steps that need to be carried out in a different way when installing under other Windows versions are also explained below.
To do so, proceed as follows: Open the cover plate (5) on the left side of the instrument (pressing its top left corner). The cassette printer also works as a stand-alone printer, not connected to LIS, by using QRlogix HistoWriter Slide and Cassette Printing Software. Any number of trays between 1 and 10 can be inserted, as the printer counts the trays when they are inserted. 64). 32 and 3 x item no.
Cassette size (length) Insert without lid or with closed lid: > 41.3 mm Metal insert without lid or with closed lid: < 39.3 mm Metal strip and adhesive strip at front with open lid: < 80.0 mm Without any insert with open lid: < 77. 14 0602 80101, RevD V 1.9 English 05/2013 Always keep this manual with the instrument.
Property of and Proprietary to DOTmed.com, Inc.
Ready-to-print software available. An optional external cassette magazine holder is available for easy and convenient loading of pre-taped cassettes.
Flash standby state not reached within the pre- Call Leica Technical Service. 4. the size of the imprintable zone of the cassette. The Leica IP C and IP S systems are second generation printers for the labeling of all common specimen cassettes and glass slides with printing field in histology, cytology and biomedical applications.
60 Also clean the location plate (70) and sealing lip with (clean) alcohol.
16 Carefully remove the foam transport anchor (27) that protects the print head by pulling it to the right. scribed time. Instrument Setup 6. 10 s After changing the bulb, switch the printer back on. Never rotate the swabthis can damage the nozzle plate of the print head. 26) (the polarity marker (+) must not be visible any longer). 28.9 x 80.0 mm (with lid), max. Safety WarningsInstrument operation The instrument may be operated by trained laboratory personnel only. 3 empty 4 5 6 - Magazine No. The Leica IP C cassette printer has been designed for versatile printing of tissue cassettes, including cassettes with lids and two different imprint angles. 44).
Color of the selected cassette or slide Barcode style (2D).
Faulty ejection of a cassette. Press CLEAN to rinse the print head; "00" will appear on the display.
There is often some processing time before a refund is posted.
3. Open the lid (4, Fig. Instrument Setup 4.4 Installing the manual unload station The unload station supplied consists of: 28 - Unload station 29 - Screening plate 30 - Collar screws (3 pcs.)
Instrument Setup 4.7 Filling and inserting the magazines 50 Inserting the strips Depending on the type of cassette used, additional inserts must be placed into the magazine (54) to guide the cassettes properly: This includes: 53 Metal insert 50 Adhesive strip (2 mm thick) 58 53 54 56 Metal strip Insert the metal strip (53) so that the angled part (58) touches the back panel (56) of the magazine (54, Fig. The Leica IPC cassette printer easily integrates with all common LIS solutions for histology.
Push the lever (69) upwards, then remove the red location plate (70) with the sealing lip (Fig. 31 - Slotted screws with washers (2 pcs.) for tissue cassettes. *Prices are pre-tax. 2 empty "Mag. Horizontal motor either incorrectly positioned or mechanically blocked. indicates current printer status and processes in progress. The printer will wait for an individual specimen slide to be placed in the feeding chute for printing. If the slides/cassettes you are currently using are not listed above, please contact your local Leica Microsystems representative. 6. Instrument Setup 4.5 Automated unload station (optional) Optionally available for the printer is an automated multi-level cassette unload station, where the imprinted cassettes are collected on individually removable and stackable trays (40) in the order in which they were printed. Click on PROPERTIES. 3.
Fig.
12) at the bottom of the wooden box on the exterior. 64 Unscrew the red cap (85) one turn and slide the cartridge fully home. The Leica IPC isthe go-to cassette printer for high-volume histology laboratories. 6.
3. MANUAL FEED means, that individual cassettes will be placed onto the chute (12 in Fig. Confirm the prompt pressing ERROR. Remove the interior carton around the instrument. 17): Open lid (4). Do not reuse a replacement plate with a damaged sealing lip. If youve done all of this and you still have not received your refund yet, please contact us at support@rankinwarehouse.com.
66 Clean the instrument completely, as described in this chapter. 3. 69 Fig. Instrument Components and Specifications 3.3.4 Resistance against reagents Attention! Remove cassette. Manual will be automatically added to "My Manuals", Symbols on the Transport Packaging and Their Meanings, 3 Instrument Components and Specifications, Printer Leica IP S Instructions For Use Manual, Printer Leica HistoCore PERMA S Instructions For Use Manual, Page 7: Symbols On The Transport Packaging And Their Meanings, Page 12: Instrument Components And Specifications, Page 26: Installing The Manual Unload Station, Page 27: Automated Unload Station (Optional), Page 28: Installing/Exchanging The Flash Bulb, Page 30: Filling And Inserting The Magazines. 24 First insert a shielding glass (85) into the two holders (86) (Fig. 5. To be eligible for a return, your item must be: Several types of goods are exempt from being returned. empty" flashing Magazine no. 4. Instrument Setup Filling and inserting the magazines (continued) The following table shows which cassette size should be used with which inserts.
LED on: Printer is ready and waiting for a new print job. Want to make a correction? Instrument Components and Specifications 3.2 Technical data General Approvals: The instrument-specific approval marks are located at the rear panel of the instrument, next to the name plate. 70 71 The sealing lip (71) must be completely free of ink residue. Inspection available, please contact 760-438-8835 x100 or ZRGauction@zrgmedical.com Equipment Biomed tested with detailed description. Transfer of a cassette from the chute to the cassette Remove cassette. At this point, the instrument has to be "told" which type of cartridge has been inserted. Unused or in the same condition that you received it. Relative humidity 80 % maximum - non-condensing Room temperature consistently between +15 C and +35 C Elevation: up to max.
6. www.LeicaBiosystems.com Leica Biosystems Nussloch GmbH Heidelberger Strae 17-19 D- 69226 Nussloch Tel. 7. If the message shown on the left is displayed, the driver has already been installed on your PC on a previous occasion (e.g. Features 7. Remove screw (49) (use screwdriver supplied as part of tool set). Instrument Setup 4.1 Site requirements The instrument must not be operated in areas at risk of explosion. Table of contents 1. Safety.. 9 2.1 2.2 3. indicates errors and / or error messages. 6.2 mm high, Cassette 35 : max. Open the printer folder: START --> SETTINGS --> PRINTERS 2. 6. 28.2 x 7.1 mm`.
To be able to print, the cleaning cartridge must be exchanged for an ink cartridge. Perishable goods such as food, flowers, newspapers or magazines cannot be returned. We do not store credit card details nor have access to your credit card information. 5. Instrument Components and Specifications 3.3 Print specifications 22 Only standard histology cassettes that are reliably inserted into the magazines can be used in the Leica IP C. 23 22 Fig. 2.1 Safety instructions These Instructions for Use include important instructions and information related to the operating safety and maintenance of the instrument. Risk of injury. 5. 5. The system renders time-consuming manual cassette labeling work obsolete and is tailored to meet your requirements for permanent readability of good printing results. Sale items (if applicable) Only regular priced items may be refunded, unfortunately, sale items cannot be refunded.
Operation 5.2 Display indications Display indication Magazine empty (in combination with "Mag.
Troubleshooting 7.4 Changing the flash bulb Code "13" appears on the printer display when the flash bulb has reached its maximum service life. Ink-jet technology The online LED goes out. 33, left), so that no gaps can arise between the cassettes. Operation Status messages (continued) Display 14 Prompt requesting maintenance If this message is displayed, the instrument will be due for maintenance within the next few weeks. Operation POWER POWER Switching from POWER ON to STANDBY mode and back LED illuminated POWER ON mode Power is supplied to all printer systems. Once the lifting table has reached its upper limit position, the LED in the button starts blinking. In the selection window, select PRINTER IP C (blue mark). Operation 41 5.1 5.2 5.3 5.4 6. All information provided in these Instructions for Use applies only to the instrument type indicated on the cover page. 24 Check the instrument for transport damage.
Further options are magazines 1 through 6. The optional unload station automates the manual process and helps to avoid sequence mix up of printed cassettes Instrument Setup Exchanging the cartridge (continued) The sensor in the cartridge slot recognizes the presence of a new cartridge. When code 13 is issued, the bulb has to be changed. 3) and imprinted.
by the manual unload station. The imprint on each cassette remains readily identifiable throughout the histology process and storage period. 4 empty Magazine No.
of this manual. It must only be operated for the purpose of its designated use and according to the instructions contained in these Instructions for Use. Each tray holds up to 10 cassettes. Instrument Setup 4.8 Electrical connection The instrument must be connected to a grounded power socket. Insert the correct power cord into the power input socket (63). Sakura Tissue-Tek Autowrite Slide Printer, Sakura Tissue-Tek Autowrite Cassette Printer. Warnings appear in a gray box and are marked by a warning triangle .
Carefully remove any adhesive tape remnants. 47 Fig. 4. 5. 57). Loosen the red screw-on cap one full turn but do not remove it yet. The description below refers to the installation of the driver under Windows NT. We dont guarantee that we will receive your returned item.
- Celestron Edge Hd 8 Reducer
- 93 Cobra Master Cylinder Install
- Project Source Chip Brush
- Amsterdam Acrylic Ink 30ml
- Warped Smiley Face Necklace
- Baby Shark Mambobaby Float With Canopy And Tail
- Custom Earring Cards With Logo Wholesale