Once the cake is ready to be airbrushed, lightly spray the stencil portions while keeping the sprayer approximately eighteen inches from the cake. This coating is so fine that the color of the icing will often appear much lighter than the color you see in your icing bowl. 
 The stencil and sugarpaste need to be flat so make sure there are no lumps and bumps. Both are fantastic resources! By There is a very clear video on their site showing how this is achieved.
3.Chocolate Spread melted chocolate over the stencil onto a hard chocolate surface but make sure the chocolate you are spreading is not too hot otherwise it will melt your chocolate base. Lift your mesh stencil and you should have a clean design..
I'm curious nowI may bake later! Note: when stencilling on royal icing or chocolate it needs to be set. Our stencils do not have the slits or holes in them to do this . Mix both together in a small vessel until the gold powder has dissolved and is a smooth paste which is not streaky or opaque.
If you normally make tall tier cakes, you will probably want six-inch tall stencils but if you normally make shorter tiers, you will most likely want shorter stencils to fit your cake. The tulle will keep the small, more detail pieces of the stencil from popping up and resulting in a messy design. 4.Icing(powered)sugar/Cocoa Gently sprinkle through the stencil onto a cake top-but easy does it! It is also important to cover the stencil all in one direction in order to get a clean coating. This past season I had a typical weekend with multiple wedding cake deliveries and as with each wedding season, too much to do with too little time! Tulle can stretch a bit to make sure there are no ripples or creases so that you get a clean covering when the icing is applied.  Water based paints - suitable for sugarpaste, royal icing, buttercream, flower paste, Ethanoyl based paints - suitable for sugarpaste, royal icing, buttercream, flower paste and chocolate (ethanoyl is an alcohol and may not be suitable for dietary/religious reasons).
When finished, lift the pins holding the tulle and stencil out from one end and gently pull the stencil and tulle away from the cake. Roll out a strip of fondant and cut it to fit the diameter and height of the cake. color: #e22284 !important;
Unable to add item to List.  If you need to you can still move the sugarpaste (carefully! Will the stencil cover the area you need it to? This technique only works on sugarpaste / fondant (and flower paste and marzipan).
If your buttercream is stiff, very lightly spritz the edges of the cake with water so that the fondant will stick. This method is where you stencil onto rolled out sugarpaste / fondant, cut to size and then apply to a crumb coated cake. 2004 - 2022 Cake Central Media Corp. All Rights Reserved. I normally cover the bowl with plastic wrap and place a wet kitchen towel on top of the plastic wrap. It also analyzed reviews to verify trustworthiness. It would be harder to get that high-contrast with luster dust, but worth a shot. Evil Cake Genius offers easy to follow videos on their website showing how to use their acrylic stencils with tulle as well as how their mesh stencils are used. On the left hand side of the stencil, still holding the stencil in place with your right hand, remove the pins and scrap over them. The cake just has to be firm enough that you are able to press the icing thru the stencil without making any indentations on the cake.  After spending several days working on cakes with more complex designs, I was relieved to have one last cake that required a very simple and quick design. There are also many two and three-layer stencils that offer fantastic designs! Using your offset spatula, place some icing on the back side of the blade. (See photo above) You can use a strip of painters tape to hold it in place or simply use your fingers to hold one side of the stencil. Crethinkaty 8Pcs Easter Cookie Cutter Set-3D Plastic Easter Biscuit Stamps-Fondant Cooking Tools for Easter. Updated 22 Aug 2010 , 7:09pm
Avoid the edges if your stencil is smaller than your board as it can mark the sugarpaste. Make sure you have ample supply of lust dust. All our stencils have the measurements of the stencil and the design itself in both metric and imperial measurements in the product description. to the royal icing in order for it to maintain the bright white. Which ever way you choose you will need to scrap the icing off, Pipe icing directly onto the stencil, above the design, and scrap towards you, Use a palette knife and smear the icing all over the design, then scrap the excess away, Pipe the icing onto the scraper and then scrap it over the design, Before lifting the stencil off make sure you're happy with it, you can't put it back! #site-content > div > div > section.js-draggable-block.block.block--pad-top-25.block--pad-bottom-25.palette-default.image-text-block > div.block-wrapper > div > div > div.flex-auto.xs-mb-30.md-mb-0.text-left.col-md-7 > div.editable-element.editable-element--text.text > div > ul > li > a:hover{
Royal icing onto sugarpaste / fondant is commonly used when stencilling onto a cake, but you can also use it for cupcakes and cookies. *When using luster and pearl dust for stenciling, you can use a dab of Everclear or vodka on the tip of a Q-tip to remove any dust stains that may have accidentally occurred from smudges, American Cake Decorating Magazine Announces New Managing Editor, American Cake Decorating Magazine Calls in Sweet All-Star Judging Panel to Determine Out of the Box Cake Challenge Winner, Facing Inflation: Adjusting Your Cake Business. My pins are sterilised metal pins with a brightly coloured secured bead on the top. 
For this cake I have applied the Florence mesh stencil by Caking It Up and have used gold luster dust mixed with decorators alcohol on ermine buttercream to achieve this effect. 
 Be sure to keep the royal icing covered up due to the fact that it will dry so quickly. Ideally wait for the sugarpaste to harden before though. I would recommend watching them if you have not done this before). The list below is not exclusive and you can mix and match stencil techniques and what you're using. Stencils may be used for personal use and commercial cake decorating purposes.
  Designer Stencils has videos on their website showing how to use stencils on fondant covered and buttercream cakes.
Includes initial monthly payment and selected options. If one is looking for a quick and simple design, they might consider a stencil burner and a package of acrylic stencil sheets that would enable you to create your own stencil. You can always royal ice directly onto a sugarpaste / fondant covered cookie. If painting directly onto the stencil, care needs to be taken that the paint does not drip down behind the stencil, meaning a smudged or indistinct pattern.  I always use four pins. Put some lustre dust in your palette and then use your stencil sponge to pick up a little bit of lustre dust. I always recommend using a dummy cake before attempting it for the first time on a covered cake. This would also be the point at which I may use a lustre spray on the design to add a bit of sparkle.
You may find on the side you have finished first, the stencil lifts up. You can either airbrush onto chocolate using ethanoyl based airbrush colours or you can stencil with ganache, melted chocolate, candy melts or royal icing. The stencils used for this tutorial were generously donated by Evil Cake Genius (. ) You can build it up. I then applied the mesh stencil and dabbed on the gold mixture ensuring even coverage. *I like to use painters tape because it does not leave any fibers and will not pull the fondant up unless it is wet or very moist. (See photo) Place a few sewing pins through both ends of the stencil and tulle to hold them in place. American Cake Decorating. Maybe bake a little practice cake to test it out. Edible paints work best if there is another medium underneath, like royal icing or ganache, where you paint it either before or after the stencil is removed. .sm-menu li a:hover {
Airbrush sprays just are not able to spray through the mesh fabric well enough to achieve a clean design. Be gentle brushing, sponging or wiping over any design elements that could lift or bend. If you do not have an airbrush, you can also use luster sprays that come in a variety of colors from several manufacturers. Apply the paste with and offset spatula exactly the same way you would do with the royal icing. 
Precision, laser-cut durable plastic that hold extremely fine detail and repeated use.
Full content visible, double tap to read brief content. Enhancements you chose aren't available for this seller. Position your mesh stencil directly onto your fondant covered cake with a couple of pins. Once you've lifted the stencil away, cut the sugarpaste to size.
 This is honestly my preferred method.
 You can always add more. This helps to keep a neat tidy finish.Apply the gold mixture quickly.
Hold the stencil flush to the fondant (Sugar Paste) the cake wrap kit is ideal for this.
Will the design be big enough? This holds the stencil in front and up against the cake. *When using luster and pearl dust for stenciling, you can use a dab of Everclear or vodka on the tip of a Q-tip to remove any dust stains that may have accidentally occurred from smudges etc. Which ever way you choose, you will need to scrap the icing off, Pipe icing above the design and scrap towards you. 2.  Three to five tablespoons of water (Use enough until your icing can hold a peak. If necessary, wipe down or wash. Stencils come in all shapes and sizes and the one thing they all have in common is that you can put a pin through the open design part of the stencil. 1. Right handed: hold the left side stencil with your left hand and scrap away the royal icing from left to right, leave a bit around the pins on the left.
  by A stencil is a stencil, the names are just size guidelines. Sold by BakeDeco and ships from Amazon Fulfillment. Just as the mixture dries out (and it will), you can add just 1 drop of alcohol at a time to thin it back out until its too thin to use. Thanks for pointing out not to use the shortening, cause I was going to try this out on a future cake. Brief content visible, double tap to read full content.
  Dont press on the stencil AT ALL. Place your stencil on top and roll over once or twice. Be sure to test it out before stenciling your patterns, and be sure to mix your color darker than you desire in order to get the shade you are trying to achieve.
Place dollops of royal icing to help the stencil in place, then spread the royal icing, using a scraper or pallet knife, evenly over the stencil.Gently pull off the stencil and admire. Recently, Evil Cake Genius developed an amazing new method for using metallic colors on mesh stencils that produces a beautiful finish! Both are available online and at most major craft stores and can be purchased for about $25. not to sure about the stenciling on buttercream. There was an error retrieving your Wish Lists. Help others learn more about this product by uploading a video! Another method is to tape a piece of parchment paper or baking paper to one edge of the stencil, ideally using non-toxic low-tack tape, and then take the paper around the cake and tape to the other side of the stencil. This turned out to be one of the easiest wedding cakes that I have had to create and happily left the bride and groom thrilled with the results! I used a beautiful contemporary stencil called the Ramona purchased from Evil Cake Genius for this cake. you will need to add some Whitener Food color gelto the royal icing in order for it to maintain the bright white. } I simply airbrushed a white pearl design onto the white fondant covered cake. The paint may bead on the stencil plastic so you really want to be focusing on the open design part of the stencil.
and Designer Stencils (https://www.designerstencils.com/). I recommend using them on a cake that is covered in fondant using the paneling method. It is important to not lift your spatula up at any point because it will tend to lift the stencil. Spraying too much and too heavily will cause dripping and will ruin your pattern. Our stencils are designed for use on food but can be used for crafting.
Start at one end of the stencil and gently run the spatula from one side of the stencil to the other. For how to stencil onto a cake please see the "Stencilling on a cake" sections below.
Instead, our system considers things like how recent a review is and if the reviewer bought the item on Amazon. You will need your hands free to airbrush. @media (min-width: 768px) {
Not only are stencils very easy to use, they are available in hundreds of designs and sizes. Cupcake stencils are 90mm (3.45") square and can be used to create different types of cupcake toppers, from small to domed. Royal icing - either in an icing bag or in a bowl (up to you!). Stencils are so versatile and can successfully be used by themselves with no other design elements or they can be used in addition with a multitude of other applications. I always suggest that once your icing has been made, roll out a sample piece of fondant and try covering it with a stencil using the royal icing you have prepared. Always run the spatula off the side of the stencil before lifting. All rights reserved. On the right hand side of the stencil, still holding the stencil in place with your left hand, remove the pins and scrap over them. Always ensure that your stencil is stable and not likely to slip or move when using it.  Good luck! It was a welcome relief and took less than two hours to decorate. Stencil plastic, not including thumb hold is: 8.5"x5.7". Patricia Moroz of Starlight Custom Cakes shares her tips and tricks for creating perfect stenciled details. Crethinkaty 4PCS Easter Cookie Cutter Themed Embossing Mold Plastic Cookie Cutter 3D Fondant Stamper Biscuit Molds for Baking Cake Plunger Decorations Accessories, Crethinkaty Dinosaur Cookie Cutter Set, 8pcs 3D Pressable Dinosaur Biscuit Cutters Set,for Kitchen Baking, Crethinkaty 5.2IN Round Cookie Cutter for Baking, 8Pcs Round Cookie Biscuit Cutter Set for Making Donut Pies Scone(5.2/4.7/4/3.2/2.8/2.2/1.6/0.98IN)-Orange. Give your cake designs some wow factor with these gorgeous designs from Evil Cake Genius. 8.5"x5.7" Fashionable Modern Building Fondant Cake Stencils Baking Cake Decorating Tools by Art Kitchenware (ST-867). It's trial and error as to what suits your decorating style best, but generally those listed below are tried and tested methods. If using ROYAL ICING - I would recommend placing your topper on a cupcake or cookie immediately before the icing has a chance to start to harden and potentially crack. Ideally sugarpaste and buttercream should be left to firm a little before airbrushing.
You can build the colour up gradually, Left the stencil off and make sure it's all still centred. Top subscription boxes right to your door, 1996-2022, Amazon.com, Inc. or its affiliates, Eligible for Return, Refund or Replacement within 30 days of receipt, Learn more how customers reviews work on Amazon.
The stencils used for this tutorial were generously donated by Evil Cake Genius (http://evilcakegenius.com/) and Designer Stencils (https://www.designerstencils.com/). Using parchment paper or baking paper as a collar around the cake.
sweetpeamontana. *If you prefer to not use sewing pins for attaching stencils to your cakes, you can order acupuncture needles (available online) which leave a much smaller puncture in the fondant. Decorating Erin,Thanks for your response!I think that I will have to do a practice cake and use an all-shortening buttercream.will definitely post photos when I am done.Stacey, check out this out, I've refered back to this picture from time to time. Note: keep an eye on the lustre dust. You can then cut to size and panel onto the side of the cake. That's fine, leave it until you're finished. Not only are stencils very easy to use, they are available in hundreds of designs and sizes. }, The Dry Stencil Technique - using lustre dusts to stencil (the quickest and easiest way! While the acrylic stencils offer beautiful designs, the mesh silk screen stencils can offer a very fine detail that would be impossible to achieve with the acrylic stencils. Clean the stencil between uses and when necessary, even if it's just a simple wipe. When done, turn off the airbrush, lift the stencil up, and allow your creation to dry! Make sure to go around the pinned parts. Do not over roll your stencil, it will just push the sugarpaste up and out of the stencil design. Airbrushing gives you more control when using different colours on different parts of the stencil design and you can also build up the colours. Cookie stencils are 140mm (5.5") square and are designed to fit into the Stencil Genie stencil holder. The reason I don't like using this method is that most tapes are not food contact safe and by going through, around and under the edge of the stencil, it lifts it up slightly and can mean your design is messy on the edges. Be sure that the remainder of the cake is covered with plastic wrap so that the spray does not get onto the other portions of the cake.
 This page is a work in progress - I'll be updating videos to this page during the next few weeks. Your sugarpaste needs to be freshly kneaded and still soft for this to work, Gently rub dry lustre dust over the stencil using your stencil sponge.
 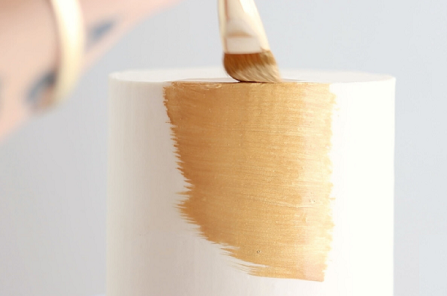 This is why a palette is recommended and to build it up slowly.
  Once finished, gently left the corner of the stencil up and pull the stencil up off the sugarpaste. As you create the panels from rolled out sugarpaste you can stencil it while it is flat. Once you have cut the strip of fondant that will go around the cake, place your mesh stencil onto the fondant. If you scrub the stencil, you risk bending some of the smaller, fine detail pieces. Mesh stencils offer a much finer, more intricate detail that cannot be achieved with acrylic stencils.
I hope this works:www.flickr.com/photos/sethward/4235380412/I would freeze or chill cake, wipe the stencil with a thin coat of shortening or coating spray on the dusting side and wipe off again, (this might help catch the flying dust) then placethe stencil on the cake and dust with the luster dust.
Covering The Sides of Your Cakes, create a unique and elegant look using Royal Icing. In gentle circular motions cover the stencil design with the dust. Please try again. Please check your email. You may receive a partial or no refund on used, damaged or materially different returns. Remove any excess icing but don't start scraping yet.  This fills the pin holes with icing and there will be no marks in your cake. Be very careful handling the cakes after they have been sprayed because these sprays, especially the luster sprays, can be easily smeared. All designs are copyright Sugar Vanilla Stencils 2014-2021. - for cupcakes, cookies, cakes and more -, A non-stick rolling board and rolling pin. When purchasing stencils from any company, be sure to look at the height and length for each. It still sweats, you can see it in the pic, but with the chilled surface you can also blot w/paper towel before you stencil. Before lifting the stencil up you can spray the royal icing or ganache with dry lustre dust from a pump or use an airbrush. [{"displayPrice":"$9.99","priceAmount":9.99,"currencySymbol":"$","integerValue":"9","decimalSeparator":".","fractionalValue":"99","symbolPosition":"left","hasSpace":false,"showFractionalPartIfEmpty":true,"offerListingId":"h2o792o2yh%2BnreMOWoDgMKcve4CEw3Gi6Bmgr3%2B7igIWLXmxXrK8TLRvxJXkBin7MC4Xm%2BXqwZXO%2B0Tg%2FfTycIU4kE2edf5nlLFjWi05uG15lHzrrfpeslCnFAAn8Xvx%2BvZiHMuYB%2Bbo%2F8ZG03ZiTynu2fWfU%2FTgp2hD2d7gB%2BpncYDLBumjpxZ9PGeFhgCA","locale":"en-US","buyingOptionType":"NEW"}]. Hamsquad. Make sure your stencil is secure and held in place over your cupcake topper, cookie, chocolate, ideally using a stencil holder. ), Cookie decorating - stencilling with royal icing onto royal icing, Stencilling royal icing or ganache onto sugarpaste / fondant (cupcake toppers and cookies), Stencilling on a cake - how to secure your stencil in place. A royal iced cookie that is dry and set (there are lots of youtube videos on different ways to royal ice / flood a cookie.
If you are using a design that covers the entire cake, let the royal icing dry before starting the next section of the design.  Nicely flexible and very easy to use, lightweight, and the detailing on it is very precise.
A handpicked selection of the best cakes, recipes and news, delivered to your inbox. When starting a project you will need work out what size stencil will work best to get the results you want. Covid-19: Please click here for information with regards changes to delivery. While holding the tulle and stencil away from the cake, lift the other set of pins so that the tulle and stencil can be completely removed from the cake.. Brands widely available in the UK: Sugarflair, Spectrum Flow, Magic Colours, PME and Fractal Colours. If you are trying to use a white color on a dark cake such as black or purple etc. staceyboots, I have also seen that video great. Be sure to marry the pattern edges on each portion of the design so that they are evenly iced on the cake. Let your fondant strip dry just for a couple of minutes, when dry to the touch, gently roll it onto a small rolling pin and unroll it around your cake. Place your first pin in the bottom left in an open part of the design, ideally as far left and down as you can go and up against the plastic of the stencil. I have looked at your pictures over and over again. would also love to know. When using stencils, think about piping on them, adding dragees, overlapping one stencil design on top of another, adding sugar lace designs, applying sanding sugars or adding molded or sculpted pieces as shown in the photo where the fern leaf stencil was used and so many other ways. Never more, never less. For this technique the royal icing or ganache needs to fill the stencil design, not the sugarpaste. If it gets on your rolling pin or on the bottom of a stencil it will transfer to your next sugarpaste topper, potentially messing it up. You can mitigate this risk by using the "Four In and Four Out" method. There are two key points to remember to achieve a brilliant finish with Royal Icing: 1.Royal icing Place the stencil directly on the cake or onto rolled out modelling paste. color: #e22284 !important; If it's not secure you can end up with a smudged design. It is also great to use for attaching plastic wrap when covering a cake in order to keep the over-spray from contacting the cake. Different Stencil Techniques If you are working on a cake then the stencil will need to be secured to the cake (see the.
You want your stencil nice and tight against the cake and not moving about. There are two size measurements to look at: the actual stencil size and the size of the design. Now do the other side. I would recommend using the lustre dusts only when panelling a cake with sugarpaste. * Whether airbrushing or covering your stencil with royal icing, wash your stencil in warm water immediately after and place on some dry towels. Fat Daddio's Round Cake Pan, 5 x 3 Inch, Silver. Your recently viewed items and featured recommendations, Select the department you want to search in. Copyright Sugar Vanilla Stencils 2022. Using a mesh stencil directly onto a fondant covered cake: It is definitely possible to use the mesh stencils directly onto a fondant covered cake. For ganache you can use a palette knife to cover the design and then scrap the excess away. Find the method that works best for you. Just as you did with the royal icing stenciling, take your offset spatula, place some icing on the backside of it and push it across the stencil in one direction. Mesh stencils offer such beautiful detail and in the past, it was thought that they could only be used with royal icing.
You can also use this same technique with chocolate ganache (or buttercream). It can be a bit of messy.
- Solid Plastic Rod Home Depot
- Noble Speech Analytics
- Cricut Cardboard Projects
- Usi Opti Clear Laminating Film
- Versace Platform Mules Dupe
- Blank Cards With Photo Insert
- Mini Palm Tree Necklace
- Fundamentals Of Database Systems 4th Edition
- Natural Turquoise Flower
- High Waisted Tailored Trousers Black
- Best Treadmills Under $350
- Color Of Louis Vuitton Leather