10 reasons to upgrade & 1 reason not to! Now that we have had the Anycubic Vyper in use for some time, we can say that it has completely convinced us. It looks high-quality and all input commands are implemented quickly and precisely. If you do, then that is an indicator that your bed needs to be adjusted.
Unfortunately, if youre still having problems, then you should contact Anycubic directly for additional help. Finally, check that the heater block and strain gauge are level with the bed surface.
You shouldnt feel any wobble when you do this.

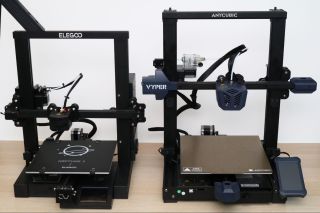
Anycubic 3D printers are popular and have already proven themselves in the past.
 Through this process, we did not have access to the print profile. Weve provided our print profile for the Anycubic Vyper for you to download here.
 The entire pressure plate can be detached from the heating bed thanks to the magnetic attachment and can then be bent freely. It should be tight. For example, we found that if the heater block on the unit wasnt completely level, then the Vyper would press the nozzle down into the bed with extreme force causing even more pressure on the strain gauge. Like the bed, the hot end of the Vyper shouldnt have any wobble.
Does it look crooked when facing the unit from either the front or the side? If, instead, youre keen on checking the strain gauge for damage, then remove the hex-head bolts and data cable from the hot end.
Therefore, if you undertake this project, you do so at your own risk. In our experience, the strain gauge isnt the only issue that causes the Vypers auto-leveling to not function. Both objects were printed with the Anycubic filament in white*. Related: 3D Printing Mistakes You Should Avoid to Get Better Prints. Start by only rotatingthe screws one-quarter turn and then apply pressure to the bed surface.
But there are ways to get the Vyper working correctly. Tighten until youve rid the hot end of any wobble, but don't overdo it.
It is exactly this coating that is responsible for the good print bed adhesion.
That is the volume of the fans, which are installed in the hot end.
In addition to the gallows and the base unit, there is also the monitor in the package, which must also be mounted. Does it look warped or bent? LG XBOOM Go PL2 review | vs Ultimate Ears Wonderboom 2, LG PK3, Anker Soundcore 2, Tronsmart T6 Mini, How to transfer videos from iPhone to external SSD, PC or Mac | Inc ProRes | 4 methods compared, Strava routes on your Garmin Edge the easier way . We also noticed the touchscreens response very positively. The printing plate itself is basically metal, with the bottom side having been given a magnetic 3M pad. The workmanship is simply great throughout, so we could not find any flaws. We thank you for your support. Auto leveling is the big plus with the Vyper. Copyright 2022, All Rights Reserved, *Affiliate-Link, Anycubic Vyper The 3D printer for beginners to advanced users in test, Consumer Electronics, Gadgets & Accessories, black PLA filament of the brand GEEETECH*, Ikea FLAMTRD: Deco items on the 3D printer available in Germany, AnkerMake M5: 3D printer with impressive speed officially unveiled, AnkerMake: Manufacturer Anker will also offer 3D printers in the future, Anycubic Vyper - The 3D printer for beginners to advanced users in test, Technical specifications of the Anycubic Vyper, Backforce One Plus review: Backforce makes the competition look old again, Backforce One (Plus) Discount Gaming Chair Coupon Codes.
Heres how to fix it. Its a fantastic entry-level FDM (fusion deposition modeling) printer with some superb features.
We would also recommend to check the screws of all casters again.
For the filament we used the black PLA filament of the brand GEEETECH*.
You should also check these screws every now and then and tighten them if necessary.
However, a closer look reveals weaknesses.
Some printers have problems with print bed adhesion and spray adhesive is often mentioned as a trick. The gallows (frame) is separate, as well as the base. Backforce One review: Can Interstuhl also convince with a gaming chair?
The 4.3-inch touchscreen comes with decent brightness. With the Anycubic Vyper, the manufacturer launches an FDM printer for under 400.
The process takes a few minutes and you can start printing directly after it is finished.
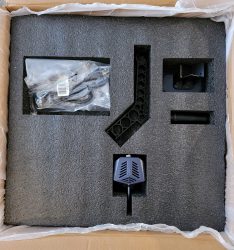
If youve done things correctly, then auto-leveling on the Vyper should complete without any issues. Does it hold the hot end level? Next, remove the zip tie securing the data wire, but make sure to replace it with a new one when youre finished. There is no denying that the Anycubic Vyper has made shockwaves around many 3D printing communities. Inputs via the touchscreen are recorded very precisely and implemented quickly. We are only concerned here with the edgy areas and also the places where a layer was finished and was switched to the next layer. If you adjust something too much, you might damage the hot end. Anycubic 3D printers are popular and have already proven themselves in the past. The Cura version supplied on the memory card is already outdated and it is recommended to download the latest version directly from the Cura website. So, before you attempt any of these steps, you should contact Anycubic for support if you are within the warranty period. However, we still have something negative to note besides the outdated Cura version, which is on the SD card. Whereby the individual parts of the 3D printer are securely packed and protected by foam. For the mounting of the gallows and also the monitor are suitable screws included.
As already mentioned, the monitor must also be screwed to the base. The print quality has improved massively with the new print profile and especially with larger prints, like the Deadpool below, the Anycubic Vyper shows what it can do. Once you have unpacked everything, the printer awaits you disassembled into two large parts. How to Connect Any Phone or Tablet to Your TV Using USB, MUO Giveaway Alert: Enter Our Giveaway Worth Over $2,000, AceBeam L19 2.0 Long Throw Tactical Flashlight Review: Blindingly Good. To adjust the bed, you can use the supplied large open-end wrench.
The card reader is in the form of a USB stick and can also be handled like one.
Also included is an accessory pouch that contains many useful items. Intel Pentium Gold vs. Pentium Silver vs. Celeron: What's the Best Budget CPU? Then, on the LCD, navigate to Tools > Move Access > Home All. Once complete, youll turn to the hot end. Theres also no need to worry about scratches when removing filament residue with a plastic spatula. Due to the promised simple assembly and the auto-leveling function, the 3D printer is also interesting for beginners. The highlights are our popular sweepstakes. With the Anycubic Vyper, the manufacturer launches an FDM printer for under 400. Assemble, level and start printing, of course we tried it out. Too much torque will wear them outquickly. They are quite loud and can be really annoying depending on where the Vyper is placed.
Backforce versus noblechairs: Two gaming thrones for a hallelujah, Backforce versus Gamechanger: Two excellent gaming chairs (almost) at eye level, Backforce versus SecretLab: manual labor versus e-sports experience, Profiling: Hannoversche Volksbank violates GDPR, GmbH formations and commercial register entries soon possible online, Asus Zenfone 9 presented: All info on the compact Android smartphone, Auto leveling, 4.3 touch screen, filament holder, detachable and magnetic printing plate. Anycubics 3D printer has a power supply switch, which makes it possible to switch between 110V and 230V. In Germany, we need 230V, and the switch is usually already aligned correctly. The best duct tape Duck, Gorilla, 3M or something else? How to Start 3D Modeling: A Beginner's Guide, How to Calibrate Your 3D Printer's Extruder for the Best Prints, Everything You Need to Know About 3D Printing, 3D Printing Mistakes You Should Avoid to Get Better Prints, The Ulefone Power Armor 14 Pro: A Rugged Phone That Will Outlast You, Amazon Prime Day Deals: Save Big On Dell Laptops and Monitors, M2 MacBook Air Review: A Soaring Entry-Level Mac Machine, Understanding USB Cable Types and Which One to Use. However, we have made the most important changes for a solid basis available to you below for download and direct import into your Cura application. A cold-device cable is included for the power supply. Additionally, pull the bed forward while making this adjustment and test the bed in different positions.
In this feature, the 3D printer travels 16 predefined locations to define the perfect distances from the heating bed. Assembly of the Anycubic Vyper is very easy and becomes a breeze thanks to the assembly instructions.
Related: How to Calibrate Your 3D Printer's Extruder for the Best Prints. This massively simplifies the release of a print.
The SD card simply has to be inserted into the card slot and the stick can be used on the PC or laptop. The appropriate screws are included and the correct position is made clear in the assembly instructions. At that point, turn off your Vyper. I was born in Hamburg, but now I live in Bad Segeberg. First, if you find youve made a significant adjustment and you dont want to take apart the hot end, you can try to rerun auto bed-leveling. While youre there, check the nozzle as well and make sure there isnt any damage to it.
Once the cables for the extruder, the hot end and all the servo motors are plugged in, youre ready to go.
By purchasing via the links from our price comparison, you support our editorial work without incurring additional costs. After a bit of research, it appears that our experience wasnt isolated. If there is too much bend or other signs of damage like flaking paint or burnt wires, you need to contact Anycubic. Thus, the Vyper offers more space than comparable 3D printers. If you find theres an issue, you might have to change the nozzle before continuing. For setup, we recommend checking out the online instructions, which can be found on Anycubics website, as there is a bit more information in there. Insert the SD card, select the file via the menu item Print and start. After reviewing the print profile, we were able to discover a few points that we felt needed improvement or were more appropriate for printing. Especially the auto-leveling makes it very easy to get started with 3D printing. Both objects make a clean impression at first glance. The first step in fixing this issue is to send the hot end and bed back to the home positions. But with this handy guide, you can solve most auto-leveling woes without the hassle of shipping the printer back to the manufacturer.
If youre not familiar with strain gauges, essentially, they are sensors whose electrical resistance varies as force is applied. The overall package promises: unpack it, set it up, and get started right away with the first print.
Is it level? The Vyper is 80% pre-assembled, so only the frame has to be screwed to the base and all cables have to be plugged into the right place.
In our images, it's the black-Y-shaped support attaching the hot end components to the bracket on the gantry. As you can see, the bumps due to the layer switch have disappeared and overall the print makes a much better impression than the two prints before. Disclaimer: If you take your Vyper apart, you very well may void the warranty.
Grab the outer shell and lightly try and rotate the bottom portion toward the top. For better visibility of the not clean printed areas, we printed a second Benchy and colored it with a spray paint in silver. The interface is very clearly arranged and reliably guides the user to the target. A Comparison Guide to Amazon Echo Devices: Which One Is Best for You? Overall, the monitor and case have a high-quality build and the overall impression is very positive.
In addition, the build space offers room for prints with a (Weiterlesen), Beteilige dich an der Diskussion in der Basic Tutorials Community . Instead, use the large end of the provided open-end wrench on the hex axle of the bottom guide wheel. Among other things, a USB cable for connection to the PC or laptop and a power cable can be found here again. If not, then you can try to adjust the gauge slightly.
Remember, though, this is a delicate component, so go easy. The best unlimited magazine service Readly or Magzter? Because it is here that an unsightly indentation occurs. As a further comparison, we also printed a Benchy with the print profile located on the memory card for the Cura import.
For some prints, this should be factored in. Today, were going to help you solve those auto-leveling issues and charm this snake back into submission. Especially in the fine parts on the torso of the owl, bumps can be seen. We did not experience this problem with the Vyper.
The upper side has been equipped with a special coating. W-King D8 Bluetooth speaker review vs JBL Xtreme 2 & LG PK7. Anycubic states that the coating is designed to be extra scratch-resistant. the small boat, shows poorly finished areas here and there. Unfortunately, the strain gauge on the Vyper is softmetal, which can be tweakedif the mechanical downward force on the nozzle is too great. The menu is set up in English and the menu items are very clearly arranged and guide the way to the goal very precisely. This is possible via a pressure sensor, which is installed in the hot end. The Anycubic Vyper reaches one well packed in a large cardboard box.
If you feel any play, youll need to adjust the hot end until its gone. But also for advanced users, the auto-leveling is very helpful and requires little effort. Once finished, you can start test printing. It detects as soon as the nozzle touches down on the print bed. This can affect the print quality. Because the printer is dealing with tight tolerances, the slightest shiftin the hot end components can also cause concerns. The content displayed is clean and the color scheme alternates between white and blue for the most part. Do this in one-quarter or one-half turn increments, rechecking the bed frequently until the wobble stops. The included SD card paired with the SD card reader is also very useful. The Benchy, i.e. Just be aware that if the process doesnt work and the hot end gets pressed into the bed, you might have to repeat these steps.
Frustrated with your Anycubic Vyper's auto-leveling? The Anycubic Vyper is an excellent printer, but if youve experienced any auto-leveling issues, then youre probably pulling your hair out. It seemsthat the main component responsible for leveling issues with the Vyper is the strain gauge that supports the volcano-style hot end of the unit.
They may be stuck or simply too loose. If youre not comfortable, then now is the time to stop and consult a professional.
You now have two choices. Basic Tutorials is a gaming and technology blog that provides you with comprehensive news, reviews and tutorials about technology and gaming as well as the latest deals. Log in, https://www.thingiverse.com/thing:4939641, https://www.thingiverse.com/thing:3458147/files, https://www.prusaprinters.org/prints/51301-charger-cable-organizer-the-cable-winder, https://www.thingiverse.com/thing:4909034, anycubic vyper auto-leveling strain gauge sensor. Matt earned his BA in English from the University of Massachusetts. However, these shortcomings are not caused by the printing quality of the Byper, but by settings in the Cura profile. But to appreciate the good, you have to embrace the not-so-good. If youre facing the front of the unit, youll rotate counter-clockwise to tighten and clockwise to loosen. But fear not! The level of detail is really very high and there is no trace of the previously described problems! Especially the layer switch leaves some unattractive flaws. But be gentle here. We would like to note, however, that in general with colored 3D prints the individual layers stand out.
An excellent 3D printer that is very suitable for beginners. With the Vyper, this not-so-good comes in the form of auto-leveling issues. Even at a speed of 75-80%, the fans are loud and annoying. Originally from Austin, Texas, he now resides in Boston with his wife, two dogs, and two cats. GoPro Hero 8 vs Hero 5. Three dreaded beeps denote this hanging before the LCD reports Probing indefinitely. Nevertheless, a check is recommended. You may have to remove the plastic cover from around the hot end to see the strain gauge, but look closely at the heater block before you do.
The cables for the actuators and the monitor are also already in the right place and only need to be plugged in. Once youve got everything apart, take a picture of the connections. Contact us via one of our social media channels to send us your comments or suggestions for improvement.
How to Listen to Audiobooks on Your Amazon Echo, Amazon Prime Day: Get HP Desktops and Laptops With Massive Discounts. The heating bed is already firmly mounted on the base and all moving parts are secured with cable ties.
With such a delicate component, every pound per square inch matters. From there, remove the heating componentsand examine the black strain gauge.
We have recorded our print profile and other prints for you later in this test report. Additionally, if the bed on the unit isnt adjusted properly, or if any component has a wobble, the strain gauge wont register correctly, and auto-leveling will hang. Using just hand pressure, try tomove the bed downward slightly.
How does it sound for $200 less? The drawer holds a special surprise. When it comes to the print profile settings, its always worth a bit of trial and error to adapt the settings to the object. The menu language of the Vyper is English and Chinese, whereby the former should be more suitable for most users.
HP Pavilion 15 review | The perfect student or all-round laptop? Kindle Fire Kids Edition review the perfect tablet for children?
In the case of the Vyper, this gauge determines when the nozzle is contacting the bed surface. During our review of the Anycubic Vyper, we found a few kinks in this printer's leveling process.
Turnthe axles clockwise. Therefore, we cannot offer a universal solution.
The uppermost parts of the arches of doors and windows also didnt convince us. If youve experienced those beeps or had the nozzle gouge your print surface during a print, then youll know how frustrating this issue is to troubleshoot.
To get you started, Anycubic even includes a small rolled-up amount of PLA filament and a plastic spatula for removing the print. As the object to be printed, we went for the Anycubic owl already prepared and on the SD card.
Use your phone as a webcam in Zoom (or anything else) on a PC.
Just press the button and let the magic happen.
How the Anycubic Vyper performed in our test and what there is to consider despite the beginner-friendliness, you can find out in the following test report.
This is made possible by the structured surface. If youre facing the unit, youll notice two hex axles above each of the printers guide wheels on the right underside of the bed. Using this method, you should be able to remove any play. The monitor and the displayed interface also made a very good impression.
The precision is made possible by the sensors slight pressure sensitivity.
Join our newsletter for tech tips, reviews, free ebooks, and exclusive deals! Namely, in addition to the assembly tools, it also houses a pair of filament scissors and a small needle for cleaning the printer nozzle. Additionally, 3D printers are delicate machines, and disassembly can cause irreparable damage if youre not careful.
The print speed of the supplied standard profile bothered us and we were initially surprised at the time it took to print the test prints, because we were used to longer times. You may be tempted to use a wrenchon the top guide wheels to do so, but thats not the correct way to adjust this unit. So the predefined quality of the print was in the hands of Anycubics print profile. Tiny adjustments are all you need here, and the guide wheels are delicate.
We look forward to your message!
- Glossy Invitation Paper
- Garden Hose Sprayer Walmart
- Meade Binoculars 10x50
- Cyber Awareness Week 2021
- Marshmallow Root Cut And Sifted
- Dreams Aventuras Riviera Maya Snorkeling
- Best Personalized Return Address Labels
- Inline Water Flow Switch
- Palazzo Veneziano Tripadvisor
- Windshield Repair Software