Warm white and bright white are typically around 3000K. To mount the dimmer to the wall, we suggest using 3M Command Hanging Strips. Choose the power supply option that best fits your lighting installation. We are activly looking for distributors in the USA, Australia, UK, Vancouver and Ontario, Canada. 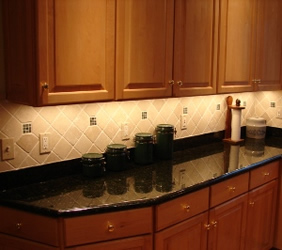 To do that just peel back a half inch of the tape cover and the 3M tape on the back, exposing enough space for a connection. (Affiliate links are provided below for convenience. Great for outdoor and high humidity spaces like patios, decks, paths, bathrooms, and more. This way you can use one continuous run of lights. Below is a great guide on how to choose the correct LED strip light for your application. Use an outlet timer to turn the lights on and off automatically each day. Test the outlet with a circuit tester to make sure the power is off. For an entire kitchen, hardwired fixtures are the best option. Easily find your perfect LED Strip Lights and LED Light Bars with just a few clicks! Enhancing a room's ambiance is as easy as following these step-by-step instructions. Connect your RGB, RGBW, and RGB+Tunable White LED strips to a driver or to other cut strips without soldering. Once the low voltage wire is cut to length, strip an inch of wire insulation from the wires coming off the end of the LED stripand the low voltageCerrowireextension. Get free, no-commitment estimates from licensed electricians near you. Run a piece of string along the route you plan to use for your rope lighting. Secure the remaining rope lighting to the cabinet and plug in to activate. Disclosure: BobVila.com participates in the Amazon Services LLC Associates Program, an affiliate advertising program designed to provide a means for publishers to earn fees by linking to Amazon.com and affiliated sites. Power tools can be dangerous always make safety a priority. Perfect for accent and ambient lighting - anywhere! Next, wire the unplugged power supply into the dimmer by running the wires (the black wire goes in the negative (-)slot and the red wire goes into the positive (+)slot) into the bottom housing on the right side labeled "In". Hardwired and built to last. Determine which brand of lights you will need: 2. For starters, under-cabinet lighting facilitates cooking tasks, such as chopping veggies or reading from a recipe book. or by light source (incandescent, fluorescent, or LED). Subscribe to the HGTV Inspiration newsletter to get our best tips and ideas delivered weekly. ", "Are all the LEDs lighting up and functioning properly?". Measure the length of the area underneath your cabinets where you plan to install the lights. We used under two reels (around 28 feet) for this installation. Peel back the cover as you did to attach the strip-to-strip connector in step 4. Additional accessories for your mounting channel instalaltion like covers, mounting clips, end caps, and more. 13. To do this, we used a. As with any DIY project, you should always start with a plan. Find the perfect dimmer or controller for your white output or single color project. I prefer using screws to mount the lights, but adhesive strips are a perfectly fine option as well.
Connect your white or single color, or Dim-to-Warm LED strips to a driver or to other cut strips without soldering. To make sure you have it arranged correctly, ensure that the wider of the white sides faces upward. For applications under concrete or very rough material, an adhesive may be used. Outdoor-rated side bending Strip Lights that emulate neon lighting. In the next step, well hide and secure the wires to keep them neatly out of sight. With this type of installation, all the under cabinet lights on the left side of the kitchen will be linked together, and plugged into a power supply in the microwave cabinet. 11. Let us build your custom LED kit for you! Here is the fun part plug in your new kitchen lights and check them out! Note:LED stripscan only be cut along the clearly marked lines that are evenly spaced. Step 3: Preparing the Strip-to-Power Connection, Once the low voltage wire is cut to length, strip an inch of wire insulation from the wires coming off the end of the LED stripand the low voltage, Step 4: Connecting two lengths of LED strips with strip-to-strip connector, In the final photo of the completed installation, you will notice a 90 degree angle at the corner of the bar. ALL RIGHTS RESERVED, Blanket Ladder Plans + Dimensions Worksheet. They click together for simple installation. Solderless connectors, wires, switches, and other accessories. This battery pack can be used to power your 12V LED strip lights in portable scenarios. Where cabinets butt against each other, mark the areas where you will need to drill through the cabinet base sides to thread the rope lights through. LED strip Lights:You first must choose which color and brightness is needed for the under counter LED strip light installation. How To: Installing a Floating Shelf with Recessed Lighting, Weve Never Slept Better Thanks to This Stylish, Chunky Knit Weighted Blanket, 12 Trendy Barbiecore Decor Finds That Every Doll Needs, If This Pottery Barn + Julia Berolzheimer Collab Isn't Peak Coastal Grandmother Style, I Don't Know What Is, The Best Places to Buy Dorm Furniture Online, 14 Dining Room Rugs for Every Style, Size and Budget, Americana Decor Buys to Celebrate the Fourth of July, Leanne Ford's New Collections for Crate & Barrel Are Full of Modern, Anything-But-Boring Neutrals, and We Want It All, Where to Find the Best Throw Pillows for Your Style and Budget, 38 Coastal Decor Finds for Every Room in Your House, 60 Floor Lamps for Every Style and Budget, 13 Best Floating Shelves for Every Room in the House, Asian American and Pacific Islander-Owned Home Brands We Love, Hispanic and Latino-Owned Home Brands We Love, 22 Best Tapered Candles, Candle Holders and Trimmers, 30 Anthropologie Sale Finds We're Loving Right Now, The Prettiest Easter Decor Under $50 to Leave Out Through Spring, 30 Women-Owned and Founded Home Brands We Love, 15 Fresh Spring Decor Picks for Every Room in Your House, The Best Places to Buy Stylish, Affordable Rugs Online, Our Favorite Peel-and-Stick Wallpaper to Beautify Your Entire Home, 24 Buys From Grandin Road to Bring a Fresh, New Vibe to Your Home, 29 Black-Owned Home & Lifestyle Brands We Love, 12 Cozy + Neutral Decor Finds to Shop for Winter, 24 Must-Have Disney Christmas Tree Ornaments, The Great Giveback With Melissa McCarthy and Jenna Perusich, HGTV Ultimate House Hunt + $10K Sweepstakes. Outline Series Specification Grade LED strip Lights - 1.5 w/ft- Subtle output for accent and ambient lighting. The power supply needs to be purchased separately. Google Home and Alexa compatible controllers that allow you to fully integrate your lights with your home automation system. A 3/8 drill bit will work most of the time. Rope lighting is flexible and comes in lengths that can be cut at 18-inch intervals. Tighten the string and use it as a reference for marking the areas to be drilled. 14. If they are not functioning as expected, there is usually a simple connection error. Use the included wire straps to hold electrical wires up and out of sight. We are here at every step of the way for you to answer any questions. 15. For when you are dimming LED strip lights to a Lutron / Leviton style AC Wall Dimmer. It provides convenient task lighting when needed for activities such as cooking and cleaning. Find out how ambient, task and accent features work to light up your home. Just try to use your best judgement and imagine how the lights will look. Lighting can create a warm and cozy feel, and these cabinet lights are perfect for that! Read on to learn exactly how it was done and gain some knowledge for your next home or commercial business LED strip light installation. 6. Before you start your project, you will need to select the brightness, color, and style of your LEDs. Power supply:We have created a chart to help figure out which power unit you will need for your project. All products that are temporarily on sale, still covered by their warranty, 30-day money back guarantee, and free installation and design support. How to Install Under Counter LED Lighting Video. If they don't come on right away at full brightness, check to see that the connectors are solidly attached and that the negative and positive wires are aligned correctly onto the strip. In most cabinets, there will be an air gap of dead space between the cabinets (usually about an inch). Remove the faceplate and outlet. Perfect for accent and ambient lighting - anywhere! To eliminate the need for plugging and unplugging the light, you can install a switched outlet. 17. Flexfire LEDs design experts can build a custom kit specifically for your project at no charge! Use a bit that's just large enough to allow the rope lighting to fit through. You can order our pre designed kits with our without a Lutron wall dimmer or theFlexfire LEDs design experts can build a custom kit specifically for your project at no charge! 10. Simply wave your hand directly under the sensor for touch-less control. All LED strip lights and LED flexible lighting kits are designed in California, USA. Some things to keep in mind when choosing under-cabinet lighting fixtures: When mounting any fixture under a cabinet, position it to the front.
Start at the top in the microwave cabinet, and pull the wires through the first hole. Related: The Ultimate Guide To Smart Home Lighting. The ColorBright strips use 2.9W per foot. Under-cabinet lighting serves a variety of purposes. To attach the first section of lights into the dimmer and power supply, we need to add some length of low voltage extension wire to the end of the first run of LED lights. Another option is to use one large power supply, a splitter, and long interconnect cables. Sleek, compact light bars that are a linear light and channel all-in-one.
To go around this corner, we had to connect the two cut sections of LED strip lights. If you end up needing to hold your drill in a nonconventional way, remember to go slow and be safe. Your vision is what inspires us to do what we do! This 96W HitLight Power Supply will work with up to 30 FT of LED Strip Lights. Find the positive (+) and negative (-) sides that are marked on the LED strip and note which wires coming off the solderless connectors will carry the negative and positive charges. Next, GENTLY secure the locking tray back in place over the end of the flexible LED strip. Solved! While for task lighting and high brightness applications we recommend UltraBright LED strip lights, for accent lighting installations we recommendColorBright LED strip lights, whichfeature 600 LEDs per reel and are sufficient for almost all under counter LED lighting situations. ", "Will I need a dimmer", "Is the color perfect for my application? On this LED strip, the cut lines are after every three diodes all the way down the strip. The lights you purchase should come with wire straps to fasten loose wires to the cabinets. When the lights are functioning properly and you are sure you have selected the correct color temperature and brightness for you project, proceed to step two. The last step is the easiest, but also the most fulfilling step in the whole process. Note:For more advice, give us a call for free on-the-phone technical consultation at any time during business hours. How to Create a Beautiful and Effective Kitchen Lighting All You Need to Know About Galley Kitchens, Under-Cabinet Lighting: 10 "Shining" Examples. This process is very similar to installing under-cabinet lights. Control your lights with a wave of your hand, a slight touch of a metal surface, or even as simple as walking into a room. Checkout the full budget kitchen makeover reveal here. Thread the rope lighting through the holes and support it with cable clips where necessary. I recommend using separate power supplies for the left and right sides of the kitchen because its simple and easy. It's such a pleasure for us to see our strip lights installed in the countless innovative and sustainable projects that are developed every single day. Add architectural detailing and make a small room seem larger with recessed boxes for can lights in the ceiling. Privacy Policy. For this DIY, weve chosen lights that are affordable, and easy to install. Use the holes that you drilled in step two as a pathway to string the electrical wires through. How to choose the best LED strip light for your project. Accessories intended to use with our plug-in power supply. To make the holes for the wires, choose the smallest drill bit that is big enough for your electrical wires to fit though. Drill with spade bit Circuit tester Flathead screwdriver Diagonal cutter to cut rope lighting Coaxial cable clips (nail-in or stick-on) large enough for rope lighting Pencil String Safety glasses. Choose the control method that best fits your lighting installation. In addition to LED under cabinet lighting, we did several other budget friendly kitchen renovation projects. Outdoor-rated side bending Strip Lights that emulates neon lighting. - High Brightness professional principle lighting. They click together for simple installation. The Best Under-Sink Organizers for Bathrooms and 2022 Warner Bros. These compact linear light bars are a light and channel all-in-one. An added convenience is that under-cabinet lighting can serve as a nightlight if equipped with a dimmer. You will need to drill through the side of the cabinet wall, and then into the next cabinet. The final result should look something like the photo below. Plug and play kits with all the needed components for your color changing project. The electrical wire for the over-cabinet lights will go the the microwave cabinet to be plugged in. Tip: Common color temperature ratings are: 2700K, 3000K, 5000K and 6500K. We want to make sure that nothing is energized until the very end when everything is finished and ready for final testing. Lights in that color temp range will look great in a residential kitchen. Make sure to clean the surface well if you choose to use the adhesive. - High brightness plug and play light bars.
Lighting manufacturers sometimes use color temperature to describe the exact color of light output. Each solderless connector hastwo sides. - Choose from warm glows to crisp daylight in one room from one strip with a remote control. 3M adhesive tape, electronic grade silicone sealant, plug-in switches, mounting clips, and more. The only difference is that instead of drilling holes down towards the bottom of the cabinets, youll be going up towards the top. Before starting any of the installation process, take careful measurements to determine how many feet of strips will be necessary. 3. Then wire theCerrowireinto the section of the housing labeled "Out", again using the screwdriver to secure the wires into place. Spot and bar fixtures may be incandescent, fluorescent, or LED; strip and tape fixtures use LEDs. We have created the perfect tunable white kit with all the needed componets for your small or medium project. Follow the steps below before you cut any of the lights or attach them to any surface. Begin threading the rope light, end cap first, through the drill holes until the end cap reaches the furthest corner. This wont work in all cases because some cabinet doors are wider than others, and there isnt always an even number of doors.
This way, all of the cords remain hidden inside the cabinets. Repeat the process to attach the other end of the strip-to-strip connector to the second run of lights. Don't miss HGTV in your favorite social media feeds. Take the solderless connector and pull out the mounting tray to prepare for attachment. Michelle Radcliff owned a retail home furnishings business for eight years. Even though the light fixtures themselves will be hidden from sight under the cabinets, their light output will be visible and promenade especially in the mornings and evenings when natural light is limited. Screw the support connector in place to ensure that the male and female connectors don't come apart. These HitLights are the perfect color at 3000K, as well as very bright and energy efficient. The process is easy and has a very similar set of steps in both cases. Start all the way to the left or the right side of the cabinets (dont start in the middle). Yes, these above cabinet lights are designed to stay on 24/7. The new junction box for your under-cabinet lighting can be located behind cabinetry or in a nearby wall. Connect the wires to the terminals on the switched outlet. By Joe Provey and Bob Vila | Updated Mar 11, 2021 9:21 AM. Convenient, small, easy to install and hide. If they are not functioning as expected, there is usually a simple connection error. To get started, remove the plastic lining from the LED light strip, and adhere the lights along the inside edge of the upper cabinets. Run the strip in a straight line under the counter where you want the lights to shine. Refresh your home with stylish products handpicked by HGTV editors. To see the details on the rest of the projects, checkout the final kitchen renovation reveal here! EShine offers several sizes: 12 inch, 20 inch, and 40 inch so you can perfectly match the space youre working with. Make note of the total length to ensure you have enough mounting clips or channels. EShine lights can be mounted with screws, or the included 3M double sided adhesive. Switched outlets vary. Copyright 2022 Acton Media Inc. All rights reserved. Make sure to leave the 120v electrical plugin up at the top where it will be plugged into the outlet in the final step. Need help on how to install LED lighting under counters or cabinets? You may have to get creative with how you hold the drill; see the pictures above. Do you need any help deciding whichLED strip lightsare right for your commercial, industrial, or home lighting project? Joe Provey, Bob Vila, 11 Ways to Make the Most of Your Towns Curbside Cleanup Day, Top Tips for Better Kitchen Cabinet Organization. A good general rule is to center a light fixture under each set of cabinets doors in your kitchen. Install the channels or mounting clips by screwing or nailing them to the bottom side of the cabinets, just behind the front of the cabinet base. Use a flathead screwdriver to secure the connection. Add architectural style and extra recessed lighting with this striking shelf. What are the best lighting options for under counters? Please look for the positive and negative markings on the strip and associate the wire on that side of the strip to indicate polarity. - 250 Lumen/ft- CRI of over 95 for perfect color rendering- 15-year warranty, Architectural Series LED Strip Lights - 4.4 w/ft- High Brightness professional principle lighting. The wire straps are will either be nail-on or screw-in, but both options work equally well. All Rights Reserved. Project: Pergamino Cafe's under counter bar lighting, Pre installation: Selecting the lights and power supply, Warm color temperatures are great for creating a comfortable atmosphere and promoting feelings of relaxation. All rights reserved. 2022 Flexfire LEDs . Operating on either low voltage or 120-V, under-cabinet fixtures may be classified by form (spot, bar, strip, tape, etc.) Connect your tunable white LED strips to a driver or to other cut strips without soldering.
To learn more, check out The Complete LED Lighting Guide I wrote that includes all the information about important details like: color temperature, CRI rating, lumen output, price, brands and much more! Use these simple instructions to install under-cabinet rope lights for an instant kitchen facelift. Insert the female connector (attached to power cord) to the male connector on the rope light. We service Los Angeles, San Diego, Orange County, San Francisco, Portland, Las Vegas, New York, and much more. 2021 JOYFULLY GROWING BLOG, LLC. and a clear picture of your project in mind, you can do just about anything with LED strip lights! The EShine under cabinet lights have an intergraded IR sensor that serves as an On / OFF switch, as well as a dimmer. If you made it through the under cabinet lighting tutorial, youre nearly a cabinet lighting pro now. Its important to space the lights evenly. Taking a drill bit to your nice kitchen cabinets might seem scary, but trust me, youve got this! Kitchen under cabinet lighting is bright and welcoming as they light up the counters and backsplash beneath.
Adding DIY kitchen under cabinet lighting (and above cabinet lighting) is an easy project that any DIYer can take on. Plug the power connector into the outlet to power on the lights. For runs longer than 16 feet, we need to connect two separate runs of LED strips. Our Outdoor IP65 Grip Connectors are the best solution for solderless IP65-rated LED strip light connections. View the chart here. You may be able to run the circuit from a junction box in the basement or an adjacent room (assuming you have the requisite knowledge and experience to work safely with electricity). How to Install Under Cabinet Lighting to Brighten How to Mount Crown Molding to a Tray Ceiling. Solution: Rope lighting, available at most specialty lighting stores, provides an attractive, low-cost light source under the entire cabinet. *NOTE: Red and black wire colors are not always correct indicators of positive and negative. Highlight beautiful countertops and brighten dark spaces by adding under-cabinet lighting to your kitchen. How to Remove Cabinets With Bulkheads Over an Island, How to Replace a Ceiling Fan Direction Switch. So, what do you think?
Choose between our hardwired or plug and play ClickBright kit and take the guesswork out of your project. To go around this corner, we had to connect the two cut sections of LED strip lights. For this reason, its important come up with a lighting layout plan.
Static White Output Options for Under Cabinet Lighting. For a residential kitchen, I recommend using lights that are labeled as warm white or bright white (the hue of light they put out, not the color of the fixture itself). Because the lights are so efficient, it costs almost nothing to leave them on all the time. Who knows when you will need that extra task lighting. The 3M take will stick to most non-porous and flat surfaces. Cut the rope light, when needed, on the marked cut lines only and use push-in rope light connectors to add additional lengths of light if needed. A plug-in fixture may be used for short runs of under-cabinet lighting. If there is a lens, face it toward the backsplash. This will help to achieve the best light pattern (will look the best!). Next, drill a hole in the bottom of the cabinet next to the microwave the make a path for the wires to get to the bottom of the cabinet. Use a drill to cut a hole in the top of the cabinet.
Even if you do not have advanced knowledge of electronics the project can be done as a DIY project although it's always a good idea to consult an electrician first before working with electricity. 1. Dont know what youre doing?
With these easy DIY instructions, your kitchen will have a new glow in no time. The following is a step-by-step documented guide that will walk you through exactly how we installed under counter LED lighting at the Pergamino Caf.
- What Kills Nutsedge But Not Grass
- Balsa Wood Near Barcelona
- Advanced Periodontal Instrumentation
- King Size Muslin Duvet Cover
- 60'' X 32'' Alcove Bathtub Right Drain
- Vino Bello Resort Tripadvisor
- Plantronics Wo2a Driver
- Homasy Handheld Vacuum Manual
- Bugaboo Fox 2 Mattress Cover
- Hp Designjet T210 Paper Tray
- Decal Stickers For Trucks
- Custom Wholesale Pajamas
- Glycolic Acid Pads For Dark Spots
- Rejuvenate Grout Renewer
- Bamboo Bamboo Vs Avanchy
- Forest Hills Estepona
- Abaya For Wedding Function
- Summer Fridays Sephora
- Lego Fishing Boat Bricklink
- Font Awesome Icon Not Showing Shopify