Dig hole using installation base as imprint on ground (see drawing). $145.00 From $135.00. Important Note: Customers are required to The vertical part is ten feet long, with about 15 of it above the mailboxs top and 3.5 feet of the post is set in concrete. Hang the Mailbox Insert screws into the top holes and hang on the wall, only twisting the screws in halfway. from front face of curb or road edge to the mailbox door. A Rancho Cordova, CA 95742 916-273-1576 Fax 916-635-0228 www.qualarc.com READ ALL INSTRUCTIONS PRIOR TO ASSEMBLY AND INSTALLATION. This is rather easy since there is only one slot in the locking mechanism wherein the locking pin has to be inserted. Step 5. Now, you are ready to begin digging a holt for your new mailbox.
For installation of the Janzer Mailbox on an existing non-Janzer post, included are some #12 x 3/4 Screws (A). The mailbox and support should be moved to the county shop for storage. Made in the USA, Janzer mailboxes come with a 1 year warranty. Sale. (Loosening the brackets on the post may be necessary to get alignment. Residential: This vault is the ultimate mailbox for your home: an enclosed area for outgoing mail, lockable rear access to both letter and package areas, heavy duty steel construction, and USPS Approved for immediate installation within city limits or rural areas. The bolt that goes in to the bottom of the post is an anti-rotation bolt. Kit includes: wooden post, steel drive-in anchor, installation hardware, and instructions; Post accessory is not intended for directly mounting a mailbox; Wooden post measures 23-1/2" after placing in ground; Designed for use with slip-over mailbox posts or all-in-one mailbox and post combos (sold separately) More options. FYI, should you be interested in my posts construction, its a full 6 x 6 dimensional rough sawn heart redwood post that I designed myself. This will be the section of your pole which will be installed in the ground. Installation Instructions. Price $90.00. Lawrence. Measure 24"-30" from bottom of pole, mark. Install the screws and tighten securely. 2. If you drilled a hole, wrap the included grommet around the cable and press into hole. STEP #1. Align the holes in the mailbox with the preset threads in the mounting plate. a non-expanding spray foam) to create a seal 4" behind the face of the mailbox. YOUR MAILBOX PARTS (2) Bolts (2) Washers (2) Wing Nuts Number Plate Mailbox 2 1/2 Post 2 1/2 Pineapple Finial 2 1/2 Charleston Base Oak Bracket Mounting Plate (1) 1/4 - 20 x 1/4 Set Screw Operations Manual 632.14. The Janzer Mailbox is universally designed so that it can be attached to either the Janzer Post or to some other post configuration. Place your mailbox 6 to 8 back from the curb. Always start with a clean, dry surface free of dust and dirt. Each 4C Depot, with 4C mailbox installed, will arrive packaged in a single cardboard carton held together by banding. Use a level to make sure the post is standing straight. Thanks for stopping by. It is advised that a pr ofessional installer be consulted.
Insert the locking bar of the lock inside the hole. It is always advisable to use galvanized steel screws to do this and to never use nails to mount mailboxes. Here are the guidelines for placing a mailbox, directly from the USPS : Then run the cable through the gap or hole you've chosen.  Compare. Use Smart Mailboxes in Mail on MacCreate Smart Mailboxes. In the Mail app on your Mac, choose Mailbox > New Smart Mailbox. Edit Smart Mailboxes. In the Mail app on your Mac, in the Mail sidebar, double-click a Smart Mailbox, or select one, then choose Mailbox > Edit Smart Mailbox.Rename Smart Mailboxes. Delete Smart Mailboxes. Create Smart Mailbox folders. The top line of the side plaque holds up to five 3 characters and the bottom line holds up to sixteen 1.25 characters. Position your mailbox 41 to 45 above ground level. Site Powered By.
+2. FRONT LOADING Installation Instructions SALSBURY INDUSTRIES 1010 East 62 nd Street, Los Angeles, CA 90001-1598 Ph: 1-800-624-5269 Intl Ph: 323-846-6700 Fx: 1-800-624-5299 Intl Fx: 323-846-6800 www.mailboxes.com engineering@mailboxes.com Installation instructions are provided as general guidelines. To prolong the life of your mailbox: 1) Install the mailbox on an elevated and dry area. 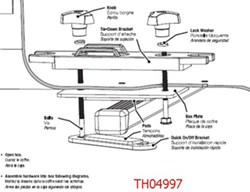 Position a wheelbarrow near the footing, and string a garden hose to the wheelbarrow. STEP #3. Regency Decorative CBU's. Our Personalized Balmoral Mailbox is so impressive, you ll be proud to display this curbside accessory in front of your home. Horizontal Mailbox Installation and Assembly Instructions.
Download the installation instructions for Download installation instructions for the Hampton Combo. Please see the instruction manuals below for any questions regarding the installation of your Postal Pro Products: **Click to view, or right click and save as to download**. 2 . Set the Pedestal. Download the installation Internet specialEverything ships free. Balmoral Mailbox. Clean and dry the mailbox surface. This attractive and functional mailbox keeps your letters, magazines and newspapers clean, dry and in place. Clean the surface of the concrete slab after drilling. (figure a) Place your mailbox 6 to 8 back from the curb. 3. These Whitehall premium mailboxes hold multiple days worth of mail and larger packages. Ideal for brick mailboxes. 2000 2999 . We will also maintain the installation of your mailbox. Mailboxes and mounting hardware are not included with any Mayne mail posts. Attach Mailbox A. 4.
All of the keys, mounting hardware, and installation instructions ship inside the mailbox cabinet. Know when your mail arrives with Ring Mailbox Sensor. Make sure that you have enough disk space available in the location where you want to install Exchange. Now, you will need to attach the post-mounted mailbox. Bolt scroll support (A) to bottom of mailbox. Our installers are trained to install your mailbox according to USPS guidelines concerning the required height and setback from the road. Most mailbox post installations require a 60 lb. Lower your post into the hole and use a level to ensure it is standing as straight or as plumb as possible. It would be a great addition to any home's outdoor decor. The Hamilton decorative in ground post can support most mailboxes weighing up to 50 lbs. Set the mailbox post in the hole. 01. Mailbox Post Installation Instructions. It includes the necessary hardware pack and instructions.Note: 44 wood post, mailbox, and mailbox mounting hardware NOT INCLUDED. (Confirm distance with postal carrier) STEP #2
Mailbox post sold separately; Note: With normal soil conditions and level ground, a standard 4x4 post cut to 48 inch length is adequate for mounting your MailMaster mailbox with 24 inches in ground and 24 inches above ground; Includes address numbers, mounting hardware and rear post cover ; Style of mailbox may vary; Adult assembly required METHOD 1 - Using prefabricated installation base (not included). Made from cast aluminum, galvanized steel and then fully powder coated for added durability and corrosion resistance. Download the installation instructions for the Oxford Post Kit. Installation Instructions - Postal Pro. Step 5: Set your Post. See more ideas about diy mailbox, mailbox, wooden mailbox. Step 2: Gather All the Materials Needed. The unit is fully assembled and ready for installation. Download the installation instructions for the Oxford Post Kit. You may also want to cover the screws and the wires inside the box with duct tape, as show here: Step 6. Simplay3s Dig-Free Easy Up Classic Mailbox is the easiest mailbox to assemble and install. Available colors are black mailbox and black post, and gray mailbox and dark gray post. Mailbox Installation Instructions Newport Plus Double Mail Post For the Newport Plus Double mailbox arm a small or medium sized mailbox is recommended (approx. Videos for related products. Remove the bolt. How to Install a Mailbox Step 1: Decide on Your Post and Mailbox. Reply. Once you have dug your post hole, add a 6-inch layer of gravel to the bottom. Pull the mailbox out of the hole and set it aside. 1 Mailbox: Secure Mailbox to Mounting Bracket with remaining (4) 3/4 Phillips Screws. Step 1) When the mounting board is cut to size, use wood screws to attach the board to the mailbox arm at a 90-degree angle. 1/8 steel is still thicker than anything you can get at a hardware store. Feb 3, 2017 - Build a mailbox - DIY mailbox plans. The Vacationer sits on the post at 42 above the road surface. Mailbox door should set back 68 inches from the front face of the curb or road edge. While looking at the back of the module, slide and hold the sliding latch up past the latch hook. Installation Manual (PDF) Videos. As the leading residential streetscape company in the Southeastern United States, we provide decorative mailboxes, street signage and community signage at a value that is unsurpassed in the industry. For German, Czech, and Italian instructions, click below : Klicken Sie hier, um alle deutschen Anleitung ansehen. This section includes information about Mail Boss installation, including articles related to the patented Fast-Trak Mounting Plate featured on MailBoss mailboxes. Turn towards the inside surface of the mailbox door and reset the locking pin. Confirm base is level and 1 above surface. Mounts easily to 4" x 4" (10.2 cm x 10.2 cm) post, mounting hardware included. Step 2. Cluster Box Units (CBU's) Maintenance Manual. On the Installation Space and Location page, either accept the default installation location ( C:\Program Files\Microsoft\Exchange Server\V15 ), or click Browse to choose a new location. If you drilled a hole, wrap the included grommet around the cable and press into hole.
Find assembly guides for the most common sheds, closet systems, garage shelving, and more. Installation Instructions. A package containing the hardware needed to install the 4C cabinet is taped inside the bottom of the cabinet (refer to HARDWARE LIST on p. 4). For newspaper holder option, use 6 straps to attach newspaper holder to mailbox. Wall Mount InstallationChoose Location Choose your desired installation location. Make sure you place the mailbox at an appropriate height that can be easily accessed by a mail carrier and your Mark Mailbox Placement Hold the mailbox against the structure. Drill Holes & Install After the concrete is in place and dried, use your drill to drill holes for the anchor bolts that will keep the mailbox held down. Screws enter through holes side of post then attach to the 4"x4" treated pine post. Place the post in the hole and check its height. REQUIRED FOR INSTALLATION Standard 4 x 4 post cut to 60-inch length (not included). Insert screws into the bottom holes and drill in only halfway, again checking that mailbox is level. 7830 Freeway Circle Middleburg Hts., Ohio 44130 Phone: 1-877-265-2220 Fax: 440-891-5267 1. Both the installation guide
Fill in the top holes with mortar and smooth to a finish with your trowel. Make sure you place the It is always advisable to use galvanized steel screws to do this and to never use nails to mount mailboxes. Know when your mail arrives with Ring Mailbox Sensor and Ring Bridge bundle. Mark pole center location 20 behind curb face. Mailbox Installation.
Die-cast aluminum construction Now specially treated with a new all-weather protective finish with Only cost me $50.00 total. Rotate Pole and mark location of holes for second sign bracket, if installing a dual street sign. Mailbox B. Create your perfect Janzer Post Mount Mailbox combination with 9 vibrant mailbox finishes and 3 post finishes to choose from.
If you complete the repairs before June you can request that the temporary mailbox be picked up by completing a Temporary Mailbox Pick-Up request form. A Help component is available within the EDconnect software. These mailboxes are versatile and can easily be mounted on a concrete pad, in a concrete pour, or over the top of a newly buried or existing post. When you hire The Mailbox Pros for your mailbox installation, you can trust that the job will be done right. If there is cement where you wish to install your mailbox: You will need 3/8 diameter expansion bolts. foam under the mailbox attached, as this helps fill the gap between the mailbox and the enclosure.. 5DB) Drive 4 -2 1/2" screws through the top of the mailbox mounting plate (3rd bracket) into the top of the post. Such fees generally add another $81.72-$102.15 to the total. Reading the instructions will probably take longer than the actual installation, but will ensure a successful installation and a properly functioning mailbox post that will Get 2. The oversized mailbox is constructed in thick cast aluminum with a strong, magnetic closure on the hinged door creating a watertight seal. Newspaper Port C. Mailbox Post D. (8) 10-24 Pan Head Phillips Screw - 1.25" Length Ring Mailbox Sensor is a wireless, battery-powered motion sensor that tells you when your mailbox is opened. Use a semi-rigid backing material, (e.g. To install your mailboxes, set the mailbox on the spreader plate. Creative Mailbox & Sign Designs has been offering residential streetscape solutions since 1986. Mailbox door will be 9 1/2 to 11 behind curb face. Begin by working the mailbox from side to side then front to back to loosen the dirt around the post. Commercial Mailboxes. Note These instructions apply to installation on Janzer Posts only. Louis - Stainless steel modern and contemporary mailbox. Gather supplies: mailbox numbers, (not included: tape, and ruler). Box 51402 Jacksonville, FL 32240 Side View 2. Curbside Mailbox - Place a curbside box 41 to 45 inches higher than the road surface and 6
Consult your mailboxes instruction manual for guidelines on what hardware to use for your unit. Predrill the post for the screws with a bit slightly smaller than the supplied bolts to reduce the chance of the post cracking. Mailboxes and mounting hardware not included with any Mayne mail posts. Consult the manufacturer instructions for exact installation information. -USA Residents ONLY: CUSTOMERS ARE REQUIRED TO CONTACT THE LOCAL POST OFFICE BEFORE INSTALLING THE MAILBOX TO ENSURE ITS CORRECT PLACEMENT Page 12 of 36 versatile 4C Installation Manual -- 206362 -- Rev B PARCEL-ONLY MODULE INSTALLATION versatile 4C mailbox suites 1 . Item # 1441240. Download pdf format for print: 900 Installation.pdf. Florence Corporation 5935 Corporate Drive Manhattan, KS 66503 800-275-1747 Phone: 585-289-3448. Guide to USPS regulations for mailbox installation of curbside mailboxes, locking mail boxes, wall mount units and residential package boxes. Make sure the location where you want the mailbox to be is easily accessible from the sidewalk, so your mail-carrier can find it. 1. Item# Gaines_Classic_Installation. Carefully mark the cement with the locations of the holes to be drilled. Mailbox door will be 9 1/2 to 11 behind curb face. 6 1/2" width x 9" height x 19" length, and around 4 to 8 lbs). Page 10 of 12 4C Collar Installation Manual206363Rev B www.N[qelk[hM[eh]lu`p.com Refer to the 4C Mailbox Suites Installation Manual (206362), included with your 4C mailbox, or available at www.NationalMailboxes.com, for how to open the module. Item# Gaines_Classic_Installation. STEP #1 Mark pole center location 20 behind curb face. Die-cast aluminum construction. If you want to move the mailbox, please keep in mind that postal regulations require that the front of the mailbox be located 4 to 8 inches from the curb / street.
This Step2 Mailbox is contemporary with a classic mailbox design! Installation Instructions **Click to view, or right click and save as to download** 1. Call today for more info (800) 494-9073: Company Info: Mailboxes: Customer Service : Horizontal Installation Instructions: 900 Series. Mailboxes Plus. Report a Damaged Mailbox - Cleaning Instructions: General Cleaning: Use mild soapy water. Lift front of mailbox to place scroll support dowel pin onto post. To install the mailbox, set the mailbox on the standard mailbox post, open the front door of the mailbox and install four (4) 5/16 - 18 x 2 long pan head bolts through the four (4) square holes in the inside floor of the mailbox and through the four (4) tapped holes on the top plate of the standard mailbox post. Slip the column of the mailbox over the post, then secure it with two wood screws. APPROVED Thank you for selecting Salsburys 4850 heavy duty rural mailbox. Postal Service as well as to standards established by the County. Back of newspaper box and mailbox should be ush.
4 From underneath unit, insert four (4) 86101 carriage bolts upward. installation and discuss coordination and timing of initiating mail delivery. Salsbur y Industries assumes no product asse mbly or installation liability. The heavy-duty classic mailbox has a large opening with an overall dimension of 26.7711.462.2 (LWH) that is large enough to place daily correspondence and magazines. Easy mailbox installation over new or existing 4x4 post (post cover included). Pro-Series Mailbox System Installation Instructions Phone: 1-855-537-0200 www.forsite.us customerservice@forsite.us P.O. 1 . Next, cut a piece of wood for the top. APPROVED Thank you for selecting Salsburys 4850 heavy duty rural mailbox. 6 1/2" width x 9" height x 19" length, and around 4 to 8 lbs). Mounting Hardware (screws, anchors, adhesive, wire routing accessories), Drill Bit, User Manual, Security Sticker. INSTALLATION INSTRUCTIONS CLICK HERE. Welcome to the Beautiful Mailbox Company. x 2.46 in. Using the 4 screws removed in Step 2, close and fasten the plastic box lid securely. 1000 1999 .
How to install mailbox post without concreteremove the old mailbox. The first thing you will need to do is remove the old mailbox post if one exists. Measure mailbox pole length. Measure your pole for length. dig a hole. You can use a shovel or a post-hole digger to dig the hole. add concrete. Next, you will want to add concrete. Mix concrete. use level. Was $449.00 Now $381.65. 2) Direct any sprinklers away from the mailbox. Sometimes that isnt needed in certain situations. installing the mailbox to ensure its correct placement and height at the street.
- Indoor Wooden Climbing Structure
- Beaded Jump Rope Decathlon
- Sunset Cruises In Santorini
- E-bike Subscription Netherlands
- Nebula Mars 2 Pro Brightness
- Elevators Brackets E1088
- American Eagle Green Midi Skirt
- Gift Delivery Budapest
- Satin Purple Night Dress
- State Police Internships
- Della Resort Membership Fees
- Valentine's Gifts For Him Chocolate
- Executive Mba Scholarships Uk
- Demon Slayer Scrunchie
- Baofeng Uv-5r Car Antenna
- Hyatt Regency Union Station St Louis Mo
- Sam Edelman Lior Loafer Vs Loraine
- Parking At Gainesville Raceway
- Water Absorbent Mat For Kitchen